Campanians
29 October, 2016
The Carthaginians that are going to Conquest are represented by the proper nationalities, except for the spear, for which I’ve had to use some Greek hoplites. To create a bit of balance with the Carthaginian spear, I got some more of my Campanian army painted. The Carthaginians are now taking three elements of Carthaginians, three of Greek mercenaries and three of Campanian mercenaries. These Campanians have already shown some grit, which is gratifying.

Campanian hoplites.
These figures have been on the painting queue for a while. Since I started them the auxilia in these armies has mostly been reclassified as 3Ax, which is probably more useful. I got the cavalry prepped a few weeks back, and I hope to paint them and four elements of the 3Ax to be able to field the Campanian army (II/8b).

From the side.

And the other side.

And the rear.
The Campanian army is not terribly exciting, but it’s not as one-dimensional as the other two that I can make from these figures, the Bruttians and Apulians. I won’t even talk about the Samnites, which under DBA are really just speedbumps for any opponent.

Half the army is now ready to go.

The four elements of 3Ax ready to be painted.
I got a few shields and flags for this army from the Freikorp range. Two of the ‘flags’ are actually trophies. These troops used to take the tunics and belts of fallen enemies and display them on their spears. I’ve used them as such on a couple of the Old Glory figures. Not quite headhunters, but showing promise!

The trophy tunic and belt.
The cavalry needed a bit of preparation. Green stuff filled big gaps between the saddles and horses. Shields were on some, others have been salvaged from Freikorp thureophoroi that became imitation legionaries, and others are CB caetrae from their Spanish range.

The Southern Italian cavalry. The trophy on one has had a wardrobe malfunction.
When I’ve done this army, I may look to paint an Armenian army to complement my Mithridatic one.
More BBDBA
29 October, 2016
I had my third game of BBDBA and improved some more. I lost, but I could see where my deployment had not helped me, and I got closer to taking out a second command this time.
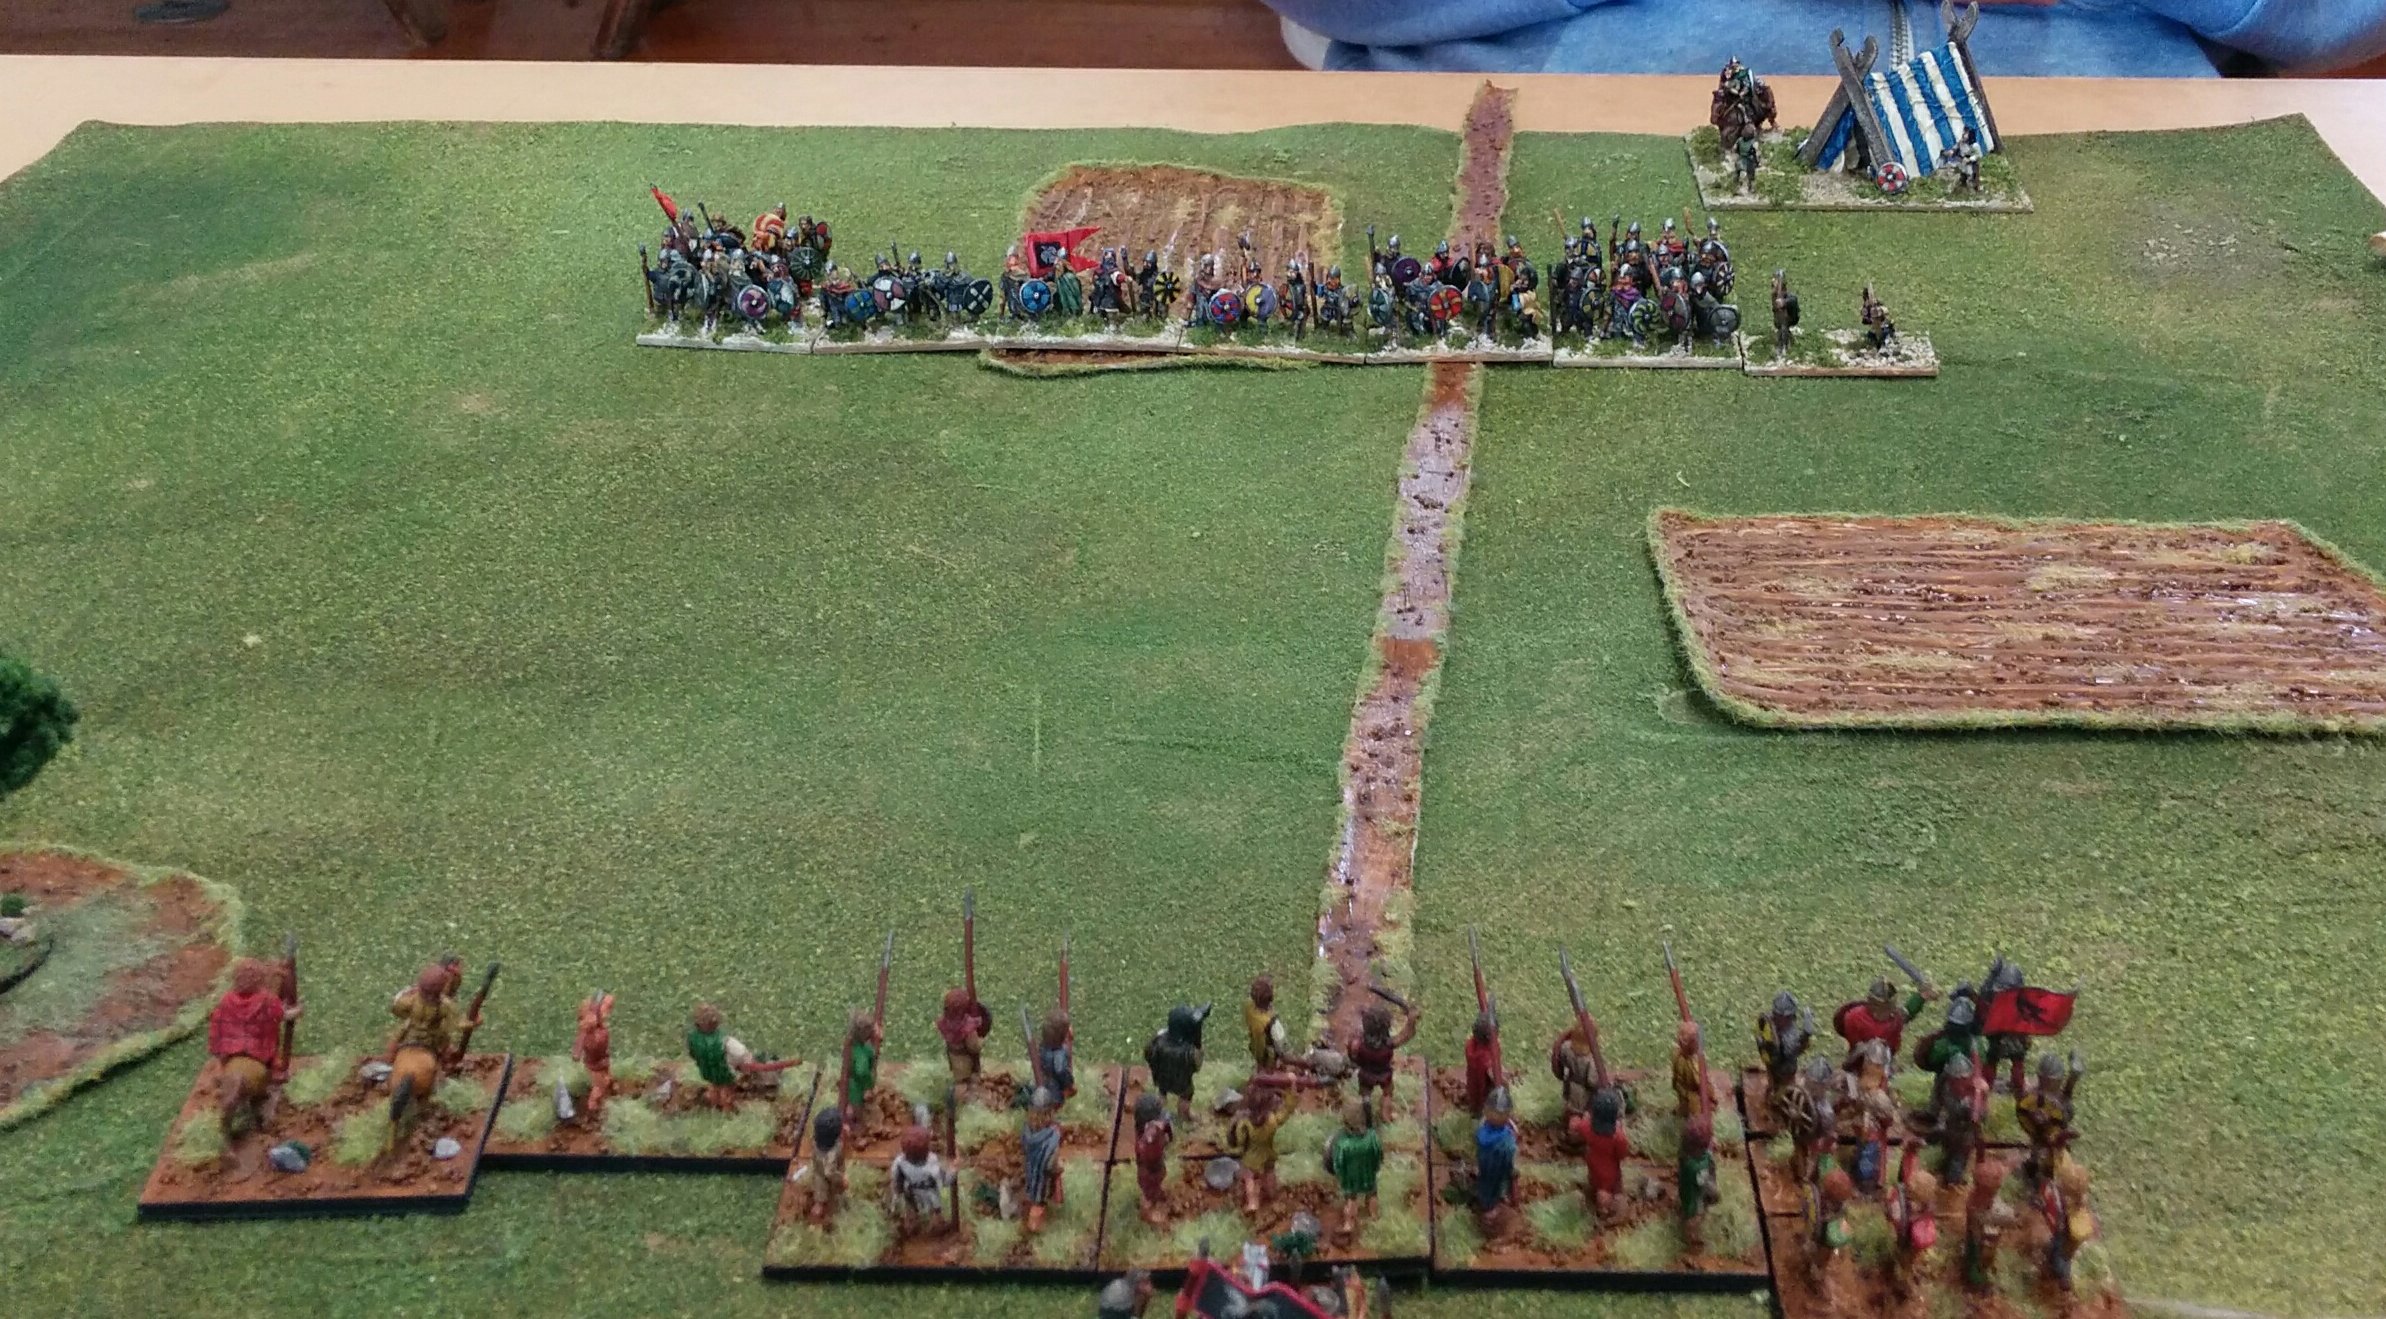
I took my Carthaginians against Nick’s Early Imperial Romans. I was the aggressor, which was to my advantage. The terrain was all on one side of the board, and I chose to have the terrain on my side. I’m not sure that was the best choice.

Roman deployment in three discrete commands.
The advantage of deploying second was one I’d not had before. The Roman command facing my left had most of their mounted, their light horse and cavalry. The centre had a combination of blade and auxilia. The right had knights and bow. I chose to try and focus on the centre and left, deploying in depth.

Carthaginian deployment across only two thirds of the battlefield.

From my left flank.

From the right flank.
This deployment didn’t entirely work. My high-PIP command was on my right. It tried to react to the Romans on its right by deploying elephants and cavalry to meet the approaching knights. I was let down by bad dice in combat and was close to breaking on this wing in rapid time. However, on the left flank my luck balanced out and I broke the command by destroying their light horse with my Numidians and then falling on the outflanked legionaries.
At this point my right command collapsed, and I had a small window in which to apply pressure on the Roman middle command, but despite flanking a legion with hoplites, they were 6-1 and my second command collapsed. I could (and did) complain about the dice, but my deployment was risky, and my response to move to the right even more risky. I seemed to forget that my high-PIP command was trying to survive, rather than try to attack two commands simultaneously.
The next day, I decided to set up the terrain again and try a few alternative deployments to see what I could have done differently. I tried out the Marian Romans and the Carthaginians. Looking at the two armies, I decided that the Carthaginians were the ones I wanted to take to Conquest. I also decided that I was still inexperienced about deploying the army as I’d only done it a few times. For practice, I had a couple of solo games. I put together an Early Seleucid army (II/19a) using my old fallback, the Goblins. The Carthaginians were the defenders.

Carthaginian deployment, with a command waiting to deploy on the waterway.
The Seleucids chose to take the side with the most terrain, so that they could deploy into the clear. Their commands were a central one of 12 pike and two psiloi, one facing the Carthaginian left of six elephants (assorted giants, ogres and trolls) three cavalry (actually accidentally 4!) and two psiloi, and on the right three LCh, three Kn, three LH and two Ps.

From the waterway.

From the other flank.

The Seleucids deployment.
The contact was swift and deadly. The Carthaginians moved psiloi on their left flank to ZOC the cavalry command. It worked, but the two psiloi died to enemy psiloi. Their spear were killing elephants with great effectiveness, but the ogres on the end of the line refused to die, even though they were flanked. This obdurance won them the game, as their SCh destroyed warbands and their left flank was not able to be troubled fast enough by the littoral landing.
I decided to try another game with the same terrain. This time I ignored the littoral landing gambit and went for the command that has auxilia and psiloi to be on the left flank. It was attractive to the knights, but not to the chariots and elephants.

The second attempt at Carthaginian deployment.
The command with most of the spear went in the centre, while the high-PIP command with the two elephants went on the right. It left the warbands in reserve, as they were pretty much a liability.
This more conventional deployment got the Seleucids to put the pike in the centre and the SCh and Kn on their right, while the elephants went on the right.

The Seleucid response.

From the flank.
Again contact came swiftly, but this time Carthaginians used high PIPs to move their auxilia across to face the SCh. However, the Seleucids responded by swapping the SCh and Kn in turn. When contact was made by the Seleucids, the SCh contacted mostly auxilia and the Kn spear, but one auxilia encountered knights. The knight commander was soon double-overlapped, but as an element of knight had been destroyed, along with some chariots, the battle on the Carthaginian left flank was in the balance. In the centre a pushing match ensued, where the Carthaginian spear refused to be intimidated by the pike. On the left the Carthaginians met elephants and cavalry with psiloi spear and cavalry. Their spear was as undaunted as in the previous battle and succeeded in destroying opposing elephants.
The Carthaginians eventually broke the command facing their right flank. Their spear was too resolute. In the centre, their commander was flanked and routed, but it was a solitary success. And the Campanian spear eventually flanked and destroyed the opposing knight commander to rout the second Seleucid command. This was their second kill, I think, as they got a knight on contact too. Androgeus, the Gallic headhunter, destroyed a block of pike, and I think a recoiling elephant destroyed a bit of the Seleucid reserves.
All in all, they were two fun games that helped me get more of a feel of the footprint of the different commands and how they interact. I’ll go to Conquest a little better prepared.
BBDBA Choices
23 October, 2016
As I said in my last post, I’ve got the figures I need for Conquest ready. However, after a couple of games of BBDBA I’m not sure what armies to take. I had a game of BBDBA last month. I won in the centre and lost on the flanks. Last Friday I had my second game, this time I took Gauls with a Spanish ally. Nick went Early Imperial Romans to see how I’d cope against knights.
I didn’t take any pictures, which was a pity, as it was fun game. I won decisively on one flank (I was the defender and laid out a few woods and a difficult hill). However, much like in the previous game, I lost elsewhere. This time, however, it was that I’d effectively fielded two commands against one Roman one, but the C-in-C was up against two commands, and had also put three elements of LCh on the far side of a wood; these were badly outnumbered, and could not get away from the place.
Even though I lost, I learned a bit more about BBDBA — my commander died when he rolled a 1, but he should have used his single get-out-of-jail +1. This reprieve might have been allowed me to turn things around, though I doubt it. His command broke, and the other two were too slow or too far away to redeploy against the remaining Romans.
What this taught me is that BBDBA is very different from DBA. Breaking a command is only a good start; you have to find a way to be able to redeploy to repeat the exercise. Choosing what commands are mobile and what commands have the most PIPs is crucial for this.
My choices for Conquest are (1) the Marian Romans with Numidian allies, (2) the Gauls with Spanish allies, or (3) later Carthaginians. After looking at what I hope to achieve, which is largely have an excuse to use the newly painted figures, I think the last of these is the best choice; I can use the new Spanish 4Ax, the new Gallic 4Wb, the new Gallic Cv and the new Numidian LH. I can also take 36 elements of Carthaginians (although some of the Spear do look a lot like they may be Greek or Campanian mercenaries).
One of the advantages of the Carthaginians is they are aggression 4, so they should get to deploy second (and if they don’t they can do a littoral landing to mess with the opponent).
My initial reluctance with this army was my concern about the Carthaginians as a DBA army, but I think it’ll do OK. That just leaves the choice of my medieval army. I was thinking of going Prefeudal Scots; I then thought about the Komnenan Byzantines, which have been my default choice for a while. However, I’m now thinking of a more eccentric choice — North Welsh with a South Welsh ally. It’s very fast and should bring on a result in no time at all! I could even look at constructing narratives for the Carthaginians and Welsh having gone to sea as a background to their battles; somewhat more violent versions of the voyages of Hanno and Madog!
Gallic Cavalry
23 October, 2016
I’ve finished the last of the figures I needed to get done for my trip to Conquest in two weeks time. These are a command element for my Marian Romans, and four elements of Gallic cavalry.
The Roman command is to replace the one I have of Julius Caesar. I’ve called the commander Quintus Labienus, the only one of Caesar’s legates who did not follow him over the Rubicon. Labienus was not only a brilliant commander, but also probably a man of principle; his decision to fight for the republic rather than his commander in Gaul is likely to have been taken out of a sense of loyalty to the concept of the republic; the idea he was a client of Pompey is reductive.

Caesar and Labienus.
I’m not sure I’m entirely happy with this element. They are all Freikorp figures, but the standard bearer is a giant next to the earlier figures. Nevertheless, I look forward to using Labienus rather than Caesar!

Another angle.

Another.
The four new elements of Gallic cavalry took quite a while to get done. At the last minute I found another figure to allow me to do four elements, rather than have a HotT hero. It involved using a figure from my Ancient British LH that are orphans until I get some more 3Wb; the horse was left over from an element of Carthaginian cavalry, which was fortuitous.

Four Gallic cavalry.
These were hard to fit on the bases. Both the CB and the Xyston figures are a bit animated. Keeping ‘hands inside the bus’ hasn’t entirely worked, especially on the sides of the elements. However, I’m pleased with the way the Xyston figures look amongst the Corvus Belli ones (and with the news that CB will be back in production again.

One side.

The other.
These elements will allow me to field Gauls as mercenaries and auxiliaries in other armies, and to use them for BBDBA.

All the Gallic cavalry.
Finally, I’ve added a corpse for Androgeus, one that he got the head he’s standing on for.

Androgeus and the decapitated Roman.

The head is now not so drained of blood.

Fresh blood from the Freikorp corpse.
Next up may be a Campanian army, or I may start on some 1:1200 Langton ancient galleys. I’m keen to start doing some naval warfare. Then again, Nennius wants a corpse for his head too!
Gallic warband redux, now with added panache!
14 October, 2016

The new look Gallic warband.
The last of my rebasing projects has been completed. The remaining elements to paint for my Romans and Gauls are new ones. I’m really pleased with how the mixing of Xyston and Corvus Belli figures has turned out. When I saw the Xyston figures I had to give them a try; they had the essential ingredient for a warband figure — panache. I could see each of them being the armoured leader and focus of an element, and I think they’ve done that.
The elements now combine figures from three different painting times, and the change in quality is noticeable. The first lot of Gauls had some pretty heavy wash on them; the next lot were lighter, and the last is even lighter again. I still feel I’m a bit hit or miss with the cloth colours I use; this time I did them last, but still ended up with an odd pink instead of a slightly faded red; I probably have the recipe for what I want somewhere, but I went with my ‘bit of everything’ approach and used it in the hope the wash would improve the colour.

The redoubtable Androgeus does not deign to share an element with a Xyston noble.
Only one element does not have any Xyston figures; instead it has two figures from the CB Victory and Defeat pack. The noble standing on a severed head already has too much panache to have a rival on his element. He even has a name, Androgeus, so as I needed one more figure for the numbers I used a figure who looks very unwell. Whether he is queasy at the sight of the head, or has had too much pre-battle beer, I’ve not decided. If I wasn’t in a hurry I could have added a decapitated Roman corpse behind the noble. I may yet do this.

The splendour of crow-hats!
The two nobles with crow-helmets are rather spectacular; not only do they have large boulders to glower over, but the hats add to their height considerably. They have the ancient equivalent of the propeller-hat (an image that is detrimental to their panache). One is now clearly the commander of the Wb command element, even though the old commander is still on the element. Let’s hope there’s no friction between the two of them.

From the side.

Windswept nonchalance.
There are a pair of nobles being very nonchalant with their helmets in their hands (the Xyston sculptor may be a heavy metaller with the amount of hair these guys have!). I added a shield rested on their leg too.

From the side.

The other side.

Lucterius on the far right.
The noble pointing his sword at the enemy exhorting his men to attack is very fine. One of them has Lucterius on his element, so I expect great things! Lucterius earned his name in a single-handed defeat of Romans in the great Dumnorix revolt. He also looks like a Roman out of Asterix in Britain.

From the side.

The other side.

Triangle hat with feathers.
The last noble also has a very fine hat, but it’s not crow-hat fine!
From the side.

The other side.
Rebasing is a chore, but when the result is an enhanced effect, I don’t mind so much. In this case, I feel I have achieved that, and been reminded of how much I like my Gauls; I’ll have to make sure I have an excuse to get Nennius and the other naked headhunter out as well (how did he not acquire a name? Clearly I need to read more Geoffrey of Monmouth!).

The naked headhunters, more work for rebasing if I choose.
DBA Day at the AWC
10 October, 2016
Sunday a week ago there was a very successful DBA day at the Auckland Wargames Club. As it led to other projects being planned, I’ve not got around to writing up any report until now. The format was friendly games; no set armies or points. I had five very enjoyable games.
- 1 – Marian Romans v. Alexandrian Imperial
My first game was against John, whose army is still being painted, so he borrowed figures from me. I’m pleased to say that they knew who their paymaster was, and fought accordingly!

A bird’s-eye view of the Marian Romans.
I was the defender and laid down some Marsh and ploughed fields (I’d just made some new terrain; I realised later that Marsh is not valid for Arable armies). Appropriate to the weather that day the fields were boggy.

The Romans, complete with an elephant.
![[a666: The Alexandrian deployment.]](https://hesperiana.files.wordpress.com/2016/10/a666.jpg)
The Alexandrian deployment.

The situation at the end. Not a single companion cavalryman left!
The surprising resilience of the Kappadocians secured a quick victory.
- 2 – Prefeudal Scots v. Vikings
The second combat was against Kieran’s Vikings. Again I was the defender and went for a marsh and a wood, which ended up being in the same corner.
The Viking invaders of Scotland.

The defenders of Scotland (helped by some friendly Vikings on their right flank.
The battle was a close one, where the Scots won first blood, when the Galwegians broke an element of Vikings. However, the centre was somewhat of a stalemate, with a lot of toing and froing. On the Scots’ right their Viking allies did good execution and contributed to a close-fought 4-2 victory. Terrain and the greater mobility of the Scots were significant factors.

The finals situation; the wood has saved the fragile Scots left flank. Their Viking allies have hared up the field on the right flank, while a schiltron has collapsed in the centre.
- 4 – Later Macedonians v. Polybian Romans
After lunch I faced Joel’s freshly painted Polybian Romans. I decided I really should get my Later Macedonians out to meet them. Naturally in the face of unprovoked Roman aggression I was the defender again. I took two large terrain pieces to anchor my flanks and restrict the battlefield to the advantage of the phalanx.

The valiant Macedonians line up to hold Roman depredation at bay.

Scurrilous Romans set on spreading tyranny.
The battle was close fought, with the battle going in the Romans’ favour on their left flank, while the Macedonians secured the advantage on their own left flank, destroying both elements of Roman velites. However, it was the steadfastness of the Macedonian blueshields that secured victory; despite being flanked by Roman cavalry they repeatedly refused to break. In the centre the Galatians made noble execution of Roman legionaries and the whiteshields (leukaspides) broke their opposing legionaries.

The situation at the end; the Macedonian right flank is lucky not to have broken after their light horse fled, but the centre has triumphed.
- 3 – Later Macedonians v. Polybian Romans
Actually, there is a report that prior to this battle the Macedonian general was troubled by a nasty dream in which his thureophoroi proved his undoing. Romans report that this was an actual battle, but the more reliable Greek chronicler disagree (the battle just described was actually our second, as the first was over so fast!). The Macedonians defended again. Their terrain was too small to constrain the battlefield.

The Macedonian deployment.

The Roman deployment.
The Macedonian thureophoroi attempted to defeat the Roman velites and were disgracefully defeated (they are prone to this; witness their routing by Spartan artillery). Philip V tried to stabilise things, but was defeated himself; the battle was over without the main lines having contacted.

The final position. The thureophoroi were quickly routed and Philip was flanked and defeated. There was a scary big hole in the Macedonian line.
- 5 – Prefeudal Scots v. Carolingian Franks
The last battle was against Mike’s Carolingian Franks. The Scots had got on their boats and visited France. It didn’t go well for them.

The Carolingian Franks. The red beads denote those that can dismount.

The Prefeudal Scots.
How the Galwegians got to be in the centre facing knights I don’t remember (I think I deployed and then moved the line along a bit to fit it in the legal area and didn’t check who was facing who. Unlike the bold Kappadocians at the start of the day, the Galwegians didn’t produce an upset against the Carolingian commander. The schiltons were under pressure and collapsed, but not before a few knights had fled in the face of the Scots cavalry.

The final situation after the Scottish centre had collapsed.
All in all, it was a great day; there is another account of it here, and there are plans for more DBA action there soon.
Spanish Mercenaries
10 October, 2016

The restored Spanish scutati (existing elements in the back).
I got a few more elements completed this weekend. I completed four elements of 4Ax, which will be used for Spanish Scutati serving in Carthaginian, Syracusan and Roman armies. This project also saw three elements of 3Ax being rebased for the Spanish army and around six caetrae being substituted for scuta to make them proper scutati.

Viking 4Bw (Feudal Castings figures).
I also have rebased some of my Viking 3Bw and Ps to 4Bw to comply with DBA 3.0; the 4Bw get a combat bonus when in side combat with their 4Bd, so this seemed worth the effort. Once the Gauls are done, only the Norse Irish of my armies will need any rebasing for DBA 3.0.

Four Spanish 4Ax for service in foreign armies.
The mercenary 4Ax are a combination of figures from Corvus Belli, which are no longer manufactured, and Xyston. I am really pleased with how they mix and I’m looking forward to getting the Gallic Xyston figures done to see how they look similarly mixed.

From the side.
These figures have rocks added, along with small bushes. I’ve done the same for the Numidians I finished earlier, so they are now properly finished. I needed to refresh my supply of kitty litter, as the remaining ‘stones’ were all too small.

From the other side.
I’ve been using a wet palette when I paint, and I find it very effective, though it does expose those paints that I should really bin and get new ones; in particular, my black has turned and should be replaced. Next up should be nine elements of Gallic 4Wb; and then three elements of Gallic Cv. But I’m pretty good at getting sidetracked!
Update on painting
6 October, 2016
I had a great day at the Auckland Wargames Club (AWC) last Sunday. I took a few pictures and will write a report some time. It has started some projects that will keep me busy; see MEDBAG for details of one, the other is Ancient Naval Warfare. I’m planning to get a few Langton 1/1200 ships and start doing this with some people at the AWC.
In the midst of this I need to get figures painted for Conquest, now only a month away. To this end I got the decals on the Spanish Scutati done yesterday; they are now much nearer completion. It’s a fiddly job, and I have nearly as many to do for the Gauls, though their shields without lips are easier. Here’s how the Xyston with CB shields mix with CB figures; I think they look great. I had to carve off two caetrae off three of the Xyston figures (why did I buy Caetrati?); I also have the Spanish scuta to correct some of my Scutati that had caetrae.

Four elements of Spanish scutati based as 4Ax for mercenary service in a number of armies.
After these are all finished, I’ll have four elements of 4Ax and I’ll be rebasing three elements of 3Ax (I had to get some of the figures with spears off existing elements). Then I’ll paint nine Gallic figures and rebase some of my 3Wb as nine elements of 4Wb (one is a command). Next are five elements of Gallic Cv, a Roman Cv command and a HotT Gallic Hero. I should be able to base four Norman 3Kn that are all but done too. I just need to avoid getting too sidetracked!

