Libyans
18 October, 2018

Libyans from Liverpool.
I’ve got quite a few figures started, but got a few elements finished over the weekend; one of them is some Libyan cavalry for the Later Carthaginians. These aren’t strictly necessary, but they seemed to have a bit more character than the staid Liby-Phoenicians. They’re certainly hairier!

Libyans and Liby-Phoenicians.
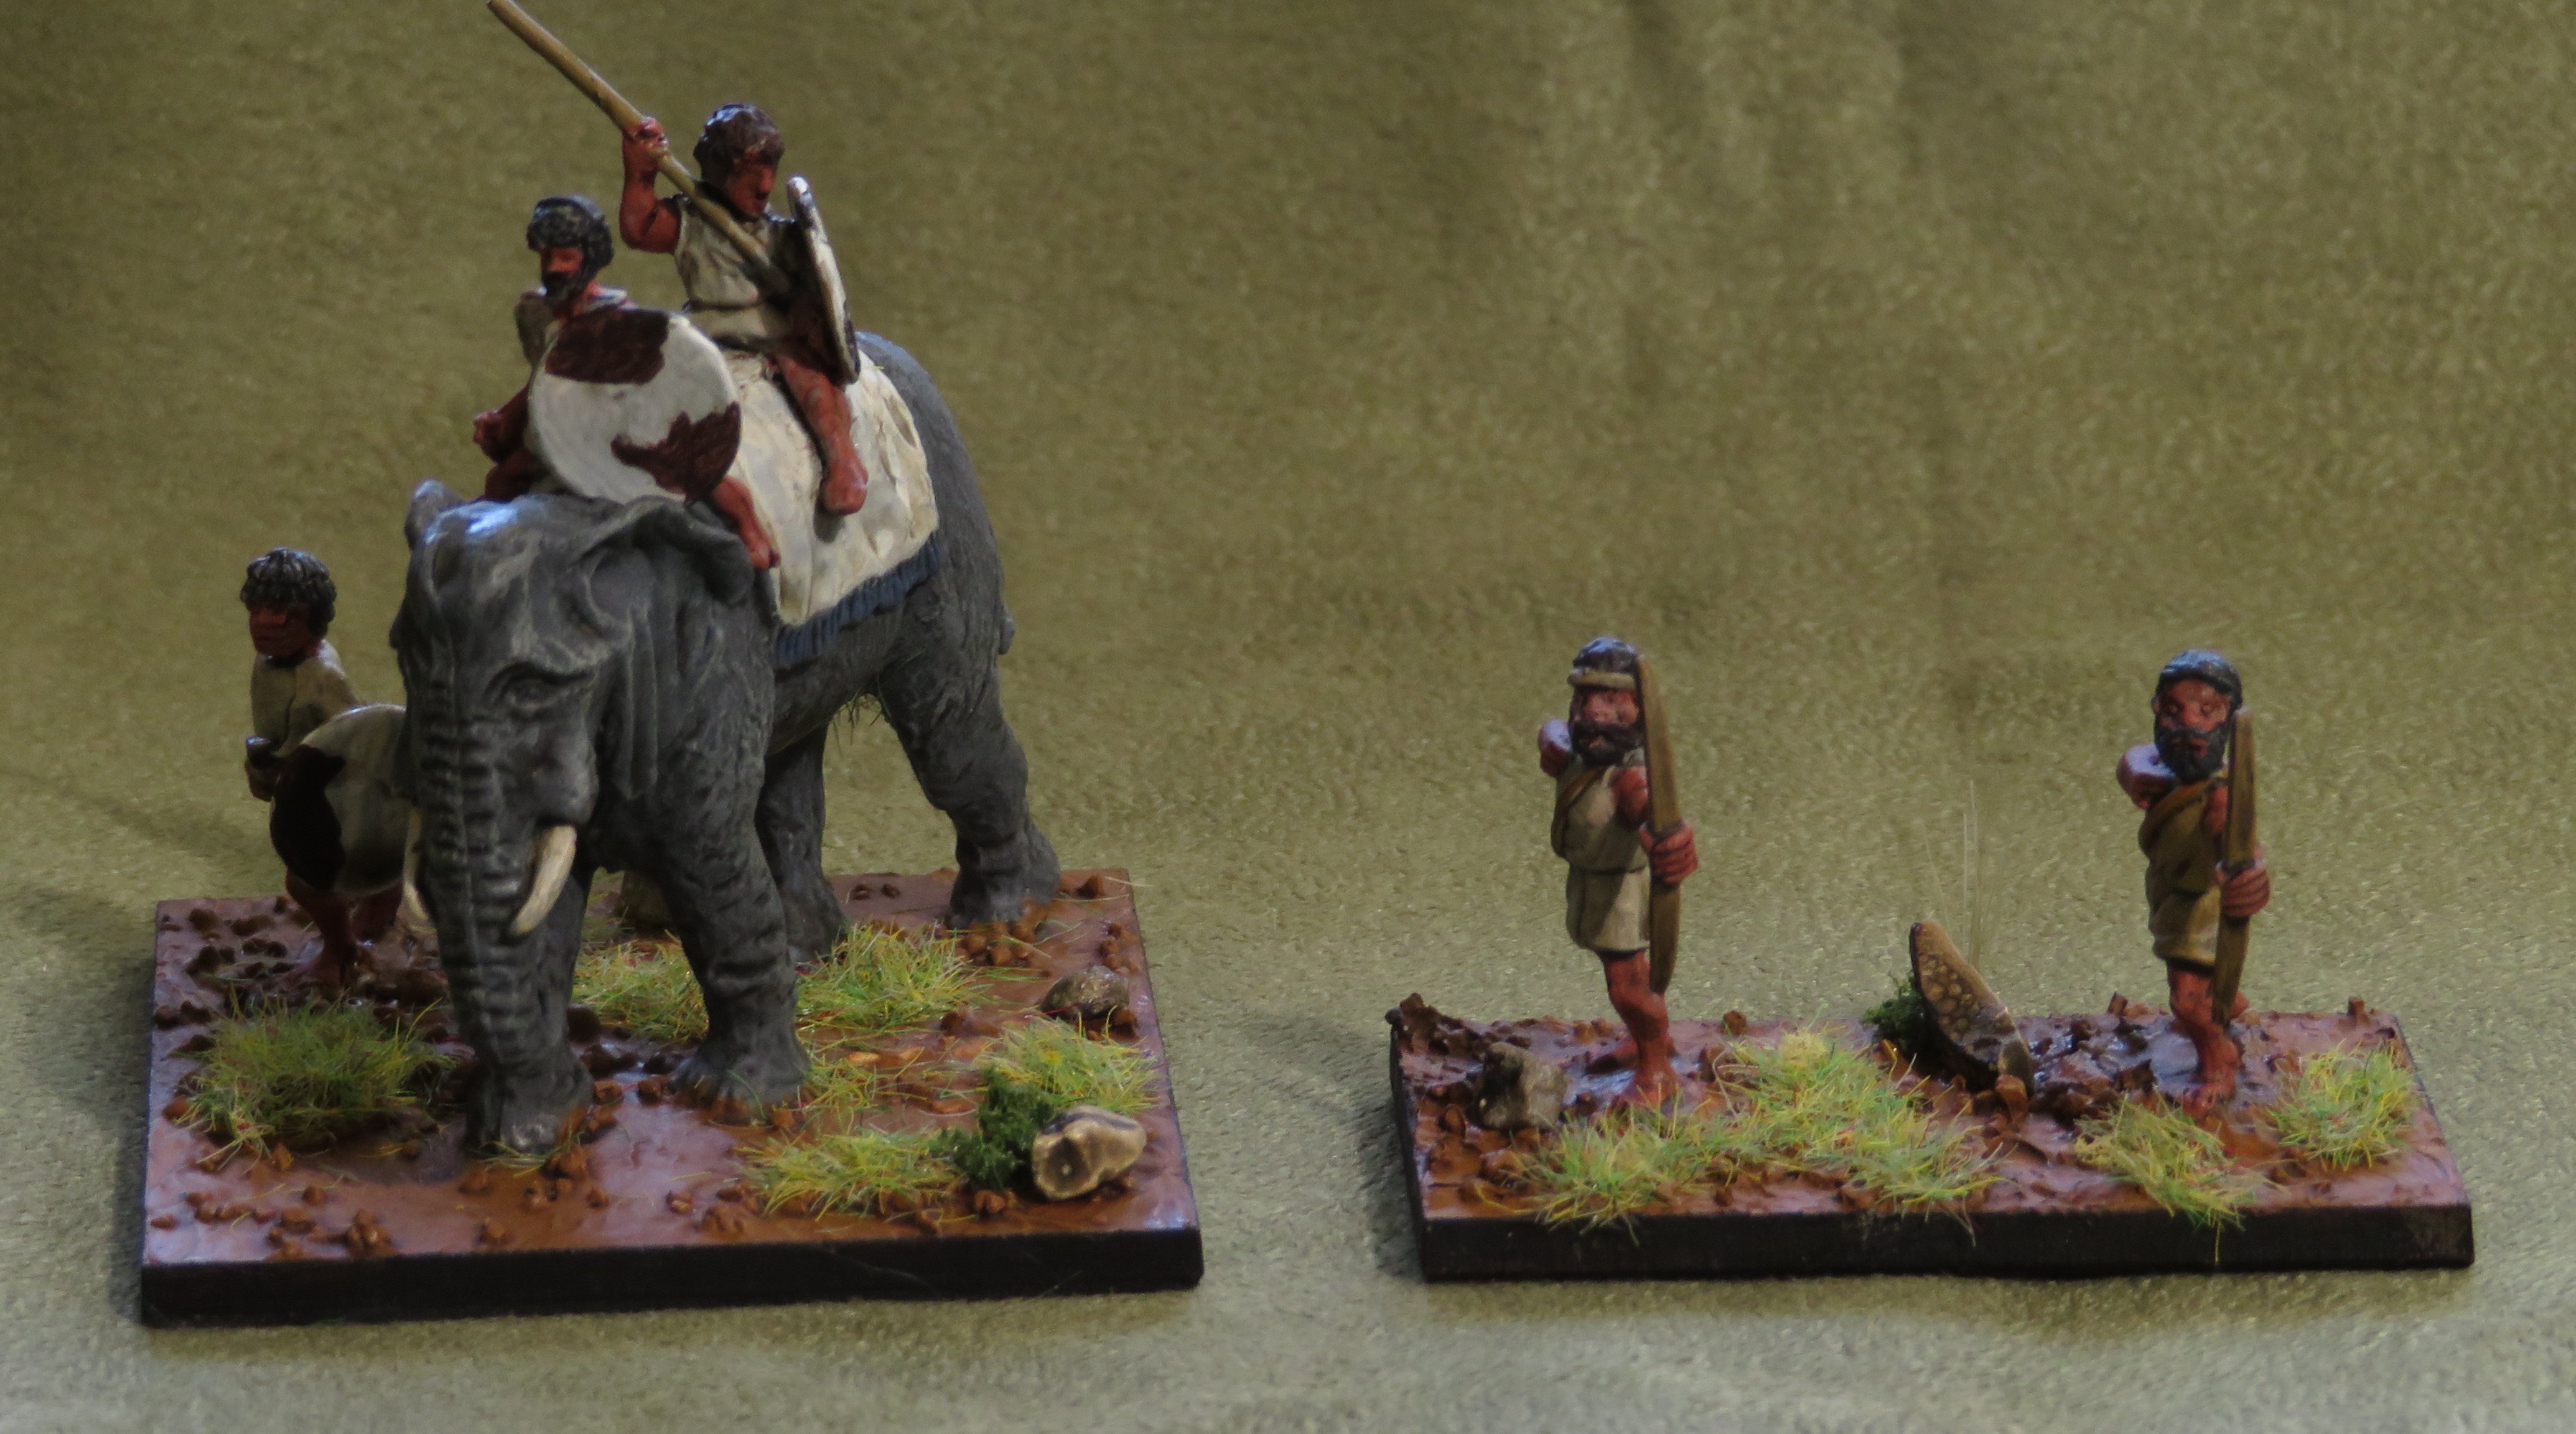
I also painted an element of Libyan skirmishers. This gives me three elements for using in BBDBA; again it’s not really necessary, but they’re nice figures.

Libyan javelinmen.
And here they are with their more established compatriots (there are a few more consorting with elephants).

BBDBA Libyans.
And finally, the figures that sparked off these purchases — a LH command for my Numidians. To justify buying them, I bought a whole lot of other CB figures …

Numidian commands.

Another angle.
Now I need to finish my Syrians, and the nine elements of Veteran Libyan and Liby-Phoenician Spearmen. They’re all started.
A number of battles with Nick
10 April, 2018
Despite plans to start a regular evening DBA meeting this year, it’s yet to happen, but I have caught up with Nick for a number of enjoyable games. One back in January saw a BBDBA contest in which my Marian Romans with Numidian allies were defeated by Nick’s Romans. We didn’t take any photos. I think my Numidians forgot to be defensive and were defeated before I could win elsewhere.
A fortnight ago we had a couple games using some of my newer armies. My Numidians defeated Nick’s Marian Romans.

The Numidians face Roman interlopers in a very green season in Numidia.

The Romans’ view.
I rushed forward to trap the legionaries next to the woods. I didn’t succeed, and I had the auxilia on my left that I didn’t want to meet with psiloi. From memory I was on the verge of defeat when I was lucky enough to create a hole in the line of the blade (I’d been falling back; I’d lost my only psiloi on the right and my commander was trying to retreat over the hill). This brought me back into the fight, which was looking over for the Numidians. I had been saved by good PIPs that allowed me to retire the general while keep pressure on in the centre. I was lucky to win.
The next battle was between my Campanians and an Italiot Hoplite army. It was fought on a battlefield with no Bad Going, but only a boggy and a scrubby patch, both Rough Going.

Campanians facing Italiot hoplites.

The Italiots.
My Hoplites created a breakthough in the centre, but I was so obsessed with winning on the flanks I didn’t exploit it. Instead, when I rolled 1 PIP I chose to take a risk with my general facing enemy cavalry so that I could develop an advantage on my right flank. This cost me the game, as my General was 6-1ed and destroyed. The Italiots managed a close victory.
Last weekend we caught up again. I got the Marians and Numidians out for a BBDBA game. Nick fielded his Early Imperial Romans. This game was interesting, as my centre destroyed his in record time and my Numidians were able to break their opponent with this support. I’ve not seen blade go down to blade so fast before. My dice were very good. the element that did it was a ring in. To get the 10 elements of legionaries I needed I used an element with different shield patterns. These are an element for my Mithridatic army, one I’ve described as Marian exiles fighting for Mithridates. Clearly they are dedicated defenders of the Republic.

The heroic Marian exiles.
The game was nearly over before the left wing made contact. My elephants were still stuck in rough going (my new hamlet), and I was nervous of the Roman knights.

The righteous defenders of the free Republic face off on hills against the supporters of the tyrant Augustus.

The EIR wing on my left, cavalry, knights and auxilia.

The EIR centre, auxilia, blade and bow.

The EIR wing on my right, blade, auxilia and rogue Numidian LH.

The battle from the side; the centre led by Cato is between two difficult hills; Juba’s Numidian psiloi are on one hill while his imitation legionaries, elephant and cavalry are in rough going; Labianus on the right wing is in a hamlet with elephants, cavalry and solid auxilia; he has psiloi and fast auxilia on the other hill.
Clearly the Numidians were not keen on fighting each other, as there were a number of rounds of combat that saw no casualties on that wing; the Romans were not so delicate in their attitude to each other. This is my first victory with this Marian BBDBA army. I’m still not sure how to get it to work well. I will probably get my Carthaginians out as a BBDBA army again soon. They are similarly winless, but I now have a better idea of how to organise commands.
Numidians
5 April, 2018
The Numidians are now compliant with DBA 3.0. I have been very disciplined this year and only bought one pack of figures (I saw them on TradeMe). They were Corvus Belli Numidian archers. I can now have my fifth Ps as archers instead of javelinmen. Painting this element is an excuse to update the page, and to take the photos again with a better camera.

All the Numidians.

The camp (a mixture of Old Glory and Freikorp figures, as well as Donningtons and Essex, I think.

Another angle.

And another.
An elephant or some archers.

Another angle.

And another.

The archers, for full DBA 3.0 compliance.

The javelinmen.

Another angle.

And another.

The cavalry.

Another angle.
Numidians
19 September, 2016
I delved into my lead pile and extracted some figures I bought a good while ago and finally put some paint on them. They had always been an army that shouldn’t have been too much trouble, as they are mostly light horse and psiloi, so few figures, and those not having a lot of variety to their clothes either.
The army was originally intended to be used in a Punic Wars campaign. It’s been finished with a view to being used as an ally to a Marian Roman army. Despite the Corvus Belli figures no longer being made, I am fortunate to be able to field the main options for the army, even with the changes to the list under DBA 3.0.

The Numidian army, all the options I have painted
The heart of the army is its cavalry. I have gone for the Cv general over the LH one. the LH one is probably a better choice for the earlier versions of the army. Otherwise, the army is able to field up to 6 LH and an elephant.

The mounted elements.

The cavalry commander and the elephant.

Another side.

The famous Numidian light horse; you can see two of these were painted some time ago for the Carthaginian army.

Another view.
The rest of the army is now mostly psiloi; under DBA 2.2 these could have been 3Ax, which would be more useful. I’ve only painted the minimum of four Ps, though I have stacks left, as I’d anticipated basing some of them as 3Ax. What would be good, would be some of the CB Numidian Warriors III (CB408) to use as Imitation Legionaries or Roman-trained regular javelinmen. In their absence I’ll be using Freikorp Imitation Legionaries I’ve already painted.

The not so famous Numidian foot, now all psiloi or a couple of imitation legionaries (on loan from the Seleucids).
I’ve also done a camp using a Baueda hut and figures from Donningtons and Freikorp.

The camp.

Another angle.

From behind.
I’m not overwhelmed by the quality of the paintjob; I’m rusty and I was in a hurry to get them done. The wash was a bit rushed, which is something I’ll be more careful about in the future. I should add some stones and reeds to the bases at some stage too. I have started using a wet palate, which has made painting faster and easier.
I did two more elephants, so that I can field a BBDBA Marian Roman army with lots of elephants. I was surprised to realise the elephants were smaller than the Carthaginian one I used for the Numidian army, but it’s less noticable when they’re on the field.

More Numidian elephants for the Romans to use.

A blurry view of the other side.
One of them needed a bit of greenstuff to repair his trunk and tail! The moulding was a little poor overall; the feet of the two crew are a bit runty and the mahouts have no goads, which may be moulding or design. The javelins are ridiculously skinny and have broken already once. I’m not sure what their longevity will be.

Big elephant, little elephant. I replaced the shields on all of them to make them match the Corvus Belli figures more.

Side on. The left one is the Freikorp Carthaginian, the right is Numidian.
BBDBA Civil Wars
19 September, 2016
Last Friday Nick and I tried a game of BBDBA. I’d got my Numidians finished and could field a Marian army, albeit with a few of the elements not as I’d want them. Nick put together another Marian army, not with any prior preparation. I was the defender and set up all my commands, followed by Nick. I then rolled 7 total for my PIPs, so made the ploughed rough; not what I’d expected!

The perfidious Caesarians arrayed with their lickspittle lackeys in support; the left command has Spanish auxiliaries, elephants cavalry; the centre command consists of a block of legionaries and a line of them; the right has legionaries and cavalry.
My plan was to win in the centre and hold on the flanks. I gave my high dice to the centre. The Numidian flank was hampered by the ploughed fields.

The glorious defenders of the republic. On the left is the loyal Juba with his elephants, imitation legionaries and Numidians; the centre is Scipio with elephants, legionaries and Spanish auxiliaries; the right has a few legionaries, Spanish auxiliaries and Gallic cavalry, commanded by Labienus.
My initial PIPs were very low, and I was anxious about trying to get my light troops across on my left to intercept the elephants. Nick had his high PIP dice there. I seemed to forget about holding on the flanks, and although I got one of the elephants, that command broke. There was a stalemate across the ploughed field on the right and I actually did win in the centre, where Nick was using some of his legionaries to break my left flank. However, I’d lost patience, and forgotten the plan, and attacked on the right flank. It didn’t go well.
The game took some time and was very close, in that I was close to breaking, but could have won if I’d hadn’t been so rash with the Numidians. In the end Nick broke the Numidians and won the battle. It was a fun game and I learnt a good deal about BBDBA.
We’ll have another game soon; I may have to rethink my commands; the centre could have used a more mobile reserve, but then the left flank would be less effective, possibly. Food for thought!
Allan Massie and Robert Harris
7 August, 2016
What got me thinking of fielding a Marian Roman army for BBDBA was reading Allan Massie’s novel Caesar. It’s narrated by Decimus Brutus, one of Caesar’s lieutenants and one of the conspirators. It examines the motives of the aristocracy in that period sensitively and intelligently. I particularly liked the way Massie described Decimus Brutus’ changing opinion of the choices Labienus made. Initially he’s derided as an overprincipalled clown, but later as the necessity for assassination grows in Brutus’ mind he is sympathetic to Labienus; there is also a fictional letter to Brutus from Labienus explaining why he supported Pompey, recognising him as the lesser of two evils and one that he thought he might be able to control better.
I’d like to read the rest of Massie’s novels on the figures of this period — Mark Antony, Augustus, Tiberius, Caligula, and Nero’s Heirs, but I can’t get the books from Google Play to my Nook; until I can I won’t buy more. Instead I’ve been finishing Robert Harris’ series narrated by Cicero’s slave then freedman, Tiro. I’ve finished the first two books, Imperium and Lustrum (or Conspirata) and am just starting on the last Dictator. The portrayal of Cicero is believable, and his take on Caesar is one that I agree with.
Anyway, it was while reading Massie that I thought that I could happily field an army led by either the Republican resistance to Caesar, or the Liberators who delivered extrajudicial justice to the tyrant. The Thapsus army has the advantage of allowing a Numidian ally and lots of elephants to bolster the Roman blade against opponents with knights. I’ve had the Numidians waiting to be painted for a while, and I had a Freikorps Carthaginian elephant that has a Numidian mahout; I’ll get two more for the maximum pachydermal goodness. I was pleased to read in the continuation of Caesar’s Civil War commentaries that Labienus had Gallic cavalry with him at Thapsus, so that’s an incentive to get more of my Gallic cavalry painted to enable Labienus to restore the Republic to its former virtue, guided by the moral vision of Cato the Younger.
BBDBA
6 August, 2016
It’s been quite a while since I’ve posted on this blog. Recently I was reminded that Conquest was coming up at the end of this year; Keith’s planning a new format with some BBDBA for the last day. It’s got me motivated to see what I could field if I were to attend. I don’t have enough figures for any army to be made up of 36 elements from one list. I’d need to field 24 elements from one list and take an ally. This precludes taking a successor army, which is a pity, as pike are better with solid wings, something they struggle to get in normal DBA. At this stage I’ve got a few armies I’m looking at:
The Republican army at Thapsus led by Scipio and Labienus and aided by their ally the Numidian Juba. I’m painting the Numidians now, and I’m looking at rebasing Spanish to make enough 4Ax. Otherwise, I’m pretty much able to field this army. I would look to get a few more elephants, though. I’m not normally a big fan of Roman armies, but the any that resisted the tyrant Caesar is OK, especially with honourable leaders such as Labienus and Cato the Younger.
Another army is a Mithridatic one with an Armenian ally. I’d need to paint a bit more to get this one ready. It’d have two solid wings of light horse and auxilia, a centre of blade or pike and enough knights to be a threat.
I could also put together a Syracusan army with a Carthaginian ally.
Anyway, along with getting these armies ready, I’m reluctantly planning to rebase my Gauls as 4Wb; I’m hoping I can get some rather nice looking Xyston Gallic foot nobles to mix in with the Corvus Belli ones to add some further presence to each element. I also have plenty of Gallic cavalry to look at painting. Perhaps they could be another BBDBA army!
2nd Punic War Day at AWC
8 November, 2010
Today MEDBAG had its biggest event to date; that said, it involved as many participants as the event at NSWC, and there were even as many games; however, this time they were themed, which added a good deal of interest to the event.
There were six of us, and Andy provided the armies (with a few Gallic warbands from John, as Andy’s were double-based). I’d decided I’d like to go Syracusan, as they were an army I’d not tried before, and Steve expressed an interest in Spanish, so it occurred to me that we could make the two sides IWC DBA competitors v. the Rest. So we made John our leader with the Romans and faced Andy with the Carthaginians, Joel with Numidians and Mike with Gauls. We decided to go with three opening rounds, then lunch followed by the BBDBA to decide the ruler of the Mediterranean. It was a good format that wasn’t too hurried; we had everything finished around 3.00, and we must have had our first battle under way around 10.45.
-
Round 1: the war begins.
First up I faced the Carthaginians. They’d gone with two elephants, two warbands and two psiloi (1x3Cv (Gen), 1x2LH, 2xEl, 3x4Sp, 2x3Wb, 1x3Ax and 2x2Ps). I’d decided that we should have to settle on one army for all the battles, as half of us had no choice, so why should the other half. Therefore I went for a spear general, a warband, a cavalry and an auxilia (7x4Sp (1=Gen), 1x3Wb, 1x3Ax, 1x2Ps, 1x3Cv and 1x2LH). Joel decided that speed was of the essence and went for six 2LH (including the commander) and six 2Ps! The Gauls were 3x3Cv (1=Gen), 8x3Wb and 1x2Ps) and the Romans and Spanish were as per the book.
I reasoned that I was unlikely to get a cavalry advantage with a cavalry general and a foot general was less likely to get in trouble. He would also give the bulk of my army more oomph and force me to attempt to win with the spear, rather than try to ignore them and their psiloi support and win with the rest. It was an approach that received some comment from other players. At worst, I hoped the sight of a general in the midst of those tasty spear would provoke the warbands and elephants to do something rash and allow my higher factors to prevail over their QKs!
I was the defender in this battle, a situation I maintained (everyone want to have a piece of Sicily!). This was even though we all had aggression 0 for the purpose of the campaign. I placed only one wood and a pair of gentle hills, but Andy kindly got the wood in the centre of my battleline. I decided to deploy on one side of it and the Carthaginians lined up opposite me.

Initial Deployments: Syracusans facing the Carthaginians.
No inspiration came to me for swapping elements, so we started to advance on each other. I expanded my line, and the crafty Carthaginian wheeled to endanger my cavalry, who risked being recoiled off the edge of the world by his general.
However, first blood went to me on the open wing, where I sent in the Gauls, Spanish and Tarantines (dressed as Numidians!). The Gauls put the Libyan skirmishers to flight and the Spanish doubled their fellow countrymen, while the heavily disguised Tarantines recoiled the Numidians.

Go Spanish! Opportunities are created on the open wing.
Nevertheless, the Carthaginians got to make contact, which was less than ideal, but given their greater mobility always likely to happen unless they rolled a 1 when within 200 paces of me. Despite this, I weathered this storm, although a spear fell to the Gauls. I was then able to overlap the Gauls with the valiant Spanish and drive them to perdition!

Looking good at 3-1 to the Syracusans.
Then it went crazy; my misdressed Tarantines routed the bemused Numidians and I had enough to win, but the elephants creamed my spear, taking out the general, another spear and the psiloi support. It was now 4G-4 to the Carthaginians and my turn!

The elephants make a big ugly hole in the Syracusan line!
Fortunately the Spanish continued to excel and with 4 PIPs they were able to charge an elephant with spear support and rout it. A narrow victory, won by mercenary valour!

The Spanish had a hand in four of the five kills—outstanding!
Meanwhile, reports reached us that the Romans had defeated some Gauls, despite the Gallic psiloi destroying an element of Roman cavalry. 4-2 to the Romans.

Initial Deployments: (Blurry) Romans facing the Gauls.
The battle with the Numidians was still underway.

Initial Deployments: Numidians facing the Spanish.
The Spanish were on the ropes, three down, but at this point, they obviously finished their siesta and demolished four of the Numidians to win; most of these were psiloi killed by their general, who was more than once flanked by the pesky blighters, but ended up swatting three of them. In fact, the last combat was 2-2 for the game, and it went the Spanish general’s way.

The Spanish general shrugs off swarms of psiloi!
The Carthaginian side had been whitewashed, though two were very close affairs.
-
Round 2: the whitewash continues!
Next it was the turn of the Numidians to visit Sicily. I saw no benefit to giving them terrain to play in and lined up my spear to meet them.

Initial Deployments: Syracusans facing the Carthaginians.
After seeing how the Numidians had deployed, I thought better of contesting the woods, and swapped the mounted over to that flank.

Initial Deployments: after the swaps.
I opted to steamroller down the field with my slow-moving foot to leave the Numidians less room to play in. This was a strategy aided by cripplingly low PIPs on their part and redoubtable defence by two elements of hoplites that didn’t deign to flinch before mere skirmishers, even when overlapped. For all that, things didn’t start well, as the Spanish, heroes of the last battle, made an early departure. At this point, the Numidians had control of the woods and the freedom to turn my flank. My mounted were off repelling an attack on the camp. However, despite all the numbers they brought to bear, the two elements of hoplites they turned to face just kept on recoiling or fleeing the skirmishers.

Attempts to dislodge that unsupported element of hoplites only got them angry!

At the same time my cavalry were slowly driving an attempt on my camp off the table.
At this point it all started to look quite easy, as the Numidians didn’t have the PIPs to trouble me. The cavalry took out a lone psiloi (or two) and the foot just kept trundling down the field. It was all Joel could do to slide one light horse a turn out to the side. One, however, didn’t get away in time, and was chased off the table, giving me a surprising victory.

Victory to the Syracusans; in the centre the Numidians must have finally got one of those redoubtable hoplite elements whose steadfastness gave me the game.
Again, the Romans had wrapped it up very fast, and we learned it was a 4-0 victory to them.

Initial Deployments: Carthaginians facing Romans.
As for the Spanish, they again waited until they were 0-3 before getting serious, and then in a twinkling they made it 4-3!

Initial Deployments: (Blurry) Gauls facing the Spanish.
The Carthaginian confederation was handed their butts on a plate again, and there were rumblings of discontent about their leadership.
-
Round 3: the Carthaginians are deposed!
Feeling very confident I faced off against the Gauls. After dealing to light horse and elephants, I was confident I wouldn’t be troubled by some naked barbarian warbands. Again we had to deal with unwelcome foreign holidaymakers on our beautiful shores, and again I put down a minimum of terrain.

Initial Deployments: Syracusans facing the Gauls.
As the battle developed I attacked the Gallic psiloi with my Spanish, but they were not able to regain their mojo from the first battle and only recoiled them. We also attacked their cavalry, getting two recoils, but then the Gauls hurtled into contact, scorning overlaps. We held up pretty well, losing only one element of spear that lacked psiloi support.

After the Gallic charge.
There was a round or two of tense encounters until I had my big chance, I had double overlaps on a warband, 5-2 to me … and he 6-1ed me. I should have known; in my experience warbands love to have their backs against the wall! That destroyed my psiloi support and it was all getting too horrible.

The dreaded 6-1!
Although we held our own in the cavalry encounter, the warband shredded us, and we lost another two spear to them, including the general! 5G-0 to the Gauls.

All over, rampant Gauls.
The dice went Mike’s way in the combat that mattered, but he’d effectively made my longer left flank ineffective, so it was a well executed victory.
Meanwhile, not caught on film were two more victories; the Romans were 3G-2 to the Numidians, catching their general, and the Spanish, showing more alacrity this time, were 4-2 to the Carthaginians.
-
Round 4: Master of the Mediterranean.
Over lunch the Carthaginians yielded control of their faction to the Gauls. In fact, with heavier losses than the Numidians, they dropped to the bottom of their faction. With the only loss, I was clearly the loser of our faction. The Spanish, with their habit of waiting until they were three down before getting serious were second, and the Romans retained their supremacy.
The Romans decided that the Gallic upstarts needed to be put in their place, and led us into Gaul to do this. They had a reinforced command (two extra 3Cv), and I lost two elements of 4Sp, but kept my foot general. The Carthaginians dispensed with their Gallic mercenaries, and the Gauls took more 3Cv. The battlefield had two woods on each flank and some gentle hills in the rear. The table was 6’x4′, so we started 9″ in compensate (that should have been 12″, perhaps).

Initial Deployments: Gallic Empire on the left, Roman on the right.
After seeing where the Gauls placed their camps we decided to meet them repeating the match-ups of the last rounds. John was somewhat dubious of the wisdom of my facing the Gauls again, but I suggested that his cavalry was better able to stop the Numidians than anything I had, and if he formed up close to me, I could rely on his blades for support. I joked that this was the Cannae stratagem; I had the weak centre that would suck the Gauls forward while our wing closed in on them.
The Romans had to deal with greater numbers of Numidian light horse (5) with three cavalry, and it got bloody. Eventually, however, his superior factors prevailed and the Numidians broke. Meanwhile, the Carthaginians were attacking the Spanish auxilia; they had better odds generally, but they were not able to find an attractive target for those elephants.
In the centre I’d formed up with a narrow frontage to face the Gauls. Just before contact I thought my light horse would be better to face them than single-ranked warbands; however, the light horse, unnerved at such brazen nakedness, fled. Not a good start; fortunately the spear held firm and flung back the warbands. In fact, they took two of them out on the left end of the line, as the Carthaginian elephant wasn’t able to get close enough to prevent an overlap.

Despite those Tarantines, the Gauls are repelled with heavy losses!
In my turn I think I only had a few PIPs, but was able to get the Romans to attack the Gallic cavalry opposite mine. Mine were then free to attack some Gallic foot; at 3-0 on these rash overlapped fools, they ought to have done some damage, but instead only got a recoil (or was I actually recoiled?).

While a cavalry battle is fought near the trees on the right flank, the Syracusans stand firm in the centre.
Fortunately the Gauls were now engaged with their cavalry against the Roman legions, and didn’t have the PIPs to contact my spear. On the downside, I had only one PIP and could only attack with my cavalry again, this time with success. The Gauls were now 3 down, though I lost a spear to one of their warbands (but had a reserve behind it!).

Action photo! One Gaul falls to the Syracusan cavalry.
Victory came to my general, who redeemed himself for the last battle, when he broke the two warbands opposite him, demoralizing the enemy C-in-C’s command.

After having his bodyguard routed in two of the previous battle, the Syracusan general, not afraid to return from a battle without his shield, finally secures victory for his Roman masters.
When the Gallic warbands fled, the rest of their alliance turned tail. Soon, they were sending ambassadors to sue for peace with the Romans. The Syracusans, despite playing an important part in the Roman victory, could look forward to being sacked by paranoid Romans at a future date if they should appear too powerful, but such is life!

The battlefield at the end. The Numidians had been in flight for one turn when the Gauls broke.
This battle brought to a close a very enjoyable day. The Syracusans remained frustrated in their dreams of empire, but being Greek, of sorts, could count on better historians (as Sallust famously admitted) than the Romans, and secure a victory in words, at least, over their masters! The success of the IWC-bound DBA players I took as a good omen for us at that competition! It was interesting that, like at NatCon, one side was markedly more successful than the other; this time, by contrast, the armies were more different to each other. Anyway, I’m already planning future events on this model. Thanks to all who took part, and Andrew, in particular, for providing the figures.
See also the reports at Steve and John’s blogs for reports and more pictures:
Conquest 2010 (Part 3): BBDBA 2nd Punic War
6 November, 2010
The last event of Conquest was a game of BBDBA. This was hosted by Keith and attended by four of the tireless Timaruvians. After an enjoyable barbecue, where I got to try a local beer, Harringtons, that I’ve kept an eye out for up here, we retired to The Wargames Room for the battle. As Keith and I provided the armies we were appointed C-in-Cs. I went Roman and Keith went Carthaginian. We each had a subordinate command (of equal size to the senior one) and an ally. The Romans had Numidians, and the Carthaginians Gauls. The Romans were the defenders and opted for very little terrain, a single wood on one flank and a number of gentle hills.

Initial Deployments: the battlefield from the perspective of the Roman C-in-C.
The Roman C-in-C, myself, deployed on our right flank (mainly because that’s where I was standing). In the centre was the Junior Roman command, Lewis, and on the left flank was our Numidian ally, Stephen. Facing us were the Carthaginians, with their C-in-C, Keith, on their left flank facing me, the Gauls, Simon, in the centre, and their junior command, Dave, on the right flank. This created an interesting dynamic, as the two low-PIP commands on each side faced the opposing allies (and when we talk about ‘low-PIP’, I mean cripplingly low-PIP!). This PIP situation was particularly acute for the Carthaginian command facing the mobile Numidians and having a pair of elephants.
The game moved along at a fast pace on the Roman left wing. While the centre and right were still advancing, the Numidians had already broken the Carthaginian right flank. I believe they did this by destroying the Carthaginian commander. With the left flank in retreat, the Numidians started to bring their auxilia against the Gallic warriors. However, these were already hard at work on the Roman centre, which, owing to rivalry between the two consuls, was getting terribly low PIPs! They quickly blew away one of the legions and had this command on the verge of collapse. On the right flank, I was just making contact with the Carthaginians perched on a hill. My cavalry was split as one tried to support the centre against the Gallic mercenaries that were fighting in support of the Gallic ally command and the other tried to resist the overwhelming odds of the Carthaginian horse.

The Roman centre hangs on by the skin of its teeth after losing two 4Bd and a 2Ps to the Gauls.
At this point the Roman centre seemed doomed, and as C-in-C I did nothing to help it, giving it a succession of 1 PIP dice to work with! Despite this, it miraculously held on. In fact, it did better than that! While beleaguered legions threw back savage Gallic charges, in one place, even one uphill, the commander rode into battle, and was able to come to grips with the Gallic commander and best him in combat. In the turn the Roman centre finally folded, so did the Gauls.

The final situation: the general of the Roman centre, supported by Numidians, has defeated the Gallic commander; just in time, as the Gauls had finally broken two more elements of legionaries.
At this point we awarded the victory to the Romans. The two demoralized commands of the Carthaginians had lost their commanders and would struggle to stop the flight of what remained of their army. It was a victory that I’d done virtually nothing to contribute towards. It was owed to Stephen’s skilful use of the Numidians, and Lewis’ refusal to break for a miraculous length of time!
This was a fun game. I enjoyed the company and have a good deal of respect for the Timaruvians, who had a long drive ahead of them when we finished that evening. Their club, the Timaru Armchair Generals, seems to be doing a few things right, as they have number of younger members who are playing ancients, of which Lewis was one at this event. DBA may be a factor in encouraging this, but I’d be interested to know what else they do. There was some discussion around this at dinner, and Simon got a good deal of ribbing for describing, by implication, most of us as elderly, something he was not allowed to forget for the rest of the evening!
I found the group from Timaru very hospitable, and 2/3 of my opponents at Conquest were from there. I hope I can get to TAGCon next year. It’s a bit of a haul for me, but I’d like to see more of what they do down there.
-
Review:
This was a game in which both the Romans and the Carthaginians could have benefitted from mixing and matching their troops. In hindsight I should have deployed in the centre, as I had a foot command, with more blades and no cavalry, while Lewis could have taken all the spear and the cavalry onto the right flank. I could have also given him the high PIP dice. The Carthaginians could have done something similar, perhaps putting their elephants with extra mounted in a high-PIP command. Still, at the end of a long day, none of us were too sharp (except my able Numidian ally!).
Conquest 2010 (Part 2): Cornishmen (and women) on chariots
29 October, 2010
I was one of the umpires for this event, in training along with Dave for the IWC competition next year. There were sixteen of us competing, so organizing the draw was quite tight for time between games. Conquest is sponsored by Comics Compulsion, and this year Tim from there was one of the DBA competitors. He also provided us with some very nice game boards for the event.
As I won my CB Ancient Britons at Conquest last year, I felt it was only proper to field them this year. Actually, they’re not one of my favourite armies. This is not because they’re not quite a powerful mix of troop types; they can have half their army mounted or can go for skirmishers to complement the light horse. It’s more that the image of them for me has been shaped by the Victorians, who adopted Boudica as a prototype of Queen Victoria of all people! As the Wikipedia author points out, it’s highly ironic that someone who fought Roman imperialism became associated with British imperialism! Because of this, the Ancient Britons don’t come across to me as the ancestors of the Celts of Britain, but the English. Still, why should that be strange when a similar fate awaited King Arthur?
Anyway, trying hard to put these associations to one side, I took the Britons. I described them as early Cornish (a link to the DBR game of the night before), but I didn’t think of a name for my leaders, particularly the warrior queen on a chariot, so was lumbered with Boudica by well-meaning opponents. There are no historical Cornish rulers from this time. My best source for a name would be someone from that eminent historian, refreshingly untroubled by the need to verify his sources, Geoffrey of Monmouth. He provides us with a Duke of Cornwall, Tenvantius, the son of Lud. He’s less prolific with female names, but I’ll go with Tonuuenna, the mother of Belinus and Brennius, who persuaded her sons to do the right thing and not fight each other, but rather go sack Rome!
Damn, with names like that, I’m sure they would have fought better, which tells you what you could discover if you looked here. I won two games, drew one and lost the other three. Still, I learnt a lot about the army as the day unfolded, which is to say, I made a lot of mistakes that I could learn from!
-
Game 1: Thessalians (II/5d), Colin Foster (Christchurch)
My first game was against a Hoplite Greek army, the Thessalians, who have a mix of troops not so different from my Picts last Conquest. Colin went for four 3Cv, two 2Ps and six 4Sp. I went for all the mounted I could, so Tonnuuena led four LCh, two 2LH and six 3Wb. As would remain a common pattern, I was the defender. I was looking forward to getting my double-ranked warband into Colin’s spear, so I went for a gentle hill and two woods. I put the two woods on one flank, but Colin did the sensible thing and opted to have the woods in my deployment zone, which the dice allowed him.
Setting up, I put the warbands in one wood, and the mounted between the woods. Colin was able to put his spear as far as possible from the warband and I elected not to swap any elements.

Initial Deployments against the Thessalians.
I rapidly found that the depth of chariots is significant when moving across the front of battlefield, and the chariots were not able to get to the right wing before they were engaged by the Thessalian horse. I also had a moment of madness and imagined I could slip my light horse between the hoplite lines. In that initial encounter one chariot was destroyed.

An overlapped chariot is destroyed and the light horse get ready to get themselves into trouble.
Things did not improve. Predictably one of the light horse was destroyed and the warbands had to rush into combat at bad odds against the cavalry. Before long another chariot and a warband were destroyed and the Britons routed.

Terrible match-ups on the right flank.
Going into this battle I thought I had a good chance. I shot myself in the foot with the terrain placement, and I then made it easy for the warbands to be avoided; had they been central they would have had better options. Finally, I discovered that chariots are surprisingly more awkward to manoeuvre than 3Cv. Good lessons!
-
Game 2: Early Neo-Assyrians (I/25b), Barrie Cameron (Timaru)
My next opponent, Barrie, had chariots and I decided to stick to the same army. The Assyrians were insanely aggressive, and I’d have to 6-1 them to be the aggressor! They have an interesting mix of mounted and foot: two HCh, two LCh, two 3Bd, four 3Ax and two 2Ps. I didn’t see any massively favourable match-ups for me, but I hoped I could bring my superior mounted numbers to bear against his foot, to which they were quite vulnerable. I think I did learn a bit from my mistakes in the previous battle, and went for different terrain and deployment.

Initial Deployments against the Neo-Assyrians.
I didn’t take any photos of this battle beyond this first picture, and my recollection is a bit hazy. It was a draw and I know that our chariots met on the right flank. Barrie tried to bring his across his front, and I pinned them much as Colin had done to me. Despite this, I don’t think it was going too well for me there. The only consolation was that it blocked the HCh, which sat out the battle. I managed to get one of the 3Ax on the left flank with my light horse, but when time was called, I’m not sure who had the advantage.
-
Game 3: Numidians (II/40), Bryan Fowler (Wellington)
Numidians with an elephant, light horse and auxilia were not an army I especially wanted to face. In the light of this I went for all the chariots again, figuring they’d have the edge over auxilia and light horse. I could have taken a psiloi as an elephant killer, but figured it’d get eaten by the auxilia.
I was the defender again and discovered that owing to a limitation of what figures he could get, Bryan had no auxilia! He had five 2LH, five 2Ps a 4Bd and an El. Even better—a stack of psiloi able to be gobbled up by my chariots. I went for a very open battlefield to give the psiloi nowhere to hide.

Initial Deployments against the Numidians. The lone warband on the right flank is the result of a swap!
I deployed with the warbands hoping to gain the crest of the hill and the mounted on either side. Things moved at a rush. But as the Numidians advanced their left flank expanded, outflanking my right flank significantly. However, I figured that Tonuuenna would QK the psiloi in front of her and lead a breakthrough in the centre. Do you think she could? For at least three turns that psiloi held her off! In that time my chariot held up the Numidian elephant, but it was a combat that could only have one outcome.

Early combat. Tonuuenna proves ineffective, and Nennius and his head faces off against three light horse!
By the time Tonuuenna finally killed that psiloi it was too late. A chariot had been flanked and destroyed, another had fallen to the elephant and Nennius had been surrounded and destroyed. Meanwhile I think my light horse had been destroyed on my left flank by psiloi and light horse. I think I was downslope of all this.

It was all over very quickly!
In hindsight I could have extended my line by not double-ranking the warband. They didn’t get any benefit against five sixths of the opposition. However, I blamed Tonuuenna for a lacklustre performance, and going into the break for lunch she was retired in disgrace!
-
Game 4: Early Imperial Romans (II/56), Simon Phillips (Timaru)
After lunch, owing to the nature of the Swiss Chess system, I was facing less experienced, or less lucky opponents. Simon, from Timaru (and recently from Scotland) had a loaner army; these Romans were also won at Conquest last year, so it was a very fitting match-up, even historical!
Going for one less chariot I took a warband general (Tenvantius) and a psiloi. I was of course the defender and stuck to my terrain choices, though putting the woods slightly more central. I fancied my chances, as these Romans, unlike Marians and Polybians, lacked psiloi for support. The auxilia and blade would be very dangerous to the warbands with psiloi support. Without it they were vulnerable to my warbands and my chariots. And for the Romans the one psiloi they could get came at the cost of a cavalry. Simon went for three cavalry, an artillery, four blades and four auxillia.

Initial Deployments against the Romans.
Simon sent a cavalry to try and get around the wood on my right flank. I stopped it with a psiloi and a light horse. I was able to drive it off the edge of the board, making it 1-0. Simon decided that these two represented a target worth chasing (or as he said later, a threat). He would prove able to get them, but at the cost of leaving his centre hanging. I lost a light horse to his artillery (I didn’t know that was a match-up to avoid!), but was able to use my chariots to effect, taking out his artillery, a blade, who were unable to expand out of column in time, and an auxilia. For all that, it was a narrow victory.

It's all over; while the Roman commander and cavalry are over to their left flank, the chariots do the damage.
-
Game 5: Alexandrian Imperial (II/15), Lewis Osborne (Timaru)
My next opponent was the youngest competitor, Lewis, who had used Ancient Britons himself. Like the Assyrians, the chance of him being the defender were remote. I went for terrain similar to what I had against the Romans (in fact I managed to stay at the same table for the whole day!). This time Tenvantius was on a chariot and I went for two psiloi. Alexander went for a defensive deployment and artillery instead of an elephant.

Initial Deployments against Alexander.
Six PIPs on the first turn got my psiloi into the woods on the left flank. The light horse also headed over to that flank too. While Alexander’s pikes and artillery sat on the hill, I thought I’d have a good chance to bring superior numbers to bear on the mounted on the left flank. This was going fairly well, and I got one of the elements of companion cavalry, but my decision to try to get Alexander himself by having Tenvantius flank him proved my undoing. Alexander recoiled me and the depth of the chariot proved fatal. He was then able to turn and attack Tenvantius and recoil him again. His deep base contacted my light horse by a few mm and it was all over, as I’d lost a psiloi earlier to his companions.

More learning with chariots: avoid going sideways!
-
Game 6: Spartacus (II/45c), Dave Batchelor (Timaru)
My final game of the day was against a fellow umpire, Dave, who brought Spartacus’ army. It was the first time I was the aggressor. Had Spartacus broken out to Britain, only to get attacked by the locals? I went with Tenvantius on foot again, but with two psiloi, as against an army of warband I figured they’d be useful. Dave went for a foot general, so had five 4Bd, five 5Wb and two 2Ps.

Initial Deployments against Spartacus.
In a crowded battlefield I believe one of my light horse got into trouble and was destroyed. At that point I retired the offending die that had rolled a 1 and my luck saw me home. In a day that had seen my warbands do very little (anything, pretty much), the chance to face other warbands must have inspired them. Perhaps they felt they had something to prove against raggedy-arsed 5Wb, as they consistently beat them (overlaps, a Wb general and double-rank advantages helped, of course).

Two mobs of slaves put to flight, one, I think by psiloi.
As the escaped slaves fought, the gladiators looked on, and before they could get into action another mob of slaves was defeated and Spartacus’ army broke and ran. What punishments worse than crucifixion could the Britons dream up for those they captured?

Another mob of unwashed slaves break and the Spartican adventure in Britain falls to ruin.
It was nice to end on a victory, and interesting that it was one that saw my warbands in action finally. I think I had struggled to make the Britons act as a combined-arms army and ended up winning (or more frequently losing) with the mobile part of the army, which made contact before the warbands could move up. Another lesson there!
It was a very enjoyable day with all the games being played in good spirits. Yet it wasn’t over. I’d played mostly Timaruvians in the competition, and I’d see more of them that evening, when four of them came over to Keith’s for dinner and a game of Big Battle DBA (BBDBA).

