Conquest 2018, Pt. 3
17 November, 2018
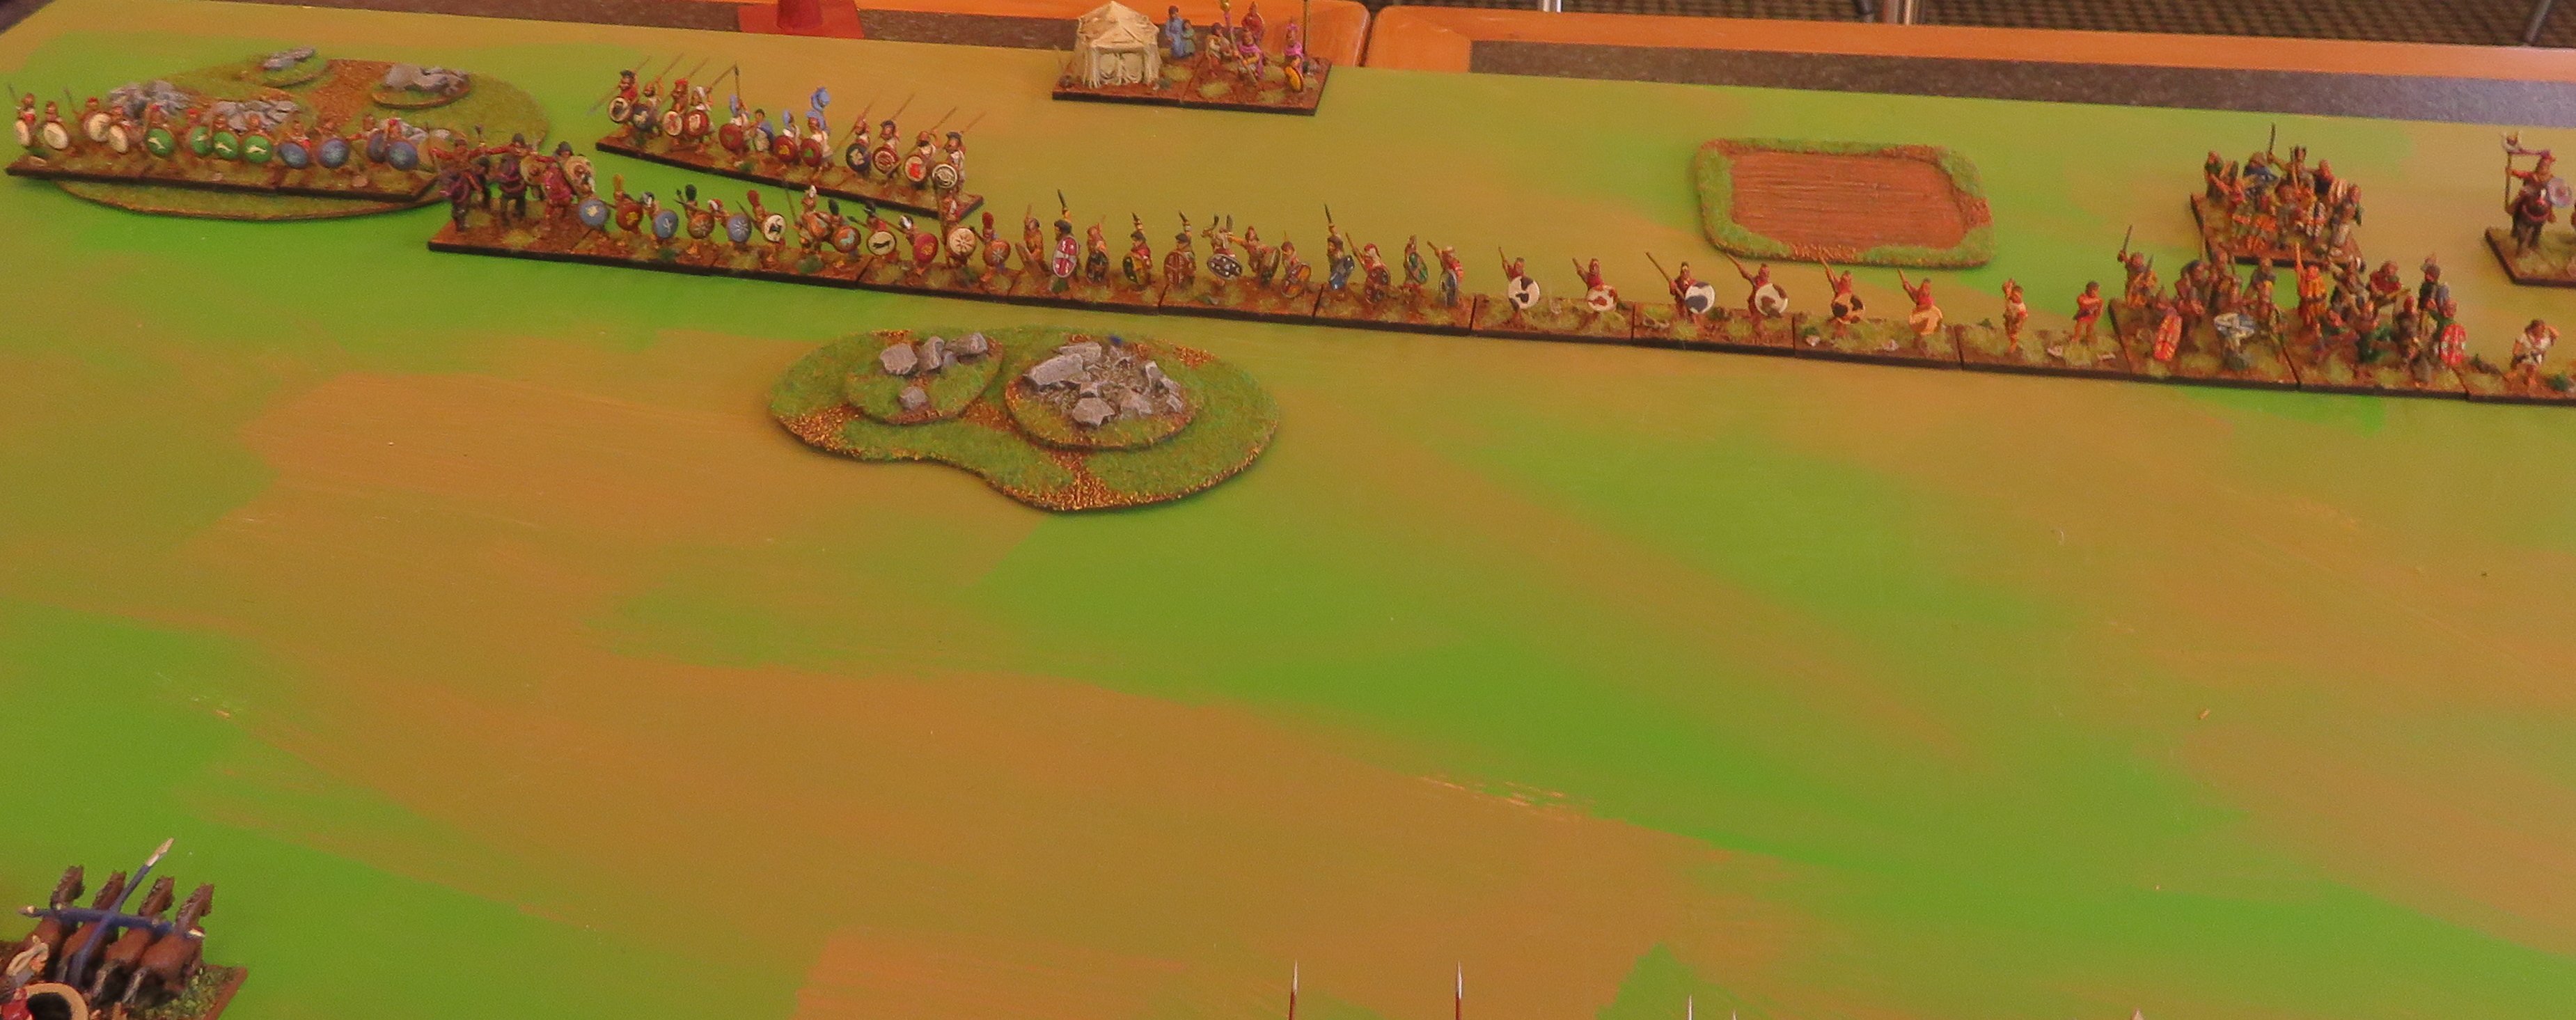
The final day of Conquest was three BBDBA games. A lot hinged on the initial dice roll for who was the invader and got to set up second. As an army characterised by Phil Barker as particularly aggressive, the Later Carthaginians should have had the advantage here, but on this occasion they allowed themselves to be invaded for the first two battles.
- 1. Polybian Romans (Keith)
The first battle was against Keith’s Polybian Romans. I placed two large marshes and a difficult hill. The command with the Gallic Warband commander set up behind the hill; the spear were in the middle and the left flank with the C-in-C had a marsh occupied with two psiloi.

The Carthaginian right flank and central commands.

The two armies opposed; the Carthaginian left flank command can be seen in the foreground.

The Roman right flank and centre.

Their left flank.
I came to realise that the terrain was not working to my advantage, and things stagnated with neither side able to make much progress in the time was called. On the left flank the cavalry had to retire before the advancing foot.

Initial advances.

Working at correcting things.
On the right flank the warband struggled to move over the hill, and the command range of the commander slowed down the advance of the psiloi, who were needed to support the Spanish scutati.

Slow progress on the right flank.
At the time the game ended the Carthaginian centre was almost broken (a flanked spearman refused to break), the warband were starting to put pressure on the right flank, but were disorganised by the hill. On the left flank a stalemate had resulted.
- 2. Athenians with Thessalian allies (Colin)
Against Colin’s Greeks, the Carthaginians were again defending. Colin had cavalry seeking to destroy exposed psiloi on my left flank, and on the right flank they had Thessalian cavalry facing the Numidians.

Athenians with Thessalian allies on their left flank.]

The opposing Carthaginian left flank.

Their right flank and centre.
Things did not go altogether to plan for the Greeks, and the Athenian cavalry were briskly destroyed by valiant Libyans. This precipitated a collapse on that flank.

Libyan javelinmen gloriously see off Athenian cavalry, while Numidians rush to fill an anticipated gap.
The Numidians were trying to bolster the threat to the left flank. As it turned out, two of them could turn round, while two stayed to exploit the advantage. The Athenian light troops were no match for the Spanish, and soon the Gauls were ululating their way forward.

The Athenian right flank starts to fold as their light troops break and the Gallic warbands surge forward.
On the other flank, things were not so happy.

Thessalians have the Carthaginians at a disadvantage.
However, the Carthaginians had a lucky escape, when the Thessalian commander was killed.

Disaster for the Thessalians as their commander is killed.
For all this, the Thessalian cavalry still had the Carthaginians at a disadvantage.

Despite the loss of their general the Thessalians continue to apply pressure.
The Gauls broke the Athenians right flank, but not before two warbands were broken. They spent a few turns mopping it up (in hindsight I should have remembered that it should have been removed after losing half of their elements; this was possibly crucial). Meanwhile, the Carthaginian centre was faltering and eventually broke.

The Carthaginian centre breaks.
When time was called I need one more element to win. I might have got it had I remembered that a command is removed as soon as half of it has been destroyed; I might have gained an extra turn to get that last element. For all that, I was under pressure on the right flank and had my centre collapsing.
- 3. Seleucids (Gordon)
Finally, in the last game I was the aggressor against Gordon’s Seleucids. I exploited this to the hilt in choosing which commands faced which.

The Seleucid left flank facing Carthage invading Syria.

Their centre and right flank.
Taking note of where the Seleucid cavalry was, the Carthaginians chose to have their light troops in the centre to face the phalanx. Their spearmen would hold the right flank defensively, and the cavalry on the left flank could exploit their numbers against psiloi and light horse, while the Numidians faced the xystophoroi.
The Carthaginians meet the phalanx with light troops and the elephants and chariots with spearmen.

Massed cavalry face the beleaguered Seleucid right flank.

The two armies opposed.

The light troops advance while the spearmen wait.

Cavalry swarm forward on their left flank.
The Seleucid scythed chariots proved ineffectual, and the centre and right flank waited while the left flank sought to exploit its advantage. It did this rapidly. It lost two Numidians to the xystophoroi, but in the end prevailed so that the cavalry could chase down the exposed psiloi. Meanwhile, the rest of the Seleucids were advancing, but were unable to gain a significant advantage, and the phalanx was waiting to be rolled up on its exposed flank. At this point the Seleucid general capitulated.

The Seleucid right flank has collapsed and the phalanx is defenceless. The Seleucids capitulate.

The Seleucid elephants on their left flank had routed some Spanish scutati, but overall had made little impression in the short time they had before their other flank collapsed.
I was pleased with how the Carthaginians performed. I think the aggression dice is hugely significant for BBDBA. I wonder if deploying with alternating commands might not reduce this a little.
Conquest 2018, Pt. 1
12 November, 2018
This is the sixth Conquest DBA competition I’ve taken part in; my first was in 2009, and then there was a hiatus between 2012 and 2015. This time I took my Later Carthaginians again and the Syrians. I didn’t get the veteran spearmen painted in time for the trip, but there were a couple of new figures, more Libyan skirmishers, and some Liby-Phoenician cavalry; both of these elements were heroic on occasions.
The first day was DBA and the Carthaginians had three battles in the morning. It started with the ill-omened discovery that the white shielded spearmen had had a shield fall off.
- 1. Early Mycenaeans (Robin)
Up first was Robin’s Early Mycenaeans, with a menacing combination of heavy chariots and pike. I was the attacker.

Early Mycenaeans.

Another angle.
I was able to arrange my psiloi to neutralise his phalanx, and my spear and Numidians to face his chariots. On the flanks my match-ups were favourable too, and the general formed a reserve for the spear.

The Carthaginians.
Early up the new Libyan skirmishers routed some pike (6-1) and the blue shields did likewise to some heavy chariots; the white shields were less steadfast (disconcerted by the loss of one of their shields). The green shields recoiled the enemy general, while the Numidians suckered in their opposing chariots.

After the initial rounds of combat.
The battle developed rapidly; the general filled the gap left by the departing white shields, and the Numidians destroyed their opposing chariots. Meanwhile, the enemy general routed the green shields. However, the Numidians moved across and taught him a stern lesson, winning the game.

Victorious against one squadron of chariots, the Numidians then triumph over to the enemy general.
This was the first general’s scalp for the Numidians, but by no means their last.
- 2. Palmyrans (Eric)
Next up I faced Eric’s Palmyrans. I was again attacking. These had a fort positioned with mathematical precision on the field. I opted to have the fort on my battle line, and Eric garrisoned it with a bow element.

The Palmyrans and their fort.
I deployed to try to take the fort on the first turn.

The Carthaginian deployment.

Another angle.
The white shields were comforted to see their shield returned owing to the magic of Blutak. On the first turn I saw the Palmyrans advance with fearsome speed, and I failed to take the fort. I was then hampered by PiP dice of 1 or 2 for most of the game. Early up the blue shields fell to the enemy commander, and the Libyan skirmishers were routed by cataphracts. Things were looking bleak, but then the green shields took the fort on a solo assault and while the Balaeric slingers scorned the dangers of the opposing cataphracts and light horse for three turns, the Carthaginian cavalry destroyed an archer. The white shields had destroyed a cataphract unit (showing the difference a shield makes!). However, the enemy commander had destroyed one of the Numidian cavalry.

Things swing back towards the Carthaginians. The new Liby-Phoenician cavalry shine against archers.
On the turn that the second archer fell, the Balaeric slingers decided they’d done enough and retired. The game was now balanced 4-4. I rolled a handsome 3 for PiPs (the most since the first turn). I decided to bring the spearmen out of the fort and attack again with the Numidians. The double overlapped general was defeated and the Numidians collected their second scalp.

After the general is routed.
This was a very satisfying victory. I could bemoan my PiPs, but my troops resisted shooting with great determination, and my combat dice were good when it mattered.
- 3. Seleucids (Gordon)
The Carthaginian’s last outing for the day was against Gordon’s Seleucids. Again I was the attacker. And again I opted to face the phalanx with psiloi.

Seleucid deployment.

Carthaginian deployment.
The Carthaginians saw off the scythed chariot (against their spear). As the lines meet, Seleucid psiloi are overpowered by the Carthaginian cavalry and the Balaeric slingers flee the phalanx. However, one of the spear is routed by an elephant.

Early situation.
On the left flank the last psiloi fled, and the Seleucid general attempted to stabilise things. However, the Balaeric slingers demolished two elements of pike to win the game. The Gauls sat out their second battle, never moving.

Victory. The double-overlapped pike is destroyed.
The morning was hugely successful for the Carthaginians; all but the Gauls had been in the action, and the light troops had proved very dangerous.
Conquest 2017
14 November, 2017
A few months back I decided to go to Conquest 2017. I’d not had much chance to play DBA this year and I was keen to get along, as I’d enjoyed the year before a lot. It also seemed a good motivation to get some painting done. Very kindly Keith, the organiser invited me to stay at his place for the event, something I really appreciated.
As I said in my last post, I’d chosen both my armies as a motivation to get more figures that I already had painted. However, I was rather slow getting them finished, and didn’t get much practice before the event. Fortunately, I was able to get a couple of games with Mike the Sunday before. this allowed me to try out the Normans in DBA, where they got a lucky victory against Mike’s Ottoman Turks. And it allowed my to try Pyrrhus’s army against them in BBDBA. This was invaluable, as I’d organised the army in such a way that it wouls have struggled, I’m sure, but with the suggestions of Mike, it did very well.
I’d organised the army as follows:
- Command Wing (medium PIPs): 3 x3Kn (C-inC), 3 x LH, 4 x 4Pk, 2 x Sp, 1 x Ps
- Centre (high PIPs): 8 x 4Pk (cmd), 3 x El, 2 x Ps
- Holding Wing (low PIPs): 3 x Cv (cmd), 4 x Sp, 3 x 3Ax
The theory was that the elephants would help the pikes create a breakthrough in the centre (hence the high PIPs); Pyrrhus would have the next best PIPs with much of the cavalry and the Oscans with the best BGo troops would hold one wing.
Against the Ottomans the Oscans were defeated as they had no BGo to anchor on, the centre did not make much progress, and the elephants were destroyed by LH, nor did Pyrrhus. With Mike’s suggestion I rearranged them as follows:
- Command Wing (High PIPs): 3 x3Kn (C-inC), 3 x El, 3 x LH, 2 x Sp, 2 x Ps
- Centre (Low PIPs): 12 x 4Pk (cmd), 1 x Ps
- Holding Wing (Medium PIPs): 3 x Cv (cmd), 4 x Sp, 3 x 3Ax
The centre was intended to be solid and just trundle forward, while I sought to win on the wings. Pyrrhus, in particular, had a potent mix of elephants, knights and light horse.
- Friday games
On the evening I arrived I had a couple of games with Keith. I used my Normans and he used his Samurai. In the first game Keith experimented with 6Cv. My archery destroyed them with exceptional dice. As a result of this Keith changed to a CP instead, and in the second game it was his turn to see his single archer do wonders. We finished a game a piece.
- Saturday Morning (Ancients DBA)
Pyrrhus had a dreadful morning; he died against Jim’s New Kingdom Egyptians and again against Gordon’s Seleucids. However, both of these were close games, and with a bit more care I might have won. The last game, against Keith’s Carthaginians, was more humiliating. Clearly concussed from his two earlier battles, Pyrrhus failed to roll more than 2 PIPs for the entire game. As a result he sat facing the Carthaginians until in desperation, after his camp was sacked and his cavalry wing was disintegrating that he sent his pikes in an attack against the Carthaginian foot. This failed, and the Carthaginians won a victory without any of their army breaking.

Pyrrhus attempts to break the Carthaginian foot to no avail (though he doesn’t die this time — photo taken by Keith).
- Saturday Afternoon (Medievals DBA)
For the afternoon competition my Normans had Viking allies and were:
4 x 3Kn (cmd), 2 x 4Bd, 3 x 3Bw; 2 x 4Bd and 1 x 4Bw (allies).
The afternoon saw the Normans facing Brian’s Rajputs. I made the mistake of having the Rajput fort, and the BGo terrain on my baseline. I abandoned the idea of trying to take the fort, and was cramped as a result. In the end I killed the elephant C-in-C with mine, but that was on the turn that my army broke.
The second battle was against Ben’s Yi Koreans. The Koreans occupied a wood on my left flank and proceeded to chip away at my knights that milled around in range. Meanwhile on my left flank my archers advanced out of a hamlet into firing range of the Korean cavalry. Their response was to charge, which largely failed, and saw them take casualties. They came back, this time with their general, and were again defeated, giving the Normans a lucky victory. If they’d waited a turn and attacked with their general, they may have had more success (then again they’d have been shot at). Credit should go to the Viking archers, who shrugged off an extended rocket barrage by the Korean artillery.
The final battle was against Jim again. His Free Company were not too different from the Egyptians, having fast blades and archers, but knights instead of chariots. The fast blades proved deadly, getting stuck into the Vikings, who had occupied a hamlet. They destroyed them, with the support of some knights, before my archers could break up his main line of battle. After that, they were able to roll up my right flank.
Overall, I won only one game that day, and finished very near the bottom of the table. However, the points system favoured results over a draw, which is a system I think is good: 8 points for a win, 1 for a loss and 0 for a draw. Losses and draws got points for enemy destroyed too.
- Sunday (Ancients BBDBA)
After such a bad showing on the Saturday, I didn’t approach the BBDBA with much confidence, especially as I was yet to win a game of BBDBA. My first game was against Keith’s Early Asiatic Successor army (Demetrius). I’d faced it last year with my Carthaginians. This time, however, I was the attacker, which meant I got to react to the entire deployment of Demetrius. This proved very useful, as the Oscans had the chance to avoid Demetrius’ xystophoroi and to contest a hill on the right flank.
In the centre my pike general deployed to the right of the opposing general, and on the left Pyrrhus deployed in reserve to meet the bulk of Demetrius’ elephants and knights. The advantage of deployment was complemented by favourable dice, and in the centre the pike to the right of Demetrius’ central commander was destroyed; he was soon flanked, but never flinched, and the centre remained otherwise static.
On the right, the Oscans hoplites withstood elephants and elephants successfully, and the auxilia were able to overcome opposing peltasts in order to start to threaten the cavalry general of that wing.

The Oscans approaching Demetrius’ left flank. Their hoplites face pike and elephants thoroughly undaunted.
However, it was on the left wing that the battle was decided. Demetrius had tried to change elements to avoid his knights facing elephants, but this left a hole in his line, and Demetrius himself had had to leave the reserve to join the battleline.
In the initial clash elephants faced off; one each fled, which gave the opportunity for one of Pyrrhus’ to attack Demetrius himself. This was the decisive combat, and the elephants finished off the commander giving Pyrrhus the advantage. He continued to exploit this by eventually overcoming pikemen facing his hoplites, as well as other casualties that I don’t remember now.

The crucial point on the left flank; elephants have fled in both directions, but one of Pyrrhus’ is able to turn on Demetrius himself.

The same point from a different angle. The pikes facing hoplites can be seen.
Meanwhile, some of Pyrrhus’ pikemen, dressed as Persian levy pike, had been defamed by Demetrius before the battle. Proving him wrong they eventually defeated the opposing pike (with cavalry support), breaking Demetrius’ second command and giving me my first BBDBA victory.

The beleaguered Demetrian pike general remains steadfast, but to his right his command collapses as Tarantine cavalry move up to overlap another pike block.
In the second battle I faced Brian’s Classical Indians. In this battle his fort was less dominant. However, when I looked at the terrain I considered trying to fight for the woods on my left with the Oscans. However, they would then face HCh, while the elephants of Pyrrhus’ command would be closer to his psiloi. I had the wings the other way around, which left me with only two psiloi to try to control the woods.

Pyrrhus faces Classical Indians.

Pyrrhus’ deployment from another angle.

And another angle.
As the battle unfolded, the Indians attempted to redeploy radically to face my deployment, and I tried to get across the board rapidly to trap his chariots behind his elephants and his line in disarray.
The plan met a hitch when the two psiloi were quickly destroyed by opposing archers. The elephants now risked being shot at and Pyrrhus and his knights were a cautious distance to their rear. In this unfavourable situation, the elephants decided to advance. They were met by opposing elephants, including the C-in-C. The odds were not good, but the dice gods favoured them, and I 6-1ed the C-in-C, doubling him. If Brian used his +1 the damage was worse, as he still died, fleeing into a HCh. He chose to die on the spot. All but one of my elephants was quickly destroyed, but the last one hatched a devilish scheme; attacking an elephant that had fled to the baseline. The hope was to lose, as he’d flee into a sub-general! He succeeded in this low devise, and in true Pyrrhic fashion succeeded in demoralising the command!

Just before contact. The elephants are almost in contact, while the Oscans are still a turn or two off. The game mat is one that I got on eBay from Poland. I’m pretty happy with it. The picture is another of Keith’s

Another picture by Keith of the same point. The psiloi can still be seen in the marsh on the left flank. The central command has a couple of elements of pike in reserve to replenish the back rank of the pike block; they are struggling to keep up.
My two remaining commands were now facing two headless chicken commands and the low PIP one. We ran out of time, but it was still closely balanced, although the Oscans were starting to look dangerous. All in all a great battle with its chaotic elephant battles!

The end of the battle with the Oscan auxilia looking dangerous. Even the camp was on the move!
For my last battle I faced Andrew’s Akkadians. I was the defender, for the first time in the competition. I deployed anchored on two patches of boggy ground. It was an interesting matchup against fast pike, and the Akkadians swept in very fast. However, the Epiriots proved too good, beating them at every point. In particular, the Akkadian horde on the hill facing the Oscans proved absolutely cowardly, and in the centre the Akkadian general, facing hoplites, was flanked and when the dice came up equal, the solid foot had the advantage and won.

Pyrrhus facing off against the Akkadians.

The Akkadian deployment.
However, it was Pyrrhus, in the only battle of the day he saw combat, that destroyed multiple elements. He came up into the battle line as it extended while his elephants tried to avoid facing psiloi. His inspirational leadership routed the enemy before him, and he took his second victory of the day.
This was my first victory against Andrew in a series of encounters that would have gone back to 2009, so I was pretty pleased. I suspect the unfinished bases of his troops may have demoralised them.
- Summary
The competition was a lot of fun. All the games were played in good spirits. I learned a lot about how hamlets work and came away considering a number of projects. Perhaps one day my Norse Irish will have a Brian Boru CP, or I’ll make a CWg for some Communal Italians. Also I will have to make a hamlet.
I’d like to thank Keith for organising the competition and for having me stay. The venue, the Woolston Club, was also really pleasant. I miss anything similar, to my knowledge, up in Auckland. Finally Comics Compulsion deserve thanks for running the overall competition.
More BBDBA
29 October, 2016
I had my third game of BBDBA and improved some more. I lost, but I could see where my deployment had not helped me, and I got closer to taking out a second command this time.
I took my Carthaginians against Nick’s Early Imperial Romans. I was the aggressor, which was to my advantage. The terrain was all on one side of the board, and I chose to have the terrain on my side. I’m not sure that was the best choice.

Roman deployment in three discrete commands.
The advantage of deploying second was one I’d not had before. The Roman command facing my left had most of their mounted, their light horse and cavalry. The centre had a combination of blade and auxilia. The right had knights and bow. I chose to try and focus on the centre and left, deploying in depth.

Carthaginian deployment across only two thirds of the battlefield.

From my left flank.

From the right flank.
This deployment didn’t entirely work. My high-PIP command was on my right. It tried to react to the Romans on its right by deploying elephants and cavalry to meet the approaching knights. I was let down by bad dice in combat and was close to breaking on this wing in rapid time. However, on the left flank my luck balanced out and I broke the command by destroying their light horse with my Numidians and then falling on the outflanked legionaries.
At this point my right command collapsed, and I had a small window in which to apply pressure on the Roman middle command, but despite flanking a legion with hoplites, they were 6-1 and my second command collapsed. I could (and did) complain about the dice, but my deployment was risky, and my response to move to the right even more risky. I seemed to forget that my high-PIP command was trying to survive, rather than try to attack two commands simultaneously.
The next day, I decided to set up the terrain again and try a few alternative deployments to see what I could have done differently. I tried out the Marian Romans and the Carthaginians. Looking at the two armies, I decided that the Carthaginians were the ones I wanted to take to Conquest. I also decided that I was still inexperienced about deploying the army as I’d only done it a few times. For practice, I had a couple of solo games. I put together an Early Seleucid army (II/19a) using my old fallback, the Goblins. The Carthaginians were the defenders.

Carthaginian deployment, with a command waiting to deploy on the waterway.
The Seleucids chose to take the side with the most terrain, so that they could deploy into the clear. Their commands were a central one of 12 pike and two psiloi, one facing the Carthaginian left of six elephants (assorted giants, ogres and trolls) three cavalry (actually accidentally 4!) and two psiloi, and on the right three LCh, three Kn, three LH and two Ps.

From the waterway.

From the other flank.

The Seleucids deployment.
The contact was swift and deadly. The Carthaginians moved psiloi on their left flank to ZOC the cavalry command. It worked, but the two psiloi died to enemy psiloi. Their spear were killing elephants with great effectiveness, but the ogres on the end of the line refused to die, even though they were flanked. This obdurance won them the game, as their SCh destroyed warbands and their left flank was not able to be troubled fast enough by the littoral landing.
I decided to try another game with the same terrain. This time I ignored the littoral landing gambit and went for the command that has auxilia and psiloi to be on the left flank. It was attractive to the knights, but not to the chariots and elephants.

The second attempt at Carthaginian deployment.
The command with most of the spear went in the centre, while the high-PIP command with the two elephants went on the right. It left the warbands in reserve, as they were pretty much a liability.
This more conventional deployment got the Seleucids to put the pike in the centre and the SCh and Kn on their right, while the elephants went on the right.

The Seleucid response.

From the flank.
Again contact came swiftly, but this time Carthaginians used high PIPs to move their auxilia across to face the SCh. However, the Seleucids responded by swapping the SCh and Kn in turn. When contact was made by the Seleucids, the SCh contacted mostly auxilia and the Kn spear, but one auxilia encountered knights. The knight commander was soon double-overlapped, but as an element of knight had been destroyed, along with some chariots, the battle on the Carthaginian left flank was in the balance. In the centre a pushing match ensued, where the Carthaginian spear refused to be intimidated by the pike. On the left the Carthaginians met elephants and cavalry with psiloi spear and cavalry. Their spear was as undaunted as in the previous battle and succeeded in destroying opposing elephants.
The Carthaginians eventually broke the command facing their right flank. Their spear was too resolute. In the centre, their commander was flanked and routed, but it was a solitary success. And the Campanian spear eventually flanked and destroyed the opposing knight commander to rout the second Seleucid command. This was their second kill, I think, as they got a knight on contact too. Androgeus, the Gallic headhunter, destroyed a block of pike, and I think a recoiling elephant destroyed a bit of the Seleucid reserves.
All in all, they were two fun games that helped me get more of a feel of the footprint of the different commands and how they interact. I’ll go to Conquest a little better prepared.
More on Allan Massie
3 September, 2016
I’ve now finished the Robert Harris trilogy on Cicero. It was very good, but it pales in comparison to Allan Massie’s books. I read his Augustus next, and loved it. Augustus is the narrator, and it is in two halves. The first he narrates to his grandsons Gaius and Lucius. It is optimistic; the second is narrated towards the end of his life and is much more gloomy. Massie paints a picture of somebody who is keen to present his legacy as a service to Rome; he has Augustus’ Res Gestae for this. He presents somebody who is perhaps not so self-aware as he thinks, as comes out when his dynastic plans go awry. Comments from Maecenas and Livia are particularly revealing.
I’d have to read Robert Graves’ I Claudius again (I read it as a teenager), but I think Massie’s portrayal of Livia is probably more believable. She’s a proud Claudian, not shy of reminding Augustus that she deigned to marry down to him!
One of the strengths of Massie’s books is that you very much get the perspective of the narrator, and it is biased. The scene he describes of the forging of the second triumvirate is similar in Augustus to in Mark Antony, which I’m reading now, but the differences are revealing. Augustus justifies himself, while Antony won’t talk of it, and it’s described by his secretary, Critias. I’ve not put the two scenes alongside each other, but the description of discussion of the proscription is modified.
Massie describes Mark Antony very favourably. His biggest failing is his sense of honour (something Ronald Syme suggests too). He would have been best to have crushed Octavian while he had the upper hand, but is described as having given his word, and therefore was not willing to do this. Massie’s description of Antony’s relationship with Marcus Brutus is fascinating; he gives a context for why Antony described Brutus as the noblest Roman at his funeral.
The varied takes on Brutus in the three books I’ve read by Massie so far are a nice illustration of how well he gets into the persona of his narrators. Mark Antony’s sympathy for Brutus contrasts with the antipathy, for different reasons, of Augustus and Decimus Brutus in the two earlier books.
Meanwhile, I have all the figures for the Thapsus BBDBA army. They are all primed and waiting to be painted. The Numidians are close to being done, and the Xyston Gauls and Spanish will mix nicely with the CB ones. It helps that I’m using CB shields. Plans to go to Conquest are also advancing. I had a couple of games of DBA with Nick a couple of weeks ago. We had a Marian Roman civil war, where his Romans with an elephant were undone by my use of Armenian cataphracts (and some good dice). My Seleucids against his Ptolemaics was the reverse, where my PIP dice were cripplingly low; the elephant and the scythed chariot are not forgiving of such dice. It was only that Nick had average combat dice that allowed me to hang around for as long as I did.
Recent Gaming
23 March, 2014
I’ve not kept up with reporting games I’ve played. Part of the reason for this is because I’ve only got a camera that is not all that satisfactory. I’ve taken better photos with my phone than with the small camera I’ve tried to use. The tripod is broken and can’t support the large camera I’d used for my gallery shots.
The other reason I’ve not been active on the blog is that I’ve been too busy painting (more in the next post). Anyway, I’ve played quite a lot recently, and had some very good luck. Here are some photos that aren’t too blurry.
- Battlecry, 16 Feb 2014
Last month I got along to Battlecry for a day of demo DBA games. We got a bit of interest and should be running a competition next year as a result of this. We played DBA 2.2, as noted earlier on MEDBAG.
My first game was against Joel, a historical matchup of my Early Seleucids against his Classical Indians.

Early Seleucids face Classical Indians.

The Indians up close (some are hidden behind the trees.

The Seleucids.
I should have been in serious trouble as the Indians came around my left flank in large numbers. However, they were obviously unfamiliar with scythed chariots, as mine proceeded to tear them to pieces. I came away with a lucky victory.

Chaos on the left flank.
Next I faced John, who’d just finished his Celtiberians. I used my Gauls.

Gauls v. Celtiberians.

View from the Celtiberian camp.
I managed to meet his warband with my cavalry and used this to my advantage in a battle on a narrow frontage.

Gallic cavalry triumphant.
I then faced Mike, who used my Carthaginians. I took my Syracusans. As we are both littoral, this involved a waterway, which ended up to my back. Mike went for a littoral landing.

Syracusan v. Carthaginians.
I hurried to advance to reduce the potential for the littoral landing party to make trouble. I was able to sack his camp (the crucified Syracusan was a provocation!) and used my longer line to outflank his elephants. Another victory.

The Tarantines return from sacking the camp.
I think we played some more games that I didn’t take pictures of. The last on my camera was my Syracusans against John’s Celtiberians. I don’t remember for sure if I won, but I think my luck was pretty strong, and I used my advantage in cavalry to compensate for the vulnerability of my spear to his warband.

Syracusans v. Celtiberians.
Unrecorded is our final BBDBA game of Carthaginians and Celtiberians against Romans and Spanish. This was officially a draw, but I’m sure the Romans had the edge when we stopped.
- Auckland City Guard
Since then, I’ve mostly played DBA 3.0. Joel’s visited after work a few times, and I’ve got to the City Guard again. We’ve had a lot of fun trying out his Aztec hordes of doom, and we tried out a number of permutations of knights against spear.
From memory the time before last we played: Normans v. Anglo-Danish, Early Crusaders v. Comnenan Byzantines, Aztecs v. Prefeudal Scots and Vikings v. Anglo-Danish. I think there was an Aztec v. Early Crusaders too.
Last weekend I took some photos:
Our first game was his Aztecs against my North Welsh.

The Aztecs meet the Welsh.

The Welsh with their South Welsh ally.
The South Welsh cavalry got in the way of his archers and the spearmen got flanked; however, the Welsh had been making progress against the important Aztec elements.
Next we played Ptolemy against Lysymachus. The Ptolemaic army was quite different from what I expected. I tried a littoral landing of three auxilia in a line with side edge contact with the waterway. It seemed legal and threw Lysimachus’ plans to meet this treat. I got a narrow victory in this battle.
We then tried Carthaginians against Gauls.

Carthaginians drawn up against Gauls.

Carthaginians with a random stack of skulls next to their camp.
The Carthaginians won in a battle stacked in their favour (though elephants don’t quick kill warband any more). Our final battle was the Carthaginians against Aztecs. I didn’t take any pictures of this. The Carthaginians took only one elephant, I think. They were lucky in a battle between their two 2LH and the Aztecs two 2Ps. I killed both of them, but had I not, my back was to a wood, and I’d have been very much at a disadvantage.
Camps, camps, camps
2 February, 2014
More than two years after I started them, I’ve finally finished four camps for DBA: Carthaginian, Roman, Syracusan and Seleucid.
- Carthaginian
Each of these camps is modular on two 40mm x 40mm squares. The tents are Baueda, the figures are a mixture of manufacturers.
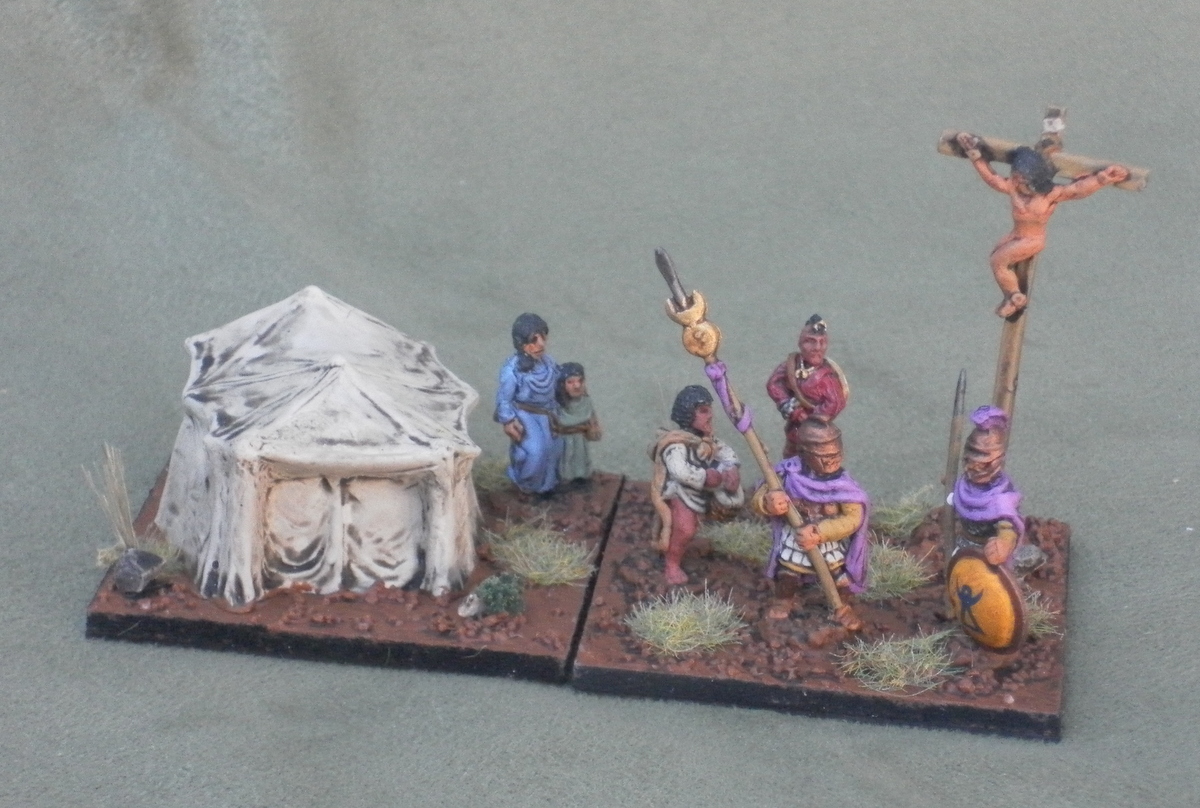
A salutary example to the Carthaginian general — his unsuccessful predecessor is crucified.
The female and her daughter next to the tent are Donningtons figures, as is the figure on the cross. The other figures are from a Freikorp command pack. I changed the shield on one figure for a Corvus Belli hoplon to make them fit better with the Corvus Belli army. I really like the transfer, which came out after I had painted this army. I’m tempted to expand the army to be able to be Early Carthaginian simply to be able to use this shield pattern! The figure on the cross is rather small, but it’s not as obvious as it was when they weren’t painted.

From the rear, the lion that the Libyan has is more visible.
The tableaux is rather busy, but I wanted to get the two guardsmen and the Numidian drummer and the Libyan with a lion into the camp.

Another view of the lion.
Carthaginians, like Romans and others in the ancient world, made use of crucifixion as a punishment. What the Romans found shocking is that they used it on citizens, and wealthy ones at that, who were criminal or simply unsuccessful.
- Romans

Romans checking the omens with the sacred geese.
This scene is made mainly with Essex camp followers or figures from a Hellenistic command pack. It shows a priest feeding the sacred geese. They should be chickens, but I only had geese figures, and they were sacred to Juno, so I figured they’d do. The priest is a Donningtons figure, the rest are Essex.

Another angle.

From the rear.

Yet another angle.
- Syracusans

Checking the omens with a goat.
This camp was inspired by one in Lead Paean. I’ve compressed my camp into smaller dimensions and don’t seem to have found the same figure for a priest. Most of the figures are Essex (the one leading the goat is an artillery figure). The woman and the priest are Donningtons. The altar is made of Green stuff and is supposed to represent a temporary altar made from cut turfs.

Another angle.

From the rear. The size of the woman in proportion to the Essex figures is noticeable from this angle.

Yet another angle.
- Seleucids

Bring out the loot!
Breaking with the theme of a religious rite that is found in many of my camps, this one shows some of the wealth of the Seleucids. It is a combination of Essex camp followers and Freikorp command figures.

Another angle.

From the rear. The shields I intend to use for the Argyraspides are visible.

Yet another angle.
These figures were useful in letting me trial how the Argyraspides will look when I paint them. I intend to do them next as part of seven stands of pike. Three of them will be the Argyraspides, who will have an optional command stand with Antigonus One-eyed as their general. They will have the same colour purple clothes as these figures. They have been ready to go for almost as long as the camps, but I may end up doing some rebasing first, so I’m not sure when I will get to them.
- Carthage crushes a mercenary revolt
I am very pleased to have finally finished these camps. I got to use one of them on Thursday when Joel came around. We played DBA 3.0. I was pretty tired, so I didn’t take any pictures. We had a Carthaginian civil war; I claimed to be Hamilcar Barca crushing the Mercenaries during the Truceless War; this claim was disputed, but we had one of the rascally rebels up on a cross to bolster our claim.
I ended up deploying between a large wood and a steep hill. The battle unfolded quickly with my spear being caught in column by the Gallic mercenaries. This was not good, as the whole column was ZOCed. I lost two stands of spear until I was able to get my Spanish auxilia across to support them; they won against an elephant 6-2, getting a narrow quick kill. From there my fortunes were transformed. The Spanish flanked the Gauls and the last element of spear held their ground to destroy both elements of Gauls. On the right flank my elephants, supported by psiloi destroyed some rebel spear to give me a skilfully wrought victory! I was sufficiently tired that at one stage Joel looked on in bemusement while I tried to flank my own Spanish auxilia!
This was a great victory under the inspired guidance of my new camp. It heralds a new beginning for an army that has struggled for form in the past!
More Imitation Legionaries
31 December, 2012

Late Hellenistic imitation legionaries. Two have red shields and could be Ptolemaic; the one with green shields would be Seleucid.
- Imitation legionaries
With a brief flurry of painting I go my Mithridatics ready for CANCON 2013. All my paints are in storage, so it took a bit of effort to get them out to do three 4Bd elements. I’d already prepped them, so they didn’t take long once I started. These elements allow me to field the late Ptolemaic and Seleucid armies. which have two and one element respectively. I’ll also use them to fill out my Mithridatic army.

From behind.
The figures are Freikorp Thureophoroi and Thorakitai; I’ve given them pila from old-style Freikorp Romans. They may not have used them, but it helps make them clearly imitation legionaries.

From the other side.
The Mithridatic army has five elements of imitation legionaries. I’ve decided to use one element of Romans, as Mithridates had some Marian exiles fighting for him; then there are two elements of Marian figures mixed with Thorakitai, but with Marian shields. And finally two of the new legionaries. It is a nicely hodge-podge collection of legionaries, in keeping with the rest of the army.

Mithridates’ legionaries: the two blue-shielded elements have a mixture of Marian Roman figures and modified Thorakitai. The middle one are straight Romans, exiled supporters of the Marian faction. The last two have more obviously Hellenistic equipment.
- CANCON
As I mentioned in an earlier post, I’m attending CANCON next year. I’m looking forward to it. I didn’t play that much DBA last year, though I started to get a few games in November. I’ll be taking a few armies to Oz when I return; I reckon I can get all my Classical armies (though I’m leaving behind the Ancient British chariots, LH and extra Ps to make room. As it is, I’ll have a stack of armies for the period of around 300 BC to the start of the principate. One army that doesn’t fit is the Komnenan Byzantines, who I need for the second day of CANCON. I’ve used it before and like it, not that I’m terribly successful with it. My other armies from Books 3 and 4 are either not finished, needing to have their bases upgraded, and/or not very competitive. I was tempted to try the Pre-feudal Scots; they’re not terrible, but are a bit of a challenge. If I wanted to keep with a similar army for the first day, I could have gone with the Syracusans. However, I’m keen to use the SCh before it is emasculated, so Mithridatics it is; I can make a fairly spurious link with the Komnenans by pointing out they’re from the same region!

Another shot of the Mithridatic legionaries.
- Mithridatics completed
The Mithridatics are a somewhat cheesy army for competitions in Australasia, as down here you are generally allowed to choose what elements you’ll use before each battle. The option to substitute five 4Bd for a SCh and four 4Pk allows you to transform the army’s capabilities. Against most foot the blade are very powerful, but against armies with a lot of knights the combination of pikes and a scythed chariot should be pretty potent. That said, I’m unsure what to field against armies with pikes and knights, though I suspect the blades are a better bet.

The Mithridatics arrayed with the legionary option.
The army has a strong selection of BGo troops; it’s able to vary the combination of Auxilia and Psiloi to give more rear support for the blade, or to create a block of three Auxilia with one Psiloi for support. The army also has a choice between a 3Kn, a 3Cv and a 2LH. The 3Kn is probably the most useful, but I really like the figures for the 3Cv and I don’t get to use them enough.

The same army from another angle.
I’ve updated the Mithridatics army page too.
Legionaries, imitation or otherwise.
28 November, 2011

Pontic Imitation Legionaries and the first of the Marians.
The Mithridatics are a bit closer now with the first of their imitation legionaries done. The blue shields are imitation legionaries, the red shields are Marians. These are Freikorp figures; For the imitation legionaries two on each element are Marians, one of an older vintage, and one each of the newer ones. The other two are Hellenistic thorakitai with scuta instead of thurioi and pila from the old vintage Marians. As mentioned in earlier posts, I’ve used VVV transfers, which I think look pretty effective.
The Marians have a centurion, two of the new vintage figures, and one of the old ones. I plan to have a centurion on each element, for colour, but also as they were so significant to the functioning of the legions. I’ll probably do pairs of shield designs for them, so that there will be some four ‘legions’ in the DBA army.
I think the figures look pretty neat, though I missed some major flash on some of the new figures; it’s very prominent on one of their faces!

From the side.
Now I’ve got these figures done, I just need to do the three elements of Ptolemaic and Seleucid imitation legionaries, who have thurioi. Then I can field later versions of these armies, as well as the Mithridatic option of five 4Bd.

The other side.
The Marians should be pretty quick to do now that I’ve established that these transfers work, though whether they’re next on the to do is another question.

From the rear.
After the Ptolemaic and Seleucid imitation legionaries, I could do some more pike; they’re all prepped; it’s just I’ve scuttled off onto other projects. And I could still be tempted to do Bruttians, again prepped, or Numidians instead of these pike. There are also some camps to be done when the mood takes me!
Elephants galore and variety aplenty!
10 November, 2011

All the elephants arrayed. Not quite enough yet for a whole army, but getting there!
Well, I’ve got some Gauls and some pikemen on my painting desk and the Gauls are all but done now (I think I started them this time last year!), but three elements of elephants jumped the queue. They are quicker to do and allow me to field a number of successor armies straight away. This made them more inviting as I got back into painting after a couple of months’ break. In the process of doing them I got the Gauls nearly done too.

The Seleucid elephant, now with skirmisher support, faces off against the Ptolemaic one.
Along with the three elephants (two early successor and one Ptolemaic), I did four archers as skirmisher support. I added one onto the base of the Seleucid elephant I’d done earlier, as particularly in the later period they deployed the elephants with a lot of surrounding skirmishers.

The Ptolemaic elephant; it is an African one and smaller than the Asian ones. Note the goad that I made for the mahout.
The figures are all Freikorp and I think their elephants are excellent. They are easy to assemble, well animated and their seems to be (to my inexpert eye) a distinction between the African and Asian ones. The Ptolemaic elephant is smaller and has different ears. As these figures don’t come with goads for the mahouts I made them using the ends of lead spears that I’d cut down for javelins. I flatten the end, cut a split in it and bent one side into a hook and gently filed the two end to points. The hooks are perhaps bigger than they should be, but they look the part and were quick and easy to make.

From the other side with its skirmisher support.
The Ptolemaic elephant will also be used as a Pyrrhic one, meaning that with the xystophoroi that I did a while back I can now field the early Ptolemaic and the Pyrrhic armies.

Early Successor elephants ready to go against each other (when I get more pike painted!
The pair of early successor elephants, without towers, allow me to field a number of the armies starting with Alexander, though I need to get some unshielded cavalry to be fully accurate. They allow fights between successor armies (when I get more pikemen painted) and me to field the earliest Seleucid army with two elephants.

The two elephants ready to serve in the early Seleucid army.

From another angle.

And yet another.
Getting these guys to sit on the elephants provided a bit of drama. When my first attempt failed I tried araldite, which is too slow to set, then pinning, which was a travesty. Finally I tried again with super glue and it was quite straight forward, but if you look at the mahout on the blue elephant you’ll see his slightly grey beard and a mark on his chest reveal the scars of this exercise!
Next up, when I get time, will be the Gauls, who allow me to field the Gauls, the Carthaginians and the Syracusans all at the same time. Then I’ll either buckle down to doing seven stands of pike, or I’ll do some smaller projects, such as a 4Bd for the later Seleucids, and some of the cavalry for that ‘d’ list (who can be used for the Mithridatic one too).

