Conquest 2018, Pt. 3
17 November, 2018
The final day of Conquest was three BBDBA games. A lot hinged on the initial dice roll for who was the invader and got to set up second. As an army characterised by Phil Barker as particularly aggressive, the Later Carthaginians should have had the advantage here, but on this occasion they allowed themselves to be invaded for the first two battles.
- 1. Polybian Romans (Keith)
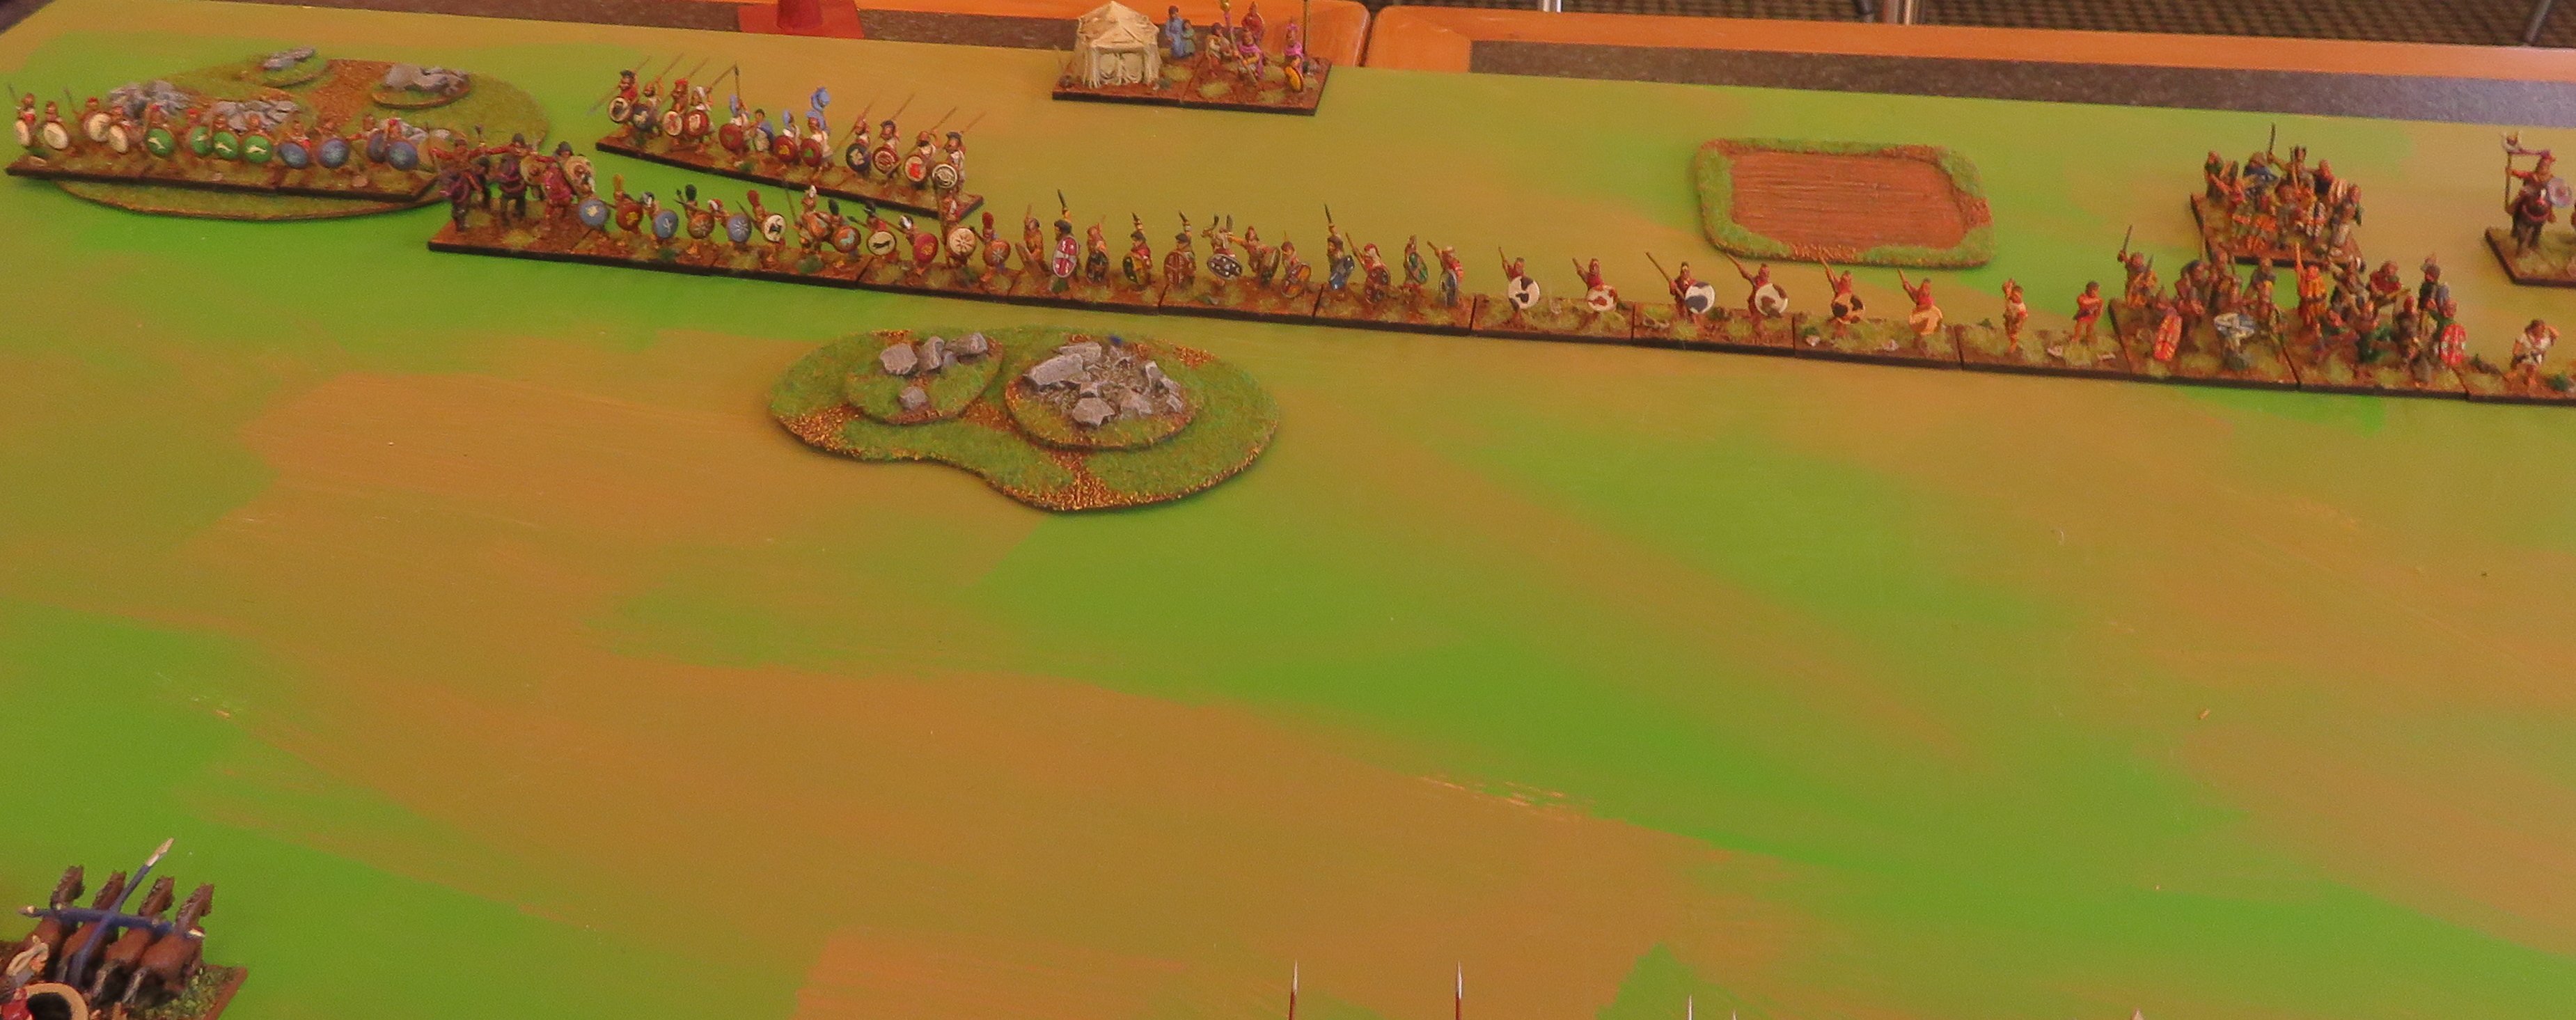
The first battle was against Keith’s Polybian Romans. I placed two large marshes and a difficult hill. The command with the Gallic Warband commander set up behind the hill; the spear were in the middle and the left flank with the C-in-C had a marsh occupied with two psiloi.

The Carthaginian right flank and central commands.

The two armies opposed; the Carthaginian left flank command can be seen in the foreground.

The Roman right flank and centre.

Their left flank.
I came to realise that the terrain was not working to my advantage, and things stagnated with neither side able to make much progress in the time was called. On the left flank the cavalry had to retire before the advancing foot.

Initial advances.

Working at correcting things.
On the right flank the warband struggled to move over the hill, and the command range of the commander slowed down the advance of the psiloi, who were needed to support the Spanish scutati.

Slow progress on the right flank.
At the time the game ended the Carthaginian centre was almost broken (a flanked spearman refused to break), the warband were starting to put pressure on the right flank, but were disorganised by the hill. On the left flank a stalemate had resulted.
- 2. Athenians with Thessalian allies (Colin)
Against Colin’s Greeks, the Carthaginians were again defending. Colin had cavalry seeking to destroy exposed psiloi on my left flank, and on the right flank they had Thessalian cavalry facing the Numidians.

Athenians with Thessalian allies on their left flank.]

The opposing Carthaginian left flank.

Their right flank and centre.
Things did not go altogether to plan for the Greeks, and the Athenian cavalry were briskly destroyed by valiant Libyans. This precipitated a collapse on that flank.

Libyan javelinmen gloriously see off Athenian cavalry, while Numidians rush to fill an anticipated gap.
The Numidians were trying to bolster the threat to the left flank. As it turned out, two of them could turn round, while two stayed to exploit the advantage. The Athenian light troops were no match for the Spanish, and soon the Gauls were ululating their way forward.

The Athenian right flank starts to fold as their light troops break and the Gallic warbands surge forward.
On the other flank, things were not so happy.

Thessalians have the Carthaginians at a disadvantage.
However, the Carthaginians had a lucky escape, when the Thessalian commander was killed.

Disaster for the Thessalians as their commander is killed.
For all this, the Thessalian cavalry still had the Carthaginians at a disadvantage.

Despite the loss of their general the Thessalians continue to apply pressure.
The Gauls broke the Athenians right flank, but not before two warbands were broken. They spent a few turns mopping it up (in hindsight I should have remembered that it should have been removed after losing half of their elements; this was possibly crucial). Meanwhile, the Carthaginian centre was faltering and eventually broke.

The Carthaginian centre breaks.
When time was called I need one more element to win. I might have got it had I remembered that a command is removed as soon as half of it has been destroyed; I might have gained an extra turn to get that last element. For all that, I was under pressure on the right flank and had my centre collapsing.
- 3. Seleucids (Gordon)
Finally, in the last game I was the aggressor against Gordon’s Seleucids. I exploited this to the hilt in choosing which commands faced which.

The Seleucid left flank facing Carthage invading Syria.

Their centre and right flank.
Taking note of where the Seleucid cavalry was, the Carthaginians chose to have their light troops in the centre to face the phalanx. Their spearmen would hold the right flank defensively, and the cavalry on the left flank could exploit their numbers against psiloi and light horse, while the Numidians faced the xystophoroi.
The Carthaginians meet the phalanx with light troops and the elephants and chariots with spearmen.

Massed cavalry face the beleaguered Seleucid right flank.

The two armies opposed.

The light troops advance while the spearmen wait.

Cavalry swarm forward on their left flank.
The Seleucid scythed chariots proved ineffectual, and the centre and right flank waited while the left flank sought to exploit its advantage. It did this rapidly. It lost two Numidians to the xystophoroi, but in the end prevailed so that the cavalry could chase down the exposed psiloi. Meanwhile, the rest of the Seleucids were advancing, but were unable to gain a significant advantage, and the phalanx was waiting to be rolled up on its exposed flank. At this point the Seleucid general capitulated.

The Seleucid right flank has collapsed and the phalanx is defenceless. The Seleucids capitulate.

The Seleucid elephants on their left flank had routed some Spanish scutati, but overall had made little impression in the short time they had before their other flank collapsed.
I was pleased with how the Carthaginians performed. I think the aggression dice is hugely significant for BBDBA. I wonder if deploying with alternating commands might not reduce this a little.
Browny-con
8 October, 2018
Browny-con was organised by Grant at his house and was a great success — 8 players and six rounds of DBA. We used a scoring system, but were relaxed about army choices, going for match-ups at each round.
A few missed games at either end missed all the rounds, and we scored 5 pts for a bye. Otherwise it was 8 for a win, 1 for a loss and 0 for a draw and you subtracted losses for your win and added kills for your loss or draw. The scores were:
Benny 35
Mark 32
Simon 30
Grant 28
Dave 26
Philip 24
Joel 23
Nick 18
Camps sacked and generals killed were (Camps sacked – Generals killed):
Benny (0-2)
Mark (0-1)
Simon (0-0)
Grant (1-2)
Dave (0-1)
Philip (1-0)
Joel (0-0)
Nick (0-1)
My games were:
1. Mitanni v. Sea People (Philip)
The Mitanni destroyed the Sea People using their light option (Psiloi and Fast Auxilia). It was their six chariots that proved superior to the auxilia and fast blade they met.
2. Campanians v. Polybian Romans (Joel)
Joel fielded a lovely BUA (Diocletian’s palace). I had him have it on his side and charged into contact with him, hoping to win on my left flank where I had fast auxilia and cavalry against his cavalry and psiloi. My centre crumbled (hoplites not enduring against blade), and things looked hopeless when my general 6-1ed his to turn around the game. I then destroyed the psiloi and cavalry on my left wing. It was a very jammy victory!
3. Mitanni v. Ugarit (Dave)
What I did to Joel, Dave did to me. I had the factors, I thought, in this battle — I had solid auxilia facing fast auxilia and I had a LCh facing a psiloi on the other flank. The dice went against me and I was 6-1ed repeatedly, losing my General and five other elements in an absolute rout.
4. Mitanni v. Midianites (Grant)

Mitanni face Midianites.
After lunch I faced Grant’s Midianites, and was grateful to finally be defending, avoiding sand dunes. I went for my heavy option of solid auxilia and solid bow. The battle was tipping in Grant’s favour when one of my bow was destroyed, but the dice went my way and I rolled up his flank and won quickly.
5. Late Carthaginian v. Pyrrhus (Benny)

Carthage faces Pyrrhus.
This was a game I thought I had; I managed to get my elephant to face Pyrrhus. All I had to do was QK his Kn general. Unfortunately, to do this I’d moved the elephant in front of a pair of Gallic warbands. If I’d moved the warbands first, I might have avoided this. It was a sideways shuffle. Predictably the elephant had to recoil — twice! On my left flank a psiloi was destroyed by an enemy one, allowing it to close the door on my auxilia, ending the game.
I was lucky to avoid losing two LH to a situation on the other flank. Benny’s LH and cavalry had advanced on opposite sides of the hamlet, so they were not lined up. The Numidians were positioned to ZoC both of them. Benny attacked with the Cv and the Numidians conformed (as he couldn’t). He then could close the door with the LH. Fortunately I won the battle. It’s an odd situation. Benny’s cavalry couldn’t advance as a group, as they weren’t one. He didn’t set out to create such a situation, but it was a nasty one.

Numidians before being attacked by cavalry with a LH overlap.
6. Mithridates v. Marian Romans (Nick)
Nick’s bad luck continued. He took an artillery element in the middle of his legionaries. It faced my Sarmatian Kn flanked by pikes. On my left flank the Romans had more BGo troops than I did facing each other across a wood. Nick’s PiPs were terrible, which prevented him from moving into the woods. He attacked with his legionaries, leaving a gap for the artillery to continue shooting at the Sarmatians. I was lucky to avoid losing anyone in these attacks, but got to charge the Sarmatians at the artillery and close the door on the legionaries in the gap with some LH. The gap widened, and after surviving a turn the artillery was destroyed. This gap was one that the Romans couldn’t fill, hampered by bad PiPs and poor combat dice.
It was a great day; most of the battles played very quickly. There’s talk of getting some HoTT armies together next.
Recent games
7 October, 2018
This year I’ve not had many games of DBA, but I’ve enjoyed the ones I’ve played. In the middle of the year we had a series of games organised by Grant at his house that he called Browney-con. I’ll finish the write-up some time soon. Otherwise, last month I caught up with Nick for a game of BBDBA at the AWC. My Carthaginians lost to his Polybian Romans, but I did take away from it a better combination of commands.

Carthaginians (right) facing invading Polybian Romans last September.
This weekend we had more games at the AWC (no photos this time). My Carthaginians went against Nick’s Polybians again. I was the attacker, and made things difficult for myself by deploying first! I possibly created an opportunity for myself, as my left flank was the high PIP command with all my Cv and LH. My right flank ended up in rough going against Nick’s high PIP command of Cv and 4Ax. Great dice allowed me to redeploy four of the Numidians to the right flank. In a tight encounter they managed to destroy that flank for the loss of only one Numidian. However, the command on that flank collapsed on the same turn, losing their Wb commander and two of their Scutarii.
Remarkably, the centre of Sp was unharmed, as was the left flank, apart from the Numidians that had done their march. That flank was in a stalemate with the Triarii. In fact, the spearmen were overpowering the Legionaries, and had inflicted a loss, as had the Wb general before he was killed.
The battle came to a conclusion with the Numidians ignoring the two demoralised commands facing each other and marching to the centre of the field to attack psiloi there. The spearmen had another success and in the last turn completed their great performance by killing another element of legionaries. The Numidians had already broken the command, however, with their attacks on psiloi, and the Roman high PIP command lost their general too.
After lunch we had two games of DBA. My Mittani were unsuccessful against Grant’s Midianites and Kieran’s Minoans, whereas Nick’s newly painted Later Crusaders were successful against Kieran’s Japanese, and Grant’s Ayyubid Egyptians. It was a really enjoyable day and there’s talk of more games too; hopefully we can get a campaign underway.
Conquest, part 2, Saturday, DBA
8 November, 2016
I took a morning flight to Christchurch, which all went smoothly. I even saw Comics Compulsion, the shop that hosts Conquest, while catching a bus from the airport. The first day was six games using ancient armies for the first three and medieval for the last three.
- Morning games (Ancient armies)
My Carthaginians were my army for the morning. With an aggression of 4, I was pretty sure I’d be the attacker most games, and I was. I fielded 2 Cv (cmd), 1 El, 1 LH, 3 Sp, 2 4Wb, 1 4Ax and 2 Ps.
- Game 1: John (Polybian Romans)
As expected I was the attacker against John, who was borrowing Keith’s Polybian Romans. I should have made him deploy on the side with the wood. It proved to be a handicap to me.

The Carthaginian deployment is cramped by a large wood.
The Romans advanced rapidly, and I lost my Numidians by foolishly trying to get them in front of the woods when before the Roman cavalry arrived. My troops fought doggedly on the right flank, and I started to win on the left, but that needless loss of the Numidians cost me the game, which was a 3-5 loss after the warband was broken, and the auxilia and a spear.

The end, after casualties on the right flank, but success on the left.
- Game 2: Mark B (Palmyrans)
I was the attacker again against Mark’s Palmyrans. I was nervous of his cataphracts, but he was even more nervous of the elephant. He deployed near the camp and spent time manoeuvring. I rushed forward, reasoning that I had more hope of catching him before he’d finished his manoeuvres. As it turned out, I won a decisive victory in record time, as his general went against Androgeus while overlapped. 3-2 odds with knights against warband is good odds, but with is back against the wall, Androgeus 6-1ed the unfortunate general and added another head to his collection.

The Palmyran deployment.
- Game 3: Jim (Greco-Bactrians)
My last game of the morning was against Jim’s Greco-Bactrians. In this game I was able to extend my left flank enough to destroy three elements, but in the last turn I couldn’t find any more there, and my centre was buckling to the pikes they faced. I lost again, 3-4.

The Greco-Bactrian deployment.
- Afternoon games (Medieval armies)
In the afternoon I deployed my Komnenan Byzantines. These are similar to the Carthaginians in their use of mercenaries. They differed in having aggression 1. I fielded 4 Cv (cmd), 4 LH, 1 3Kn, 1 4Bd, 2 4Bw.
- Game 4: Gus (Mongols)
First up I was the defender against Gus’ beautifully painted Mongols. I achieved a very rapid victory; 4(G)-1, I think. I can’t remember the details, except that my dice were very strong.

The Mongol deployment.
As the game was over so fast, we had a rematch. Again I was the defender. Again it was a quick battle, but this time it might have gone Gus’ way, but my monks clearly were praying harder, as my dice again stayed strong. At one point our generals were each overlapped, but it was mine that triumped in a 4(G-2 victory!

The Mongol rematch.
- Game 5: Brian (Medieval Scandinavian Union with Medieval German ally)
My next game was against Brian’s Medieval Scandinavian Union with Medieval German ally. I was the attacker this time, and Brian had to use a waterway. I knew Brian was a tough opponent, and when I saw he had a party set aside for a littoral landing, I stymied it with my light horse, that deployed up against the waterway in two columns.

The light horse patrol the beach.

The landing party of 3Bd and Cv off to the side.
The landing party had to deploy behind the main body of the Scandinavians. Low PIPs made the initial contact slow, but when it came the Byzantines continued to roll high in combat and broke an element of 6Kn, and then another. It was 3-0 to me. However, getting the final element was not easy, and when Brian got his spearmen into combat I lost both the bow. In the final turn I finally got my fourth element, only to lose my knights (I think) to a 6-1 going against me. The battle ended as a 4-4 draw.
- Game 6: Keith (Wars of the Roses English)
I was the attacker in my final battle, against Keith’s Yorkists. Tired after the last battle, and bereft of inspiration in the face of unattractive terrain, I nevertheless attacked (the artillery made it hard to sit back). I foolishly got my light horse destroyed and lost 0-4.

Facing the English.

The Yorkists.
I enjoyed the day greatly. I was very pleased with the way I played against Brian, who I’d played before some years ago. He finished first. I was surprised to finish third, as I had only two wins, but these were big ones, and all but my last battle were hard-fought.
DBA Day at the AWC
10 October, 2016
Sunday a week ago there was a very successful DBA day at the Auckland Wargames Club. As it led to other projects being planned, I’ve not got around to writing up any report until now. The format was friendly games; no set armies or points. I had five very enjoyable games.
- 1 – Marian Romans v. Alexandrian Imperial
My first game was against John, whose army is still being painted, so he borrowed figures from me. I’m pleased to say that they knew who their paymaster was, and fought accordingly!

A bird’s-eye view of the Marian Romans.
I was the defender and laid down some Marsh and ploughed fields (I’d just made some new terrain; I realised later that Marsh is not valid for Arable armies). Appropriate to the weather that day the fields were boggy.

The Romans, complete with an elephant.
![[a666: The Alexandrian deployment.]](https://hesperiana.files.wordpress.com/2016/10/a666.jpg)
The Alexandrian deployment.

The situation at the end. Not a single companion cavalryman left!
The surprising resilience of the Kappadocians secured a quick victory.
- 2 – Prefeudal Scots v. Vikings
The second combat was against Kieran’s Vikings. Again I was the defender and went for a marsh and a wood, which ended up being in the same corner.
The Viking invaders of Scotland.

The defenders of Scotland (helped by some friendly Vikings on their right flank.
The battle was a close one, where the Scots won first blood, when the Galwegians broke an element of Vikings. However, the centre was somewhat of a stalemate, with a lot of toing and froing. On the Scots’ right their Viking allies did good execution and contributed to a close-fought 4-2 victory. Terrain and the greater mobility of the Scots were significant factors.

The finals situation; the wood has saved the fragile Scots left flank. Their Viking allies have hared up the field on the right flank, while a schiltron has collapsed in the centre.
- 4 – Later Macedonians v. Polybian Romans
After lunch I faced Joel’s freshly painted Polybian Romans. I decided I really should get my Later Macedonians out to meet them. Naturally in the face of unprovoked Roman aggression I was the defender again. I took two large terrain pieces to anchor my flanks and restrict the battlefield to the advantage of the phalanx.

The valiant Macedonians line up to hold Roman depredation at bay.

Scurrilous Romans set on spreading tyranny.
The battle was close fought, with the battle going in the Romans’ favour on their left flank, while the Macedonians secured the advantage on their own left flank, destroying both elements of Roman velites. However, it was the steadfastness of the Macedonian blueshields that secured victory; despite being flanked by Roman cavalry they repeatedly refused to break. In the centre the Galatians made noble execution of Roman legionaries and the whiteshields (leukaspides) broke their opposing legionaries.

The situation at the end; the Macedonian right flank is lucky not to have broken after their light horse fled, but the centre has triumphed.
- 3 – Later Macedonians v. Polybian Romans
Actually, there is a report that prior to this battle the Macedonian general was troubled by a nasty dream in which his thureophoroi proved his undoing. Romans report that this was an actual battle, but the more reliable Greek chronicler disagree (the battle just described was actually our second, as the first was over so fast!). The Macedonians defended again. Their terrain was too small to constrain the battlefield.

The Macedonian deployment.

The Roman deployment.
The Macedonian thureophoroi attempted to defeat the Roman velites and were disgracefully defeated (they are prone to this; witness their routing by Spartan artillery). Philip V tried to stabilise things, but was defeated himself; the battle was over without the main lines having contacted.

The final position. The thureophoroi were quickly routed and Philip was flanked and defeated. There was a scary big hole in the Macedonian line.
- 5 – Prefeudal Scots v. Carolingian Franks
The last battle was against Mike’s Carolingian Franks. The Scots had got on their boats and visited France. It didn’t go well for them.

The Carolingian Franks. The red beads denote those that can dismount.

The Prefeudal Scots.
How the Galwegians got to be in the centre facing knights I don’t remember (I think I deployed and then moved the line along a bit to fit it in the legal area and didn’t check who was facing who. Unlike the bold Kappadocians at the start of the day, the Galwegians didn’t produce an upset against the Carolingian commander. The schiltons were under pressure and collapsed, but not before a few knights had fled in the face of the Scots cavalry.

The final situation after the Scottish centre had collapsed.
All in all, it was a great day; there is another account of it here, and there are plans for more DBA action there soon.
Pokeno Invitational
7 February, 2015
Well, it’s been a while since I’ve posted anything. A few weeks back I had my first gaming of the year, a chance to catch up with Joel and John and to see Keith for the first time in a good long time. Keith has already posted about the day, which was really enjoyable. I lost most of my games and at the time complained of poor dice, but on reflection it was really poor planning — plans that depend on good PIP dice aren’t really plans, but endeavours in blind luck! Nevertheless, it was a lot of fun and it was good to see armies out on the table that haven’t been used in a while. My Comnenan Byzantines were used twice, as were my Normans (as Early Crusaders). My Polybian Romans and Late Carthaginians were also used (oddly we had three games going simultaneously first with the Romans on one side each and then the Carthaginians). Pyrrhus’ army, Prefeudal Scots and Saxons completed the turnout.
After that day, John and I continued at my house with a game of Song of Blades and Heroes. It was a chance to use the Gnolls and some terrain. The fight at a bridge resulted in the Gnolls losing decisively against some Normans. The bridge was a bottle neck that probably favoured the superior firepower of the Normans, though the Gnolls did get to achieve a few consolation kills.
The gaming renewed my enthusiasm for painting, and I’ve got my four blocks of Successor 4Pk closer to completion, but other projects still manage to finish before them!
Recent Gaming
23 March, 2014
I’ve not kept up with reporting games I’ve played. Part of the reason for this is because I’ve only got a camera that is not all that satisfactory. I’ve taken better photos with my phone than with the small camera I’ve tried to use. The tripod is broken and can’t support the large camera I’d used for my gallery shots.
The other reason I’ve not been active on the blog is that I’ve been too busy painting (more in the next post). Anyway, I’ve played quite a lot recently, and had some very good luck. Here are some photos that aren’t too blurry.
- Battlecry, 16 Feb 2014
Last month I got along to Battlecry for a day of demo DBA games. We got a bit of interest and should be running a competition next year as a result of this. We played DBA 2.2, as noted earlier on MEDBAG.
My first game was against Joel, a historical matchup of my Early Seleucids against his Classical Indians.

Early Seleucids face Classical Indians.

The Indians up close (some are hidden behind the trees.

The Seleucids.
I should have been in serious trouble as the Indians came around my left flank in large numbers. However, they were obviously unfamiliar with scythed chariots, as mine proceeded to tear them to pieces. I came away with a lucky victory.

Chaos on the left flank.
Next I faced John, who’d just finished his Celtiberians. I used my Gauls.

Gauls v. Celtiberians.

View from the Celtiberian camp.
I managed to meet his warband with my cavalry and used this to my advantage in a battle on a narrow frontage.

Gallic cavalry triumphant.
I then faced Mike, who used my Carthaginians. I took my Syracusans. As we are both littoral, this involved a waterway, which ended up to my back. Mike went for a littoral landing.

Syracusan v. Carthaginians.
I hurried to advance to reduce the potential for the littoral landing party to make trouble. I was able to sack his camp (the crucified Syracusan was a provocation!) and used my longer line to outflank his elephants. Another victory.

The Tarantines return from sacking the camp.
I think we played some more games that I didn’t take pictures of. The last on my camera was my Syracusans against John’s Celtiberians. I don’t remember for sure if I won, but I think my luck was pretty strong, and I used my advantage in cavalry to compensate for the vulnerability of my spear to his warband.

Syracusans v. Celtiberians.
Unrecorded is our final BBDBA game of Carthaginians and Celtiberians against Romans and Spanish. This was officially a draw, but I’m sure the Romans had the edge when we stopped.
- Auckland City Guard
Since then, I’ve mostly played DBA 3.0. Joel’s visited after work a few times, and I’ve got to the City Guard again. We’ve had a lot of fun trying out his Aztec hordes of doom, and we tried out a number of permutations of knights against spear.
From memory the time before last we played: Normans v. Anglo-Danish, Early Crusaders v. Comnenan Byzantines, Aztecs v. Prefeudal Scots and Vikings v. Anglo-Danish. I think there was an Aztec v. Early Crusaders too.
Last weekend I took some photos:
Our first game was his Aztecs against my North Welsh.

The Aztecs meet the Welsh.

The Welsh with their South Welsh ally.
The South Welsh cavalry got in the way of his archers and the spearmen got flanked; however, the Welsh had been making progress against the important Aztec elements.
Next we played Ptolemy against Lysymachus. The Ptolemaic army was quite different from what I expected. I tried a littoral landing of three auxilia in a line with side edge contact with the waterway. It seemed legal and threw Lysimachus’ plans to meet this treat. I got a narrow victory in this battle.
We then tried Carthaginians against Gauls.

Carthaginians drawn up against Gauls.

Carthaginians with a random stack of skulls next to their camp.
The Carthaginians won in a battle stacked in their favour (though elephants don’t quick kill warband any more). Our final battle was the Carthaginians against Aztecs. I didn’t take any pictures of this. The Carthaginians took only one elephant, I think. They were lucky in a battle between their two 2LH and the Aztecs two 2Ps. I killed both of them, but had I not, my back was to a wood, and I’d have been very much at a disadvantage.
Camps, camps, camps
2 February, 2014
More than two years after I started them, I’ve finally finished four camps for DBA: Carthaginian, Roman, Syracusan and Seleucid.
- Carthaginian
Each of these camps is modular on two 40mm x 40mm squares. The tents are Baueda, the figures are a mixture of manufacturers.
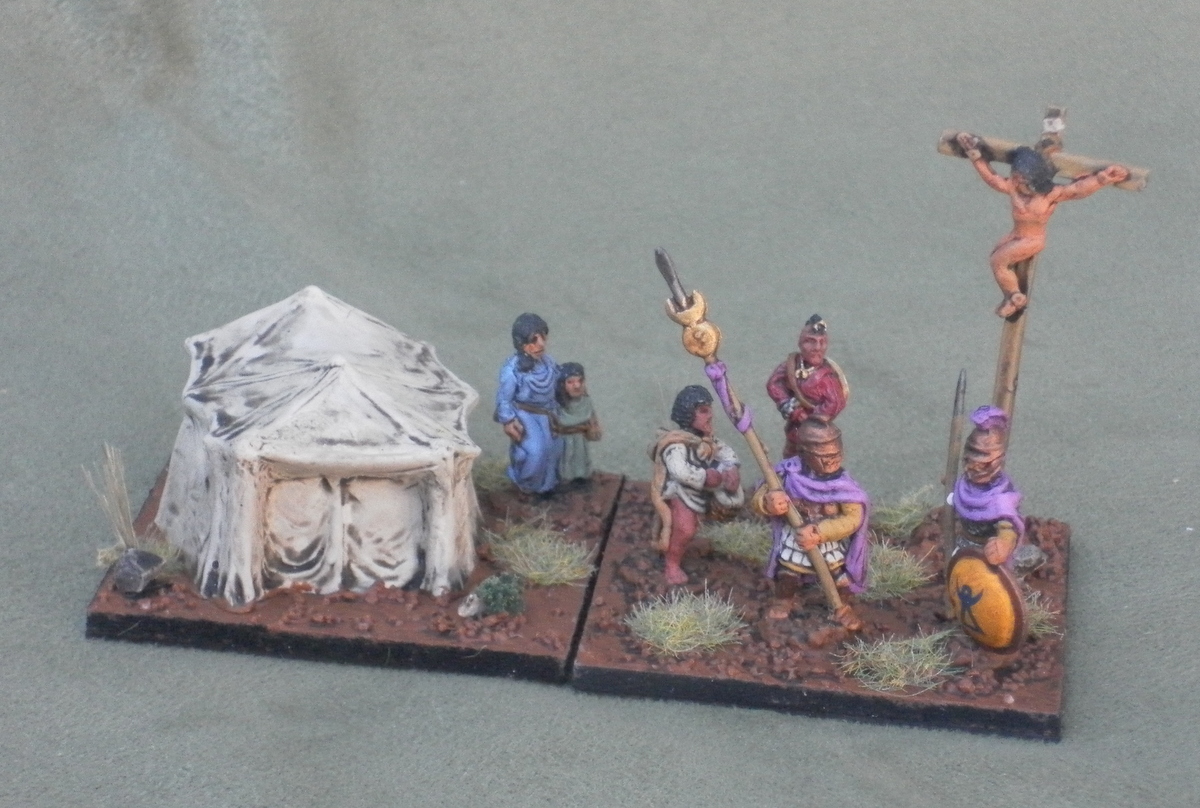
A salutary example to the Carthaginian general — his unsuccessful predecessor is crucified.
The female and her daughter next to the tent are Donningtons figures, as is the figure on the cross. The other figures are from a Freikorp command pack. I changed the shield on one figure for a Corvus Belli hoplon to make them fit better with the Corvus Belli army. I really like the transfer, which came out after I had painted this army. I’m tempted to expand the army to be able to be Early Carthaginian simply to be able to use this shield pattern! The figure on the cross is rather small, but it’s not as obvious as it was when they weren’t painted.

From the rear, the lion that the Libyan has is more visible.
The tableaux is rather busy, but I wanted to get the two guardsmen and the Numidian drummer and the Libyan with a lion into the camp.

Another view of the lion.
Carthaginians, like Romans and others in the ancient world, made use of crucifixion as a punishment. What the Romans found shocking is that they used it on citizens, and wealthy ones at that, who were criminal or simply unsuccessful.
- Romans

Romans checking the omens with the sacred geese.
This scene is made mainly with Essex camp followers or figures from a Hellenistic command pack. It shows a priest feeding the sacred geese. They should be chickens, but I only had geese figures, and they were sacred to Juno, so I figured they’d do. The priest is a Donningtons figure, the rest are Essex.

Another angle.

From the rear.

Yet another angle.
- Syracusans

Checking the omens with a goat.
This camp was inspired by one in Lead Paean. I’ve compressed my camp into smaller dimensions and don’t seem to have found the same figure for a priest. Most of the figures are Essex (the one leading the goat is an artillery figure). The woman and the priest are Donningtons. The altar is made of Green stuff and is supposed to represent a temporary altar made from cut turfs.

Another angle.

From the rear. The size of the woman in proportion to the Essex figures is noticeable from this angle.

Yet another angle.
- Seleucids

Bring out the loot!
Breaking with the theme of a religious rite that is found in many of my camps, this one shows some of the wealth of the Seleucids. It is a combination of Essex camp followers and Freikorp command figures.

Another angle.

From the rear. The shields I intend to use for the Argyraspides are visible.

Yet another angle.
These figures were useful in letting me trial how the Argyraspides will look when I paint them. I intend to do them next as part of seven stands of pike. Three of them will be the Argyraspides, who will have an optional command stand with Antigonus One-eyed as their general. They will have the same colour purple clothes as these figures. They have been ready to go for almost as long as the camps, but I may end up doing some rebasing first, so I’m not sure when I will get to them.
- Carthage crushes a mercenary revolt
I am very pleased to have finally finished these camps. I got to use one of them on Thursday when Joel came around. We played DBA 3.0. I was pretty tired, so I didn’t take any pictures. We had a Carthaginian civil war; I claimed to be Hamilcar Barca crushing the Mercenaries during the Truceless War; this claim was disputed, but we had one of the rascally rebels up on a cross to bolster our claim.
I ended up deploying between a large wood and a steep hill. The battle unfolded quickly with my spear being caught in column by the Gallic mercenaries. This was not good, as the whole column was ZOCed. I lost two stands of spear until I was able to get my Spanish auxilia across to support them; they won against an elephant 6-2, getting a narrow quick kill. From there my fortunes were transformed. The Spanish flanked the Gauls and the last element of spear held their ground to destroy both elements of Gauls. On the right flank my elephants, supported by psiloi destroyed some rebel spear to give me a skilfully wrought victory! I was sufficiently tired that at one stage Joel looked on in bemusement while I tried to flank my own Spanish auxilia!
This was a great victory under the inspired guidance of my new camp. It heralds a new beginning for an army that has struggled for form in the past!
Sunday DBA
27 January, 2014
Yesterday I go the Auckland City Guard again. I had a couple of games of DBA 2.2 with John. This time I even pulled out my phone and took a few pictures.
- Pyrrhus of Epirus against the Romans
The first game I used the later Epirot army of Pyrrhus. I’ve had the figures for a while, but not used them much. John used my Polybian Romans. I was the attacker and thought I was onto something pretty good when a third of the Romans seemed to be deployed too far to their right to do anything. Furthermore, for quite a while their PIPs were low and we advanced the bulk of our army as fast as we could while some light troops used the wood to protect the flank.

Pyrrhus advances on the Romans
All went well initially. Our general removed a Bd and its supporting legion. However, on our left flank our cavalry were destroyed and the elephant fell back. The LH were lucky to survive a round of combat downhill from cavalry. On the right flank we lost our psiloi, but our Auxilia destroyed a Bd. It was 3-2 and we killed another Bd by flanking it with the general. Victory seemed assured until our double-ranked spear were destroyed by some Triarii (I’m now unsure if we’d calculated the odds correctly; I think we were each overlapped). Anyway, with losses at 4-4 the Romans chased off my LH to make an unexpected comeback.

The Triarii triumph!
- Pyrrhus against the Syracusans
Next John took the Pyrrhic army and I got out my Syracusans. In this game I was the attacker (no mean feat against Agg. 4). I was lucky to survive the first round of combat, and in fact my Wb destroyed a double-ranked Sp (an error we realized later!). Despite this, a Ps that had shot into our rear almost won the battle by causing our Art to turn to face; a Sp recoiled into it and the Ps destroyed it.

Gallic mercenaries are responsible for most of the killing!
However, this time our cavalry won on the left flank and the Gauls destroyed the rear rank of some pike giving Syracuse a narrow victory.
Both games were very close and see-sawed. Unlike the DBA 3.0 games I’ve played recently, there was more time to adjust set-up. I’m looking forward to making DBA games at this club a regular event.
- Camp progress
The four camps that I started nearly two years ago are almost finished; I just need to flock them. The Carthaginians, Romans, Syracusans and Seleucids will each have their own camp. After that I plan t paint seven elements of 4Pk for Successor armies. I’ll be able to use Antigonus Monophthalmus as a Pk general, which could be interesting.
More DBA
26 January, 2014
Last Thursday I caught up with Joel for some more DBA 3.0. I wanted to see Sp v. Bd, so we went for my Polybian Romans against Joel’s Carthaginians. In the first game Joel’s combat dice were so dreadful that I won effortlessly. We had another game, but Joel was hindered by terrain and I won easily again. In particular his spear were mostly hopeless. However, I did see a little Sp-Bd interaction. It was interesting.

I’m still painting the camps; my progress has been limited by reading The Rich are Different by Susan Howatch. It’s the story of a New York banker in the 20s that mirrors the life of Julius Caesar. I’m now starting on the sequel on his nephew, an Augustus. Very cleverly done.

