Newer Normans
23 November, 2017
My first pair of DBA armies were Normans and Anglo-Danes. I didn’t entirely like either of them. I now have an Essex Norman army that has evolved out of getting some Essex dismounted knights, which I like, and getting given a bunch of Essex mounted knights years back. These knights had spaghetti spears and my interest in painting them was not high. When I replaced their spears I got a lot more interested, though progress is still slow, and there are many more elements that could be painted.
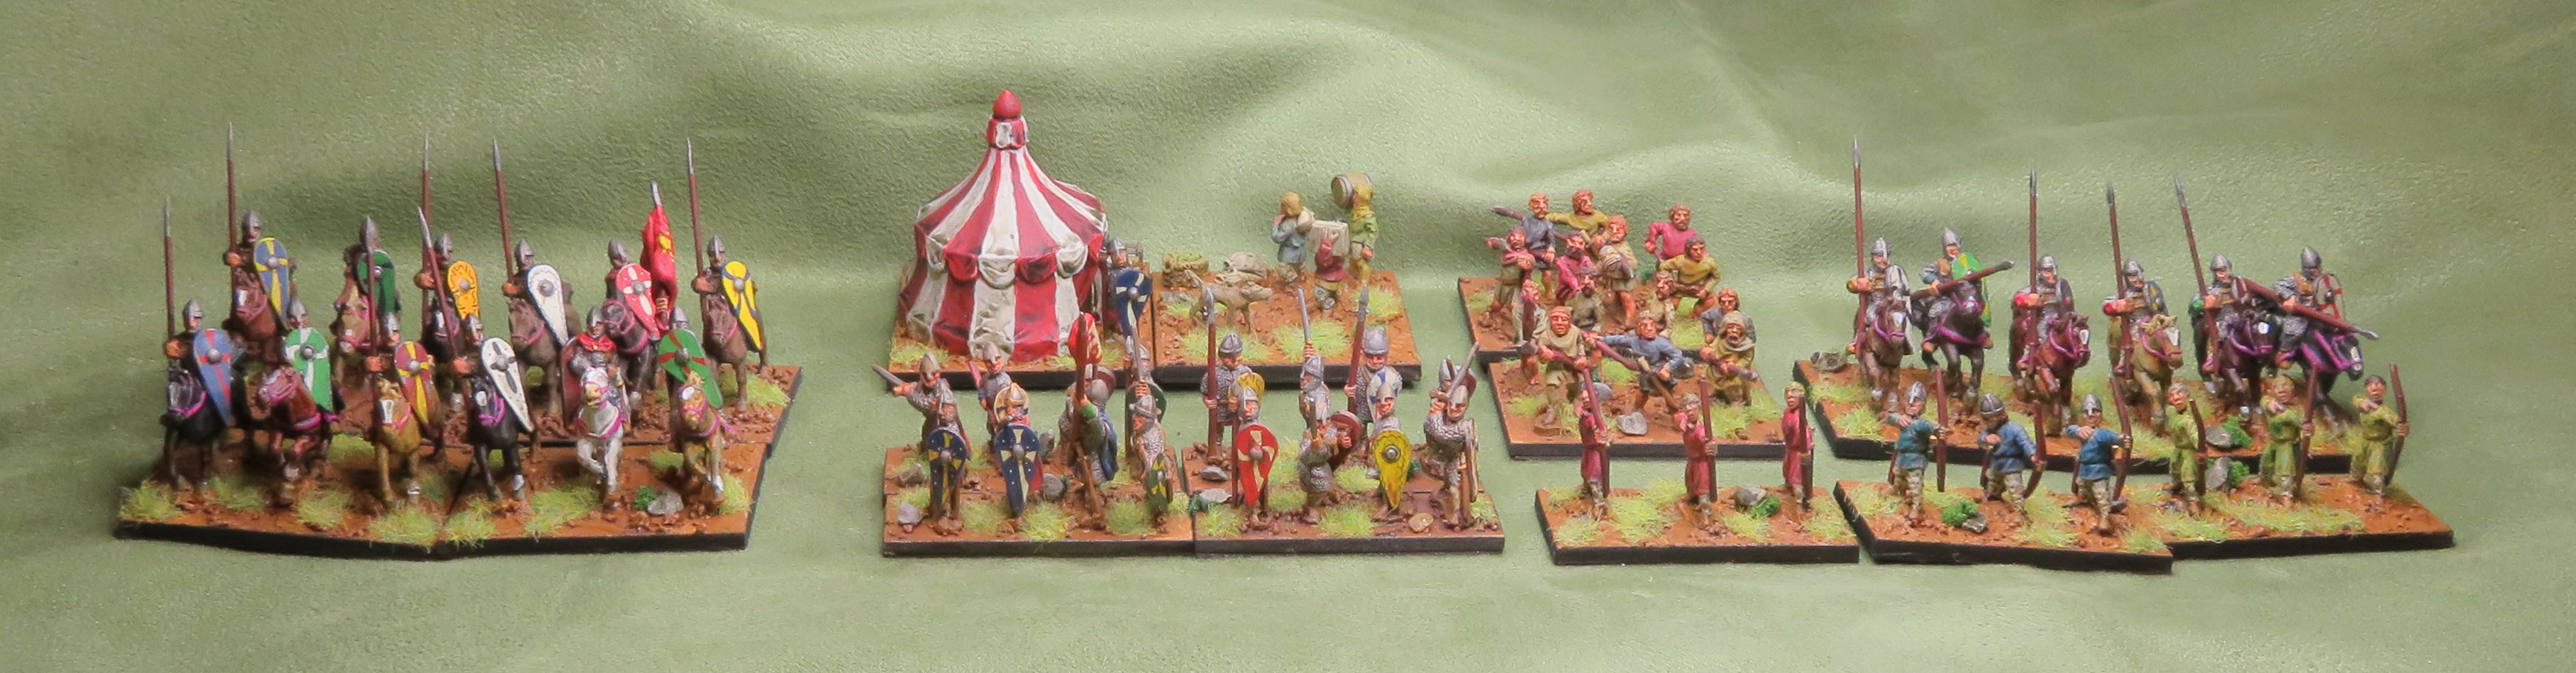
The Normans arrayed.
Currently I can field plenty of knights, mounted and dismounted, as well as archers and some very ragged horde. Spear, more archers and some pilgrims wait to be painted. These would allow them to morph into other armies around this time, such as Communal Italians and Early Crusaders.

The Norman camp.
I have quite an assortment of Essex camp followers and horde figures, so this camp was spoilt for choice for figures.

The mounted knights.

Another angle.

And another.
If you look closely at the banner in the last photo, you can see it’s unfinished. It should be a cross, but I used one off a round shield transfer, and forgot to paint in the centre. I’ve now done this.

The archers.

Another angle.

And another.
I somewhat regret giving the archers uniforms, of sorts. It was lazy. I almost mixed them up at the last minute, but didn’t. I didn’t take any pictures of the dismounted knights. I painted them ages ago. I’ll do that some time. The rest of this army, and heroes to allow it to morph as a HoTT army, are down the priority list at the moment; Mitanni come first, and then maybe Armenians and others to allow me to field a BBDBA Mithridatic army.
BBDBA Pyrrhus
22 November, 2017
In order to get my Successor and Hellenistic figures able to be fielded as a BBDBA Pyrrhic army I needed to get the Campanians painted, which I did. I also needed two other elements, one of Xystophoroi (3Kn) and one of Tarantine light horse. Fortunately I had these in my lead pile. The extra element of xystophoroi were originally Hellenistic heavy cavalry, but I can’t really see how they differ from the Freikorp xystophoroi. They’re nice figures.

Pyrrhus and his Xystophoroi.

Another angle.

And another.
The extra element of Tarantine light horse are Essex, but they match the Freikorp ones well enough.

Tarantine light horse.

Another angle.

And another.
Strictly I need to get a couple more elephants with turrets instead of using early successor ones, and paint a few more elements of pike, as two that I use for this army are actually Asiatic levy ones with trousers. However, as they fought bravely down at Conquest, I’m not in any hurry to do this.
Campanians at last
21 November, 2017
I’ve got a bit of catching up with putting my painting on the blog. I’ve spent a bit of time today using a new camera (and a tripod) and getting the settings right for the lighting I’m using. I’d say the results are better than what I was doing last year.
I have a nice little painting tray now, and storage for my paints.

The painting tray, lamp and other equipment.
The picture shows the lamp I use, one that has a magnifying glass built into it. It also shows my wet palette, which was working well last year, but now the baking paper is curling off the palette; perhaps it’s not damp enough. On the tray can be seen my Mitanni army taking shape. the foot should be done soon, and the chariot crew are progressing well. Then it will be a matter of getting the chariots assembled and painted, and the camp.
Otherwise I’ve updated the Army Page for my Southern Italian armies. The Campanians can now be fielded. I’ll aim to update the Numidians, Normans and Pyrrhic pages soon too.
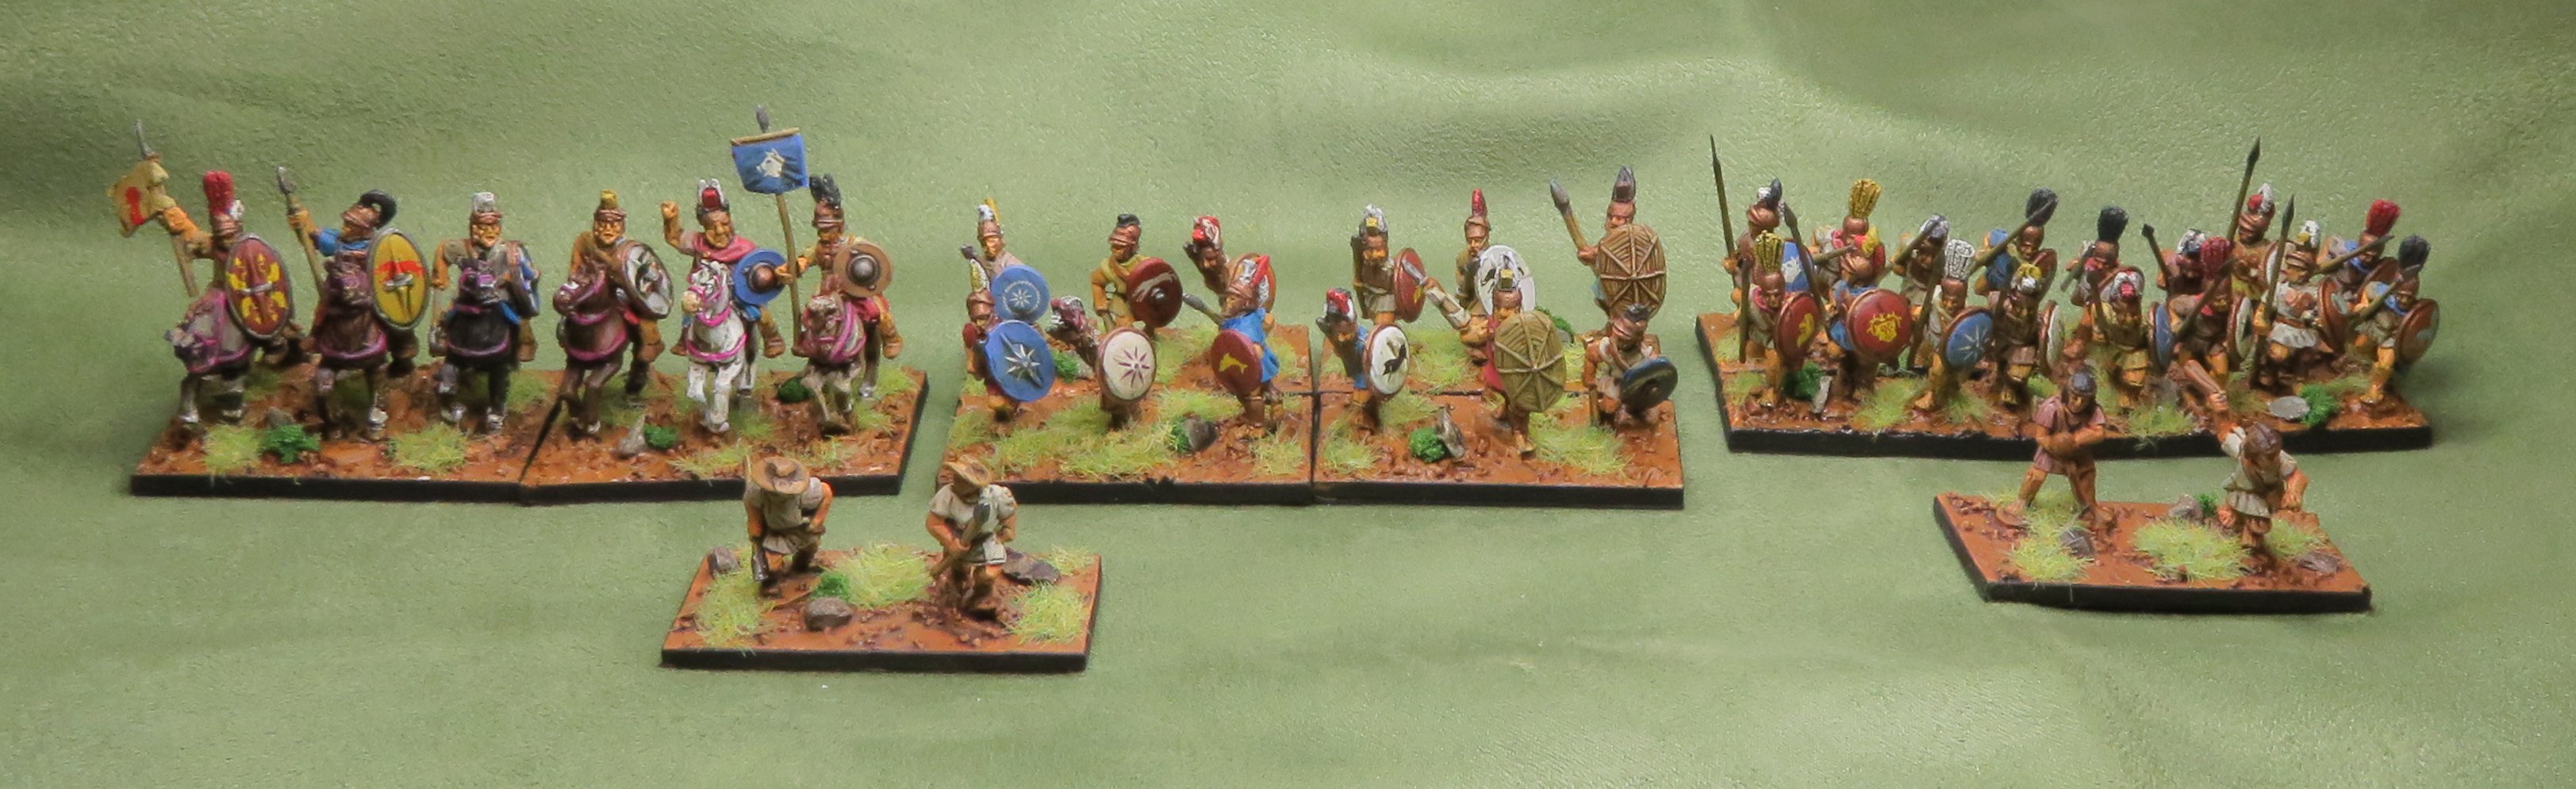
The Campanian army.
Getting the Campanians done is quite an achievement, as they were started in 2010, and the figures may have been bought earlier than that!
Conquest 2017
14 November, 2017
A few months back I decided to go to Conquest 2017. I’d not had much chance to play DBA this year and I was keen to get along, as I’d enjoyed the year before a lot. It also seemed a good motivation to get some painting done. Very kindly Keith, the organiser invited me to stay at his place for the event, something I really appreciated.
As I said in my last post, I’d chosen both my armies as a motivation to get more figures that I already had painted. However, I was rather slow getting them finished, and didn’t get much practice before the event. Fortunately, I was able to get a couple of games with Mike the Sunday before. this allowed me to try out the Normans in DBA, where they got a lucky victory against Mike’s Ottoman Turks. And it allowed my to try Pyrrhus’s army against them in BBDBA. This was invaluable, as I’d organised the army in such a way that it wouls have struggled, I’m sure, but with the suggestions of Mike, it did very well.
I’d organised the army as follows:
- Command Wing (medium PIPs): 3 x3Kn (C-inC), 3 x LH, 4 x 4Pk, 2 x Sp, 1 x Ps
- Centre (high PIPs): 8 x 4Pk (cmd), 3 x El, 2 x Ps
- Holding Wing (low PIPs): 3 x Cv (cmd), 4 x Sp, 3 x 3Ax
The theory was that the elephants would help the pikes create a breakthrough in the centre (hence the high PIPs); Pyrrhus would have the next best PIPs with much of the cavalry and the Oscans with the best BGo troops would hold one wing.
Against the Ottomans the Oscans were defeated as they had no BGo to anchor on, the centre did not make much progress, and the elephants were destroyed by LH, nor did Pyrrhus. With Mike’s suggestion I rearranged them as follows:
- Command Wing (High PIPs): 3 x3Kn (C-inC), 3 x El, 3 x LH, 2 x Sp, 2 x Ps
- Centre (Low PIPs): 12 x 4Pk (cmd), 1 x Ps
- Holding Wing (Medium PIPs): 3 x Cv (cmd), 4 x Sp, 3 x 3Ax
The centre was intended to be solid and just trundle forward, while I sought to win on the wings. Pyrrhus, in particular, had a potent mix of elephants, knights and light horse.
- Friday games
On the evening I arrived I had a couple of games with Keith. I used my Normans and he used his Samurai. In the first game Keith experimented with 6Cv. My archery destroyed them with exceptional dice. As a result of this Keith changed to a CP instead, and in the second game it was his turn to see his single archer do wonders. We finished a game a piece.
- Saturday Morning (Ancients DBA)
Pyrrhus had a dreadful morning; he died against Jim’s New Kingdom Egyptians and again against Gordon’s Seleucids. However, both of these were close games, and with a bit more care I might have won. The last game, against Keith’s Carthaginians, was more humiliating. Clearly concussed from his two earlier battles, Pyrrhus failed to roll more than 2 PIPs for the entire game. As a result he sat facing the Carthaginians until in desperation, after his camp was sacked and his cavalry wing was disintegrating that he sent his pikes in an attack against the Carthaginian foot. This failed, and the Carthaginians won a victory without any of their army breaking.

Pyrrhus attempts to break the Carthaginian foot to no avail (though he doesn’t die this time — photo taken by Keith).
- Saturday Afternoon (Medievals DBA)
For the afternoon competition my Normans had Viking allies and were:
4 x 3Kn (cmd), 2 x 4Bd, 3 x 3Bw; 2 x 4Bd and 1 x 4Bw (allies).
The afternoon saw the Normans facing Brian’s Rajputs. I made the mistake of having the Rajput fort, and the BGo terrain on my baseline. I abandoned the idea of trying to take the fort, and was cramped as a result. In the end I killed the elephant C-in-C with mine, but that was on the turn that my army broke.
The second battle was against Ben’s Yi Koreans. The Koreans occupied a wood on my left flank and proceeded to chip away at my knights that milled around in range. Meanwhile on my left flank my archers advanced out of a hamlet into firing range of the Korean cavalry. Their response was to charge, which largely failed, and saw them take casualties. They came back, this time with their general, and were again defeated, giving the Normans a lucky victory. If they’d waited a turn and attacked with their general, they may have had more success (then again they’d have been shot at). Credit should go to the Viking archers, who shrugged off an extended rocket barrage by the Korean artillery.
The final battle was against Jim again. His Free Company were not too different from the Egyptians, having fast blades and archers, but knights instead of chariots. The fast blades proved deadly, getting stuck into the Vikings, who had occupied a hamlet. They destroyed them, with the support of some knights, before my archers could break up his main line of battle. After that, they were able to roll up my right flank.
Overall, I won only one game that day, and finished very near the bottom of the table. However, the points system favoured results over a draw, which is a system I think is good: 8 points for a win, 1 for a loss and 0 for a draw. Losses and draws got points for enemy destroyed too.
- Sunday (Ancients BBDBA)
After such a bad showing on the Saturday, I didn’t approach the BBDBA with much confidence, especially as I was yet to win a game of BBDBA. My first game was against Keith’s Early Asiatic Successor army (Demetrius). I’d faced it last year with my Carthaginians. This time, however, I was the attacker, which meant I got to react to the entire deployment of Demetrius. This proved very useful, as the Oscans had the chance to avoid Demetrius’ xystophoroi and to contest a hill on the right flank.
In the centre my pike general deployed to the right of the opposing general, and on the left Pyrrhus deployed in reserve to meet the bulk of Demetrius’ elephants and knights. The advantage of deployment was complemented by favourable dice, and in the centre the pike to the right of Demetrius’ central commander was destroyed; he was soon flanked, but never flinched, and the centre remained otherwise static.
On the right, the Oscans hoplites withstood elephants and elephants successfully, and the auxilia were able to overcome opposing peltasts in order to start to threaten the cavalry general of that wing.

The Oscans approaching Demetrius’ left flank. Their hoplites face pike and elephants thoroughly undaunted.
However, it was on the left wing that the battle was decided. Demetrius had tried to change elements to avoid his knights facing elephants, but this left a hole in his line, and Demetrius himself had had to leave the reserve to join the battleline.
In the initial clash elephants faced off; one each fled, which gave the opportunity for one of Pyrrhus’ to attack Demetrius himself. This was the decisive combat, and the elephants finished off the commander giving Pyrrhus the advantage. He continued to exploit this by eventually overcoming pikemen facing his hoplites, as well as other casualties that I don’t remember now.

The crucial point on the left flank; elephants have fled in both directions, but one of Pyrrhus’ is able to turn on Demetrius himself.

The same point from a different angle. The pikes facing hoplites can be seen.
Meanwhile, some of Pyrrhus’ pikemen, dressed as Persian levy pike, had been defamed by Demetrius before the battle. Proving him wrong they eventually defeated the opposing pike (with cavalry support), breaking Demetrius’ second command and giving me my first BBDBA victory.

The beleaguered Demetrian pike general remains steadfast, but to his right his command collapses as Tarantine cavalry move up to overlap another pike block.
In the second battle I faced Brian’s Classical Indians. In this battle his fort was less dominant. However, when I looked at the terrain I considered trying to fight for the woods on my left with the Oscans. However, they would then face HCh, while the elephants of Pyrrhus’ command would be closer to his psiloi. I had the wings the other way around, which left me with only two psiloi to try to control the woods.

Pyrrhus faces Classical Indians.

Pyrrhus’ deployment from another angle.

And another angle.
As the battle unfolded, the Indians attempted to redeploy radically to face my deployment, and I tried to get across the board rapidly to trap his chariots behind his elephants and his line in disarray.
The plan met a hitch when the two psiloi were quickly destroyed by opposing archers. The elephants now risked being shot at and Pyrrhus and his knights were a cautious distance to their rear. In this unfavourable situation, the elephants decided to advance. They were met by opposing elephants, including the C-in-C. The odds were not good, but the dice gods favoured them, and I 6-1ed the C-in-C, doubling him. If Brian used his +1 the damage was worse, as he still died, fleeing into a HCh. He chose to die on the spot. All but one of my elephants was quickly destroyed, but the last one hatched a devilish scheme; attacking an elephant that had fled to the baseline. The hope was to lose, as he’d flee into a sub-general! He succeeded in this low devise, and in true Pyrrhic fashion succeeded in demoralising the command!

Just before contact. The elephants are almost in contact, while the Oscans are still a turn or two off. The game mat is one that I got on eBay from Poland. I’m pretty happy with it. The picture is another of Keith’s

Another picture by Keith of the same point. The psiloi can still be seen in the marsh on the left flank. The central command has a couple of elements of pike in reserve to replenish the back rank of the pike block; they are struggling to keep up.
My two remaining commands were now facing two headless chicken commands and the low PIP one. We ran out of time, but it was still closely balanced, although the Oscans were starting to look dangerous. All in all a great battle with its chaotic elephant battles!

The end of the battle with the Oscan auxilia looking dangerous. Even the camp was on the move!
For my last battle I faced Andrew’s Akkadians. I was the defender, for the first time in the competition. I deployed anchored on two patches of boggy ground. It was an interesting matchup against fast pike, and the Akkadians swept in very fast. However, the Epiriots proved too good, beating them at every point. In particular, the Akkadian horde on the hill facing the Oscans proved absolutely cowardly, and in the centre the Akkadian general, facing hoplites, was flanked and when the dice came up equal, the solid foot had the advantage and won.

Pyrrhus facing off against the Akkadians.

The Akkadian deployment.
However, it was Pyrrhus, in the only battle of the day he saw combat, that destroyed multiple elements. He came up into the battle line as it extended while his elephants tried to avoid facing psiloi. His inspirational leadership routed the enemy before him, and he took his second victory of the day.
This was my first victory against Andrew in a series of encounters that would have gone back to 2009, so I was pretty pleased. I suspect the unfinished bases of his troops may have demoralised them.
- Summary
The competition was a lot of fun. All the games were played in good spirits. I learned a lot about how hamlets work and came away considering a number of projects. Perhaps one day my Norse Irish will have a Brian Boru CP, or I’ll make a CWg for some Communal Italians. Also I will have to make a hamlet.
I’d like to thank Keith for organising the competition and for having me stay. The venue, the Woolston Club, was also really pleasant. I miss anything similar, to my knowledge, up in Auckland. Finally Comics Compulsion deserve thanks for running the overall competition.
A few updates
13 November, 2017
It’s over a year since the last post. Straight after Conquest I got busy with a new job; it’s quietened down a bit now, but I’ve not got back to the blog to update what I’ve been doing recently. Since I last posted, and mostly in the last few months, I’ve played a few games of DBA, and got a couple of armies finished. These were preparation for Conquest 2017, which was last weekend. Therefore, it’s time to get some reports posted.
Firstly, when I decided to go to Conquest, I decided on two armies that would encourage me to get some armies finished, much as I’d done last year. This time I decided to get my Normans to a stage they can be fielded. This involved finishing four 3Kn that had been mostly done for over a year or more. In addition, I did a camp and three 3Bw. There are stacks of Sp to do, and more crossbowmen and archers, but I could field the Normans. I’ll look to getting the rest done soon to allow these to morph into some of the other armies of that period, such as Early Crusaders, Communal Italians and Papal Italians.
The other army I decided on was Pyrrhus for BBDBA; this required me to finish the Campanians to be Pyrrhus’ Oscan troops. It also required an extra element of xystophoroi (3Kn) and Tarantine cavalry (LH). In all, this was 8 figures of 3Ax (four were already done), 9 figures of Oscan cavalry and 5 figures of 3Kn and LH. What was particularly pleasing was that I didn’t need to buy any of these; I actually reduced the lead pile a little.
I’ll post some pictures of these figures soon. Otherwise, I played a couple of games of DBA with Joel a while back, and some with John and Nick (also now a while back). Finally the weekend before Conquest I got to the AWC for a game of BBDBA with Mike. This proved invaluable, as Mike critiqued my decisions around the commands I’d created. The changes were very effective at Conquest.

