Conquest 2018, Pt. 3
17 November, 2018
The final day of Conquest was three BBDBA games. A lot hinged on the initial dice roll for who was the invader and got to set up second. As an army characterised by Phil Barker as particularly aggressive, the Later Carthaginians should have had the advantage here, but on this occasion they allowed themselves to be invaded for the first two battles.
- 1. Polybian Romans (Keith)
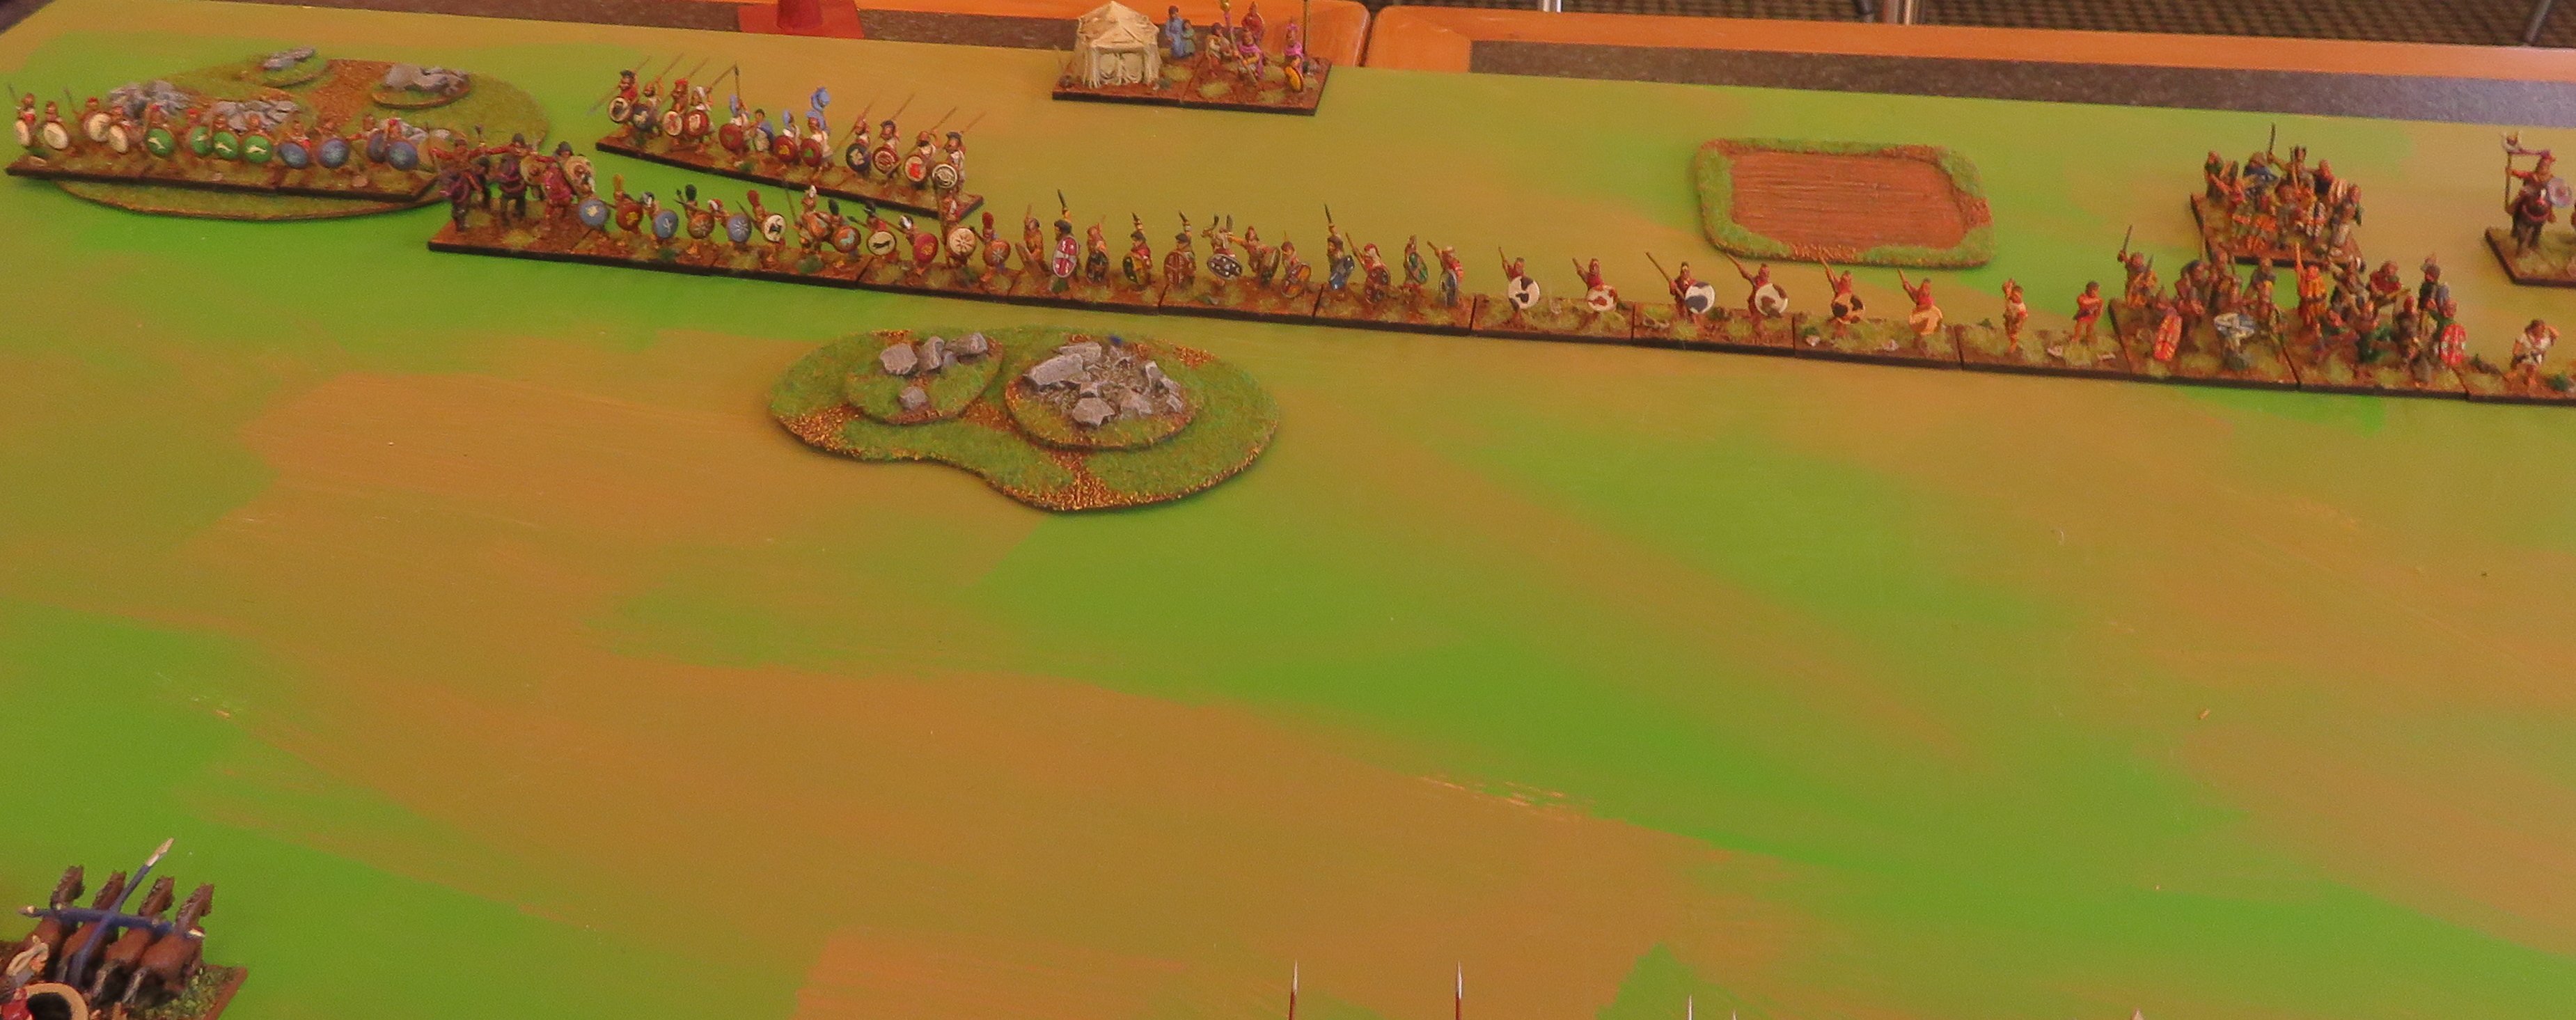
The first battle was against Keith’s Polybian Romans. I placed two large marshes and a difficult hill. The command with the Gallic Warband commander set up behind the hill; the spear were in the middle and the left flank with the C-in-C had a marsh occupied with two psiloi.

The Carthaginian right flank and central commands.

The two armies opposed; the Carthaginian left flank command can be seen in the foreground.

The Roman right flank and centre.

Their left flank.
I came to realise that the terrain was not working to my advantage, and things stagnated with neither side able to make much progress in the time was called. On the left flank the cavalry had to retire before the advancing foot.

Initial advances.

Working at correcting things.
On the right flank the warband struggled to move over the hill, and the command range of the commander slowed down the advance of the psiloi, who were needed to support the Spanish scutati.

Slow progress on the right flank.
At the time the game ended the Carthaginian centre was almost broken (a flanked spearman refused to break), the warband were starting to put pressure on the right flank, but were disorganised by the hill. On the left flank a stalemate had resulted.
- 2. Athenians with Thessalian allies (Colin)
Against Colin’s Greeks, the Carthaginians were again defending. Colin had cavalry seeking to destroy exposed psiloi on my left flank, and on the right flank they had Thessalian cavalry facing the Numidians.

Athenians with Thessalian allies on their left flank.]

The opposing Carthaginian left flank.

Their right flank and centre.
Things did not go altogether to plan for the Greeks, and the Athenian cavalry were briskly destroyed by valiant Libyans. This precipitated a collapse on that flank.

Libyan javelinmen gloriously see off Athenian cavalry, while Numidians rush to fill an anticipated gap.
The Numidians were trying to bolster the threat to the left flank. As it turned out, two of them could turn round, while two stayed to exploit the advantage. The Athenian light troops were no match for the Spanish, and soon the Gauls were ululating their way forward.

The Athenian right flank starts to fold as their light troops break and the Gallic warbands surge forward.
On the other flank, things were not so happy.

Thessalians have the Carthaginians at a disadvantage.
However, the Carthaginians had a lucky escape, when the Thessalian commander was killed.

Disaster for the Thessalians as their commander is killed.
For all this, the Thessalian cavalry still had the Carthaginians at a disadvantage.

Despite the loss of their general the Thessalians continue to apply pressure.
The Gauls broke the Athenians right flank, but not before two warbands were broken. They spent a few turns mopping it up (in hindsight I should have remembered that it should have been removed after losing half of their elements; this was possibly crucial). Meanwhile, the Carthaginian centre was faltering and eventually broke.

The Carthaginian centre breaks.
When time was called I need one more element to win. I might have got it had I remembered that a command is removed as soon as half of it has been destroyed; I might have gained an extra turn to get that last element. For all that, I was under pressure on the right flank and had my centre collapsing.
- 3. Seleucids (Gordon)
Finally, in the last game I was the aggressor against Gordon’s Seleucids. I exploited this to the hilt in choosing which commands faced which.

The Seleucid left flank facing Carthage invading Syria.

Their centre and right flank.
Taking note of where the Seleucid cavalry was, the Carthaginians chose to have their light troops in the centre to face the phalanx. Their spearmen would hold the right flank defensively, and the cavalry on the left flank could exploit their numbers against psiloi and light horse, while the Numidians faced the xystophoroi.
The Carthaginians meet the phalanx with light troops and the elephants and chariots with spearmen.

Massed cavalry face the beleaguered Seleucid right flank.

The two armies opposed.

The light troops advance while the spearmen wait.

Cavalry swarm forward on their left flank.
The Seleucid scythed chariots proved ineffectual, and the centre and right flank waited while the left flank sought to exploit its advantage. It did this rapidly. It lost two Numidians to the xystophoroi, but in the end prevailed so that the cavalry could chase down the exposed psiloi. Meanwhile, the rest of the Seleucids were advancing, but were unable to gain a significant advantage, and the phalanx was waiting to be rolled up on its exposed flank. At this point the Seleucid general capitulated.

The Seleucid right flank has collapsed and the phalanx is defenceless. The Seleucids capitulate.

The Seleucid elephants on their left flank had routed some Spanish scutati, but overall had made little impression in the short time they had before their other flank collapsed.
I was pleased with how the Carthaginians performed. I think the aggression dice is hugely significant for BBDBA. I wonder if deploying with alternating commands might not reduce this a little.
A number of battles with Nick
10 April, 2018
Despite plans to start a regular evening DBA meeting this year, it’s yet to happen, but I have caught up with Nick for a number of enjoyable games. One back in January saw a BBDBA contest in which my Marian Romans with Numidian allies were defeated by Nick’s Romans. We didn’t take any photos. I think my Numidians forgot to be defensive and were defeated before I could win elsewhere.
A fortnight ago we had a couple games using some of my newer armies. My Numidians defeated Nick’s Marian Romans.

The Numidians face Roman interlopers in a very green season in Numidia.

The Romans’ view.
I rushed forward to trap the legionaries next to the woods. I didn’t succeed, and I had the auxilia on my left that I didn’t want to meet with psiloi. From memory I was on the verge of defeat when I was lucky enough to create a hole in the line of the blade (I’d been falling back; I’d lost my only psiloi on the right and my commander was trying to retreat over the hill). This brought me back into the fight, which was looking over for the Numidians. I had been saved by good PIPs that allowed me to retire the general while keep pressure on in the centre. I was lucky to win.
The next battle was between my Campanians and an Italiot Hoplite army. It was fought on a battlefield with no Bad Going, but only a boggy and a scrubby patch, both Rough Going.

Campanians facing Italiot hoplites.

The Italiots.
My Hoplites created a breakthough in the centre, but I was so obsessed with winning on the flanks I didn’t exploit it. Instead, when I rolled 1 PIP I chose to take a risk with my general facing enemy cavalry so that I could develop an advantage on my right flank. This cost me the game, as my General was 6-1ed and destroyed. The Italiots managed a close victory.
Last weekend we caught up again. I got the Marians and Numidians out for a BBDBA game. Nick fielded his Early Imperial Romans. This game was interesting, as my centre destroyed his in record time and my Numidians were able to break their opponent with this support. I’ve not seen blade go down to blade so fast before. My dice were very good. the element that did it was a ring in. To get the 10 elements of legionaries I needed I used an element with different shield patterns. These are an element for my Mithridatic army, one I’ve described as Marian exiles fighting for Mithridates. Clearly they are dedicated defenders of the Republic.

The heroic Marian exiles.
The game was nearly over before the left wing made contact. My elephants were still stuck in rough going (my new hamlet), and I was nervous of the Roman knights.

The righteous defenders of the free Republic face off on hills against the supporters of the tyrant Augustus.

The EIR wing on my left, cavalry, knights and auxilia.

The EIR centre, auxilia, blade and bow.

The EIR wing on my right, blade, auxilia and rogue Numidian LH.

The battle from the side; the centre led by Cato is between two difficult hills; Juba’s Numidian psiloi are on one hill while his imitation legionaries, elephant and cavalry are in rough going; Labianus on the right wing is in a hamlet with elephants, cavalry and solid auxilia; he has psiloi and fast auxilia on the other hill.
Clearly the Numidians were not keen on fighting each other, as there were a number of rounds of combat that saw no casualties on that wing; the Romans were not so delicate in their attitude to each other. This is my first victory with this Marian BBDBA army. I’m still not sure how to get it to work well. I will probably get my Carthaginians out as a BBDBA army again soon. They are similarly winless, but I now have a better idea of how to organise commands.
Xystophoroi
17 July, 2011

Ptolemaic Xystophoroi.
I’ve completed two elements of Xystophoroi. They are Freikorp figures with spears from Xyston. They are for a Ptolemaic army; however, they can be used for quite a number of other armies. I’m close to being able to field a whole swathe of successor and Hellenistic armies, though not in opposition to each other. The biggest hold-up is two more elements of elephant. One is an Early Successor one with a pikeman sitting on its back. The other is an unarmoured one with a tower. The first of these would allow me to do a whole range of early successor armies, the other would be for the Ptolemaic army and for a Pyrrhic one. Otherwise, there’s a lack of pikes. My next project may be about seven elements of pikes to allow opposing pike blocks (one of these would be a command element for Antigonus Monophthalmus).

From another angle.
I have two elements of 3Cv ready to go too, but they are waiting for decals on their shields (which are in the post). These are for the Syracusans, but can be used by a number of other armies, though I’m not sure when shields started to be used, making them less useful for some of the earlier armies.
I’ve updated my armies page with a list of all the new armies I should soon be able to field!

From the rear.
Otherwise, I darkened my Seleucid elephant a while ago; it was much lighter than the two Carthaginian ones, so I gave it a drybrush with a darker grey, which I think improves it.

A more tanned Seleucid elephant.
28mm DBA Campaign Day at the AWC
20 June, 2011
Yesterday I got along to a 28mm DBA day at the Auckland Wargames Club. It had been proposed by Jerome, who on the day asked me to organize things. As we had no map and no theme—the armies were what people chose to bring—I went for what I could remember of the system described by Chris Brantley on Fanaticus:
http://www.fanaticus.org/discussion/
We went for random rounds that led to the loser becoming the winner’s vassal. After three rounds there were two equal factions and we decided the winner with a game of BBDBA.
The participants were:
Andrew: Sea-Peoples (I/28)
Alistair: Spartans (II/5a)
Mark: Gauls (II/11)
Steve: Marians (II/49)
John: Marians (II/49)
Jerome: Early Franks (II/72d)
Mike: Vikings (III/40b)
Richard: Ghaznavids (III/63b)
This made for a preponderance of blade armies, making my Gauls a better choice than I’d thought. I’ll only describe my games, except to say all the games came to a result apart from one in the first round between John and Andrew; they started late and their blade were only bouncing each other back when we called time.
In the first round I faced Jerome, who’d not played DBA before. Our armies were fairly similar, except my Gauls had more cavalry. Jerome stayed in a big wood initially, and when he started to move, he didn’t have enough PIPs to get fully out of it. I hoped to contact his general with my cavalry and overwhelm him, but I ended up making contact with my warband on his, and owing to the effects of pursuit it soon developed that I had the edge, as I could get rear-rank support when he was still in BGo. I lost my psiloi on one flank, but got a 6-1 on a double-rank Wb and from there the advantage stayed with me.

The final situation against the Franks.
My second game was against Ghaznavids; it was a match-up I didn’t expect to do too well at, as my Warband would not like his two elephants. However, Richard, had not played DBA since version 1 and didn’t know about the second move of warbands. I was blessed with a plenitude of PIPs at the right time and was able to get warbands into his spear. On the first round my cavalry bounced off his, but on the second I got a pair of warbands against the spear next to his elephant general and a psiloi onto the general. The dice smiled on me; both his spear fell to my warbands and then my psiloi rolled 5-2 on his general for a surprise victory. Richard would not have allowed me to get so close if he’d known about warbands’ charge move.

Warbands triumph over elephants.
For the third round I had the victors meet. I faced Sea People and didn’t get the table edge I’d hoped for. The Sea People deployed between two hills. I ended up losing as I got dragged into fighting in the centre rather than waiting to win on my right flank. This happened as I tried to provide overlap support on the right flank, which drew my cavalry forward to provide it. My one attack on the right flank (which took 4 PIPs to coordinate) was repulsed without success. In the centre my general was double overlapped and rolled a 1, silly chap!

The Gallic general cops out, and it's all over against the Sea People.
At the end of this round Andrew commanded me and Alistair, who had defeated Richard: one elephant recoiled into the other, oh dear! Richard had a point that this was a consequence of the depth of 28mm elephants. What happened was one elephant was recoiled then attacked in it flank. It turned to face, and coward that it was, recoiled again into the other elephant. In 15mm it would have recoiled behind the other elephant. The Spartan camp was a rhino being led away in chains; now they could use an elephant, or at least bits of one!
John faced Steve, and the resolution of this Roman Civil War was that Steve was his vassal as was Jerome, who had defeated Mike. Mike and Alistair decided to sit out the final battle, leaving Andrew and John to attempt to bring their inconclusive opening battle to a result. This time with allies. Andrew was the aggressor, so we got to match up our armies to our advantage. Andrew faced John on the flank with BGo, I faced Steve on the more open flank and Richard’s cavalry and elephants faced Jerome’s warbands with a bit of wood in the way.

The battlelines are drawn. The Sea Peoples on hte right with the Gauls in the forefront.

From the other end of the field.
On my end of the field I was hampered by low PIPs (1s) for about 3 turns. I decided to try to get my cavalry across my front and around the Roman flank. I was very lucky to do so without getting caught. Meanwhile, the Ghaznavids had lost a light horse to warband who closed the door with their second move. He then advanced against the Romans, hoping to get the elephants at the warband. However, his cavalry were swept aside by the Romans and it was all over in the centre.
I then had great PIPs. I was able to get my general behind the Roman line to attack their psiloi, something I can’t remember ever managing before. The warband had the PIPs to double-move into overlap and combat. It was looking good. The general despatched the psiloi. The cavalry on the flank had overlap from a warband; 3-2 odds and the Romans had nowhere to recoil. They got a stick, sigh! From there it all went wrong. The next combat was no longer 4-4 odds, but 4-5 and was recoiled. The last two were doubled and the Gauls were broken. But for that second combat I might have broken the Romans and kept the game alive. It was a victory for blades; curse their tenacity! Steve’s Marians soaked up the pressure from most of two armies and came out with barely a scratch!

The final result. The Ghaznavids are in retreat and four Gallic warbands have been broken. Meanwhile at the other end of the field little has happened.
This was an enjoyable day; it had a good turn out and all the games were played in good spirit. Some of the players decided DBA wasn’t what they liked; the fast-play rules have their own quirks that need to be learnt, and there is nothing in the rules to allow for better quality troops. Thank you Jerome for proposing the day and Andrew for providing me and Steve with armies.
This is the second such event at the AWC; I hope there will be more. I may try to encourage something similar to be organized at the North Shore Club, perhaps in 15mm and with a theme. It makes for a fun day.
Painting Progress
15 June, 2011
It’s over two months since I posted on here. I’ve not had much opportunity to do any painting, and this Sunday was the first time in ages I did any. I decided I really wanted to see my hoplites completed, so I got to work that night hacking off shields, which involved removing glued-on spears, and cleaning up the Freikorp ones. Monday night I attached the shields using green stuff and last night I glued the spears back on and undercoated the new parts. They are now ready to paint!

Essex hoplites with Freikorp shields. The from left stick is a command element. In the background are some Seleucid light troops that have languished for two months!
The green-stuff part was the least pleasant, as it doesn’t set for a few hours, and I couldn’t tell how strongly attached the shields are (I still don’t really know). Gluing the shields went very easily, as they slotted back into the spot they had previously. Can’t wait to get these guys painted, as along with the two I’ve done, I’ll have eight 4Sp and need only a couple of cavalry to have a complete army (Syracusan or any number of later hoplite armies!).
Gladiator Hellenistic figures
6 December, 2010
I placed a large order for Gladiator figures. This was to get discounted postage, but also because they have quite a few packs of a single pose. I bought some of their hoplites, as I decided the Essex ones weren’t going to work with their ugly shields. I’m now happy with the modified Essex figures that have Freikorp shields. However, I painted an element of the Gladiator hoplites to see what they looked like.

Hoplites: from the left, Gladiator, modified Essex and Old Glory Campanians.
The Gladiator figures are a little squat against other manufacturers. In particular, they seem to lack necks!

From the side.

From the other side.
Gladiator have a good range of light troops, and there is some variety in these packs. I like their javelinmen and slingers in particular. I’ve painted up an element of each of these and of their Thureophoroi.

Gladiator archers, javelinmen, slingers and Thureophoroi.

From another angle.
These will be used in the Later Macedonian and the Syracusan armies.
Retrofitting hopla
17 November, 2010
I’ve been looking for good hoplite figures for a while. I guess I could go with Xyston, which are doubtless very good, but likely to be too big and are a hassle with their undrilled hands. I got some Gladiator hoplites, but am not really satisfied with them (though I’m yet to paint any). I actually like the Essex hoplite, but its shield is a travesty, being too small and having no rim. What’s a hoplite with a crap hoplon?

The old Essex hoplites.
I found a way around this when I got some of the hopla from Freikorp (for their HG17). I found it was actually quite easy to remove the Essex shields, although the spear had to come off as well (and it’s a whole lot easier if the figures aren’t based!). I used a craft knife and as the metal is very soft they came off without much effort, better still the arm stayed on! I painted the Freikorp shields up quite a while ago, but did nothing until last weekend about actually attaching the shields to the hoplites. I only have 8 of the Freikorp shields, so I painted up another element of hoplites and attached the shields using green stuff (as the concave backs made for poor contact with what remained of the figures’ arms.

The retrofitted hoplites.
One thing I’ve found with the Freikorp shields is that they seem to be quite porous, and washes are very dark on them, even after adding a transfer. By contrast, the Essex figures have very shallow detail, which means washes don’t pick up as much detail as on some figures. For all that, I like the pose of the Essex figure and the variations of armour and helmets that stop them being too uniform.

From another angle.
The hoplites are going to be used for a Syracusan army, though I’m sure they can morph into quite few other hoplite armies. Before I order any more shields, however, I have to paint some of the other Freikorp figures I’ve ordered, to check they’re a range I want to get more of. I’m working on a Seleucid elephant (HG10a), which I think has great animation, and compared to the CB one is a breeze to put together. I’m also working on a scythed chariot (HG27), which is very attractive, though a little big for the base. I’m also painting a command for the Later Macedonians from HG20 and HG21 and some Tarantine cavalry for these and the Syracusans (HG25).
Finally, I’m doing an element of Macedonian pike (HG03). These are nice figures, with a good pose and variations on the head position and helmet. The shield is also appropriately smaller than a hoplon. Once these are painted I’ll order some more of those hopla and the figures I need to complete the Hellenistics as Syracusans, Seleucids, Ptolemaics and even Pyrrhic (I only bought samples of the cavalry first up, but based on these I’m very happy with their range).

And another angle.
Conquest 2010 (Part 2): Cornishmen (and women) on chariots
29 October, 2010
I was one of the umpires for this event, in training along with Dave for the IWC competition next year. There were sixteen of us competing, so organizing the draw was quite tight for time between games. Conquest is sponsored by Comics Compulsion, and this year Tim from there was one of the DBA competitors. He also provided us with some very nice game boards for the event.
As I won my CB Ancient Britons at Conquest last year, I felt it was only proper to field them this year. Actually, they’re not one of my favourite armies. This is not because they’re not quite a powerful mix of troop types; they can have half their army mounted or can go for skirmishers to complement the light horse. It’s more that the image of them for me has been shaped by the Victorians, who adopted Boudica as a prototype of Queen Victoria of all people! As the Wikipedia author points out, it’s highly ironic that someone who fought Roman imperialism became associated with British imperialism! Because of this, the Ancient Britons don’t come across to me as the ancestors of the Celts of Britain, but the English. Still, why should that be strange when a similar fate awaited King Arthur?
Anyway, trying hard to put these associations to one side, I took the Britons. I described them as early Cornish (a link to the DBR game of the night before), but I didn’t think of a name for my leaders, particularly the warrior queen on a chariot, so was lumbered with Boudica by well-meaning opponents. There are no historical Cornish rulers from this time. My best source for a name would be someone from that eminent historian, refreshingly untroubled by the need to verify his sources, Geoffrey of Monmouth. He provides us with a Duke of Cornwall, Tenvantius, the son of Lud. He’s less prolific with female names, but I’ll go with Tonuuenna, the mother of Belinus and Brennius, who persuaded her sons to do the right thing and not fight each other, but rather go sack Rome!
Damn, with names like that, I’m sure they would have fought better, which tells you what you could discover if you looked here. I won two games, drew one and lost the other three. Still, I learnt a lot about the army as the day unfolded, which is to say, I made a lot of mistakes that I could learn from!
-
Game 1: Thessalians (II/5d), Colin Foster (Christchurch)
My first game was against a Hoplite Greek army, the Thessalians, who have a mix of troops not so different from my Picts last Conquest. Colin went for four 3Cv, two 2Ps and six 4Sp. I went for all the mounted I could, so Tonnuuena led four LCh, two 2LH and six 3Wb. As would remain a common pattern, I was the defender. I was looking forward to getting my double-ranked warband into Colin’s spear, so I went for a gentle hill and two woods. I put the two woods on one flank, but Colin did the sensible thing and opted to have the woods in my deployment zone, which the dice allowed him.
Setting up, I put the warbands in one wood, and the mounted between the woods. Colin was able to put his spear as far as possible from the warband and I elected not to swap any elements.

Initial Deployments against the Thessalians.
I rapidly found that the depth of chariots is significant when moving across the front of battlefield, and the chariots were not able to get to the right wing before they were engaged by the Thessalian horse. I also had a moment of madness and imagined I could slip my light horse between the hoplite lines. In that initial encounter one chariot was destroyed.

An overlapped chariot is destroyed and the light horse get ready to get themselves into trouble.
Things did not improve. Predictably one of the light horse was destroyed and the warbands had to rush into combat at bad odds against the cavalry. Before long another chariot and a warband were destroyed and the Britons routed.

Terrible match-ups on the right flank.
Going into this battle I thought I had a good chance. I shot myself in the foot with the terrain placement, and I then made it easy for the warbands to be avoided; had they been central they would have had better options. Finally, I discovered that chariots are surprisingly more awkward to manoeuvre than 3Cv. Good lessons!
-
Game 2: Early Neo-Assyrians (I/25b), Barrie Cameron (Timaru)
My next opponent, Barrie, had chariots and I decided to stick to the same army. The Assyrians were insanely aggressive, and I’d have to 6-1 them to be the aggressor! They have an interesting mix of mounted and foot: two HCh, two LCh, two 3Bd, four 3Ax and two 2Ps. I didn’t see any massively favourable match-ups for me, but I hoped I could bring my superior mounted numbers to bear against his foot, to which they were quite vulnerable. I think I did learn a bit from my mistakes in the previous battle, and went for different terrain and deployment.

Initial Deployments against the Neo-Assyrians.
I didn’t take any photos of this battle beyond this first picture, and my recollection is a bit hazy. It was a draw and I know that our chariots met on the right flank. Barrie tried to bring his across his front, and I pinned them much as Colin had done to me. Despite this, I don’t think it was going too well for me there. The only consolation was that it blocked the HCh, which sat out the battle. I managed to get one of the 3Ax on the left flank with my light horse, but when time was called, I’m not sure who had the advantage.
-
Game 3: Numidians (II/40), Bryan Fowler (Wellington)
Numidians with an elephant, light horse and auxilia were not an army I especially wanted to face. In the light of this I went for all the chariots again, figuring they’d have the edge over auxilia and light horse. I could have taken a psiloi as an elephant killer, but figured it’d get eaten by the auxilia.
I was the defender again and discovered that owing to a limitation of what figures he could get, Bryan had no auxilia! He had five 2LH, five 2Ps a 4Bd and an El. Even better—a stack of psiloi able to be gobbled up by my chariots. I went for a very open battlefield to give the psiloi nowhere to hide.

Initial Deployments against the Numidians. The lone warband on the right flank is the result of a swap!
I deployed with the warbands hoping to gain the crest of the hill and the mounted on either side. Things moved at a rush. But as the Numidians advanced their left flank expanded, outflanking my right flank significantly. However, I figured that Tonuuenna would QK the psiloi in front of her and lead a breakthrough in the centre. Do you think she could? For at least three turns that psiloi held her off! In that time my chariot held up the Numidian elephant, but it was a combat that could only have one outcome.

Early combat. Tonuuenna proves ineffective, and Nennius and his head faces off against three light horse!
By the time Tonuuenna finally killed that psiloi it was too late. A chariot had been flanked and destroyed, another had fallen to the elephant and Nennius had been surrounded and destroyed. Meanwhile I think my light horse had been destroyed on my left flank by psiloi and light horse. I think I was downslope of all this.

It was all over very quickly!
In hindsight I could have extended my line by not double-ranking the warband. They didn’t get any benefit against five sixths of the opposition. However, I blamed Tonuuenna for a lacklustre performance, and going into the break for lunch she was retired in disgrace!
-
Game 4: Early Imperial Romans (II/56), Simon Phillips (Timaru)
After lunch, owing to the nature of the Swiss Chess system, I was facing less experienced, or less lucky opponents. Simon, from Timaru (and recently from Scotland) had a loaner army; these Romans were also won at Conquest last year, so it was a very fitting match-up, even historical!
Going for one less chariot I took a warband general (Tenvantius) and a psiloi. I was of course the defender and stuck to my terrain choices, though putting the woods slightly more central. I fancied my chances, as these Romans, unlike Marians and Polybians, lacked psiloi for support. The auxilia and blade would be very dangerous to the warbands with psiloi support. Without it they were vulnerable to my warbands and my chariots. And for the Romans the one psiloi they could get came at the cost of a cavalry. Simon went for three cavalry, an artillery, four blades and four auxillia.

Initial Deployments against the Romans.
Simon sent a cavalry to try and get around the wood on my right flank. I stopped it with a psiloi and a light horse. I was able to drive it off the edge of the board, making it 1-0. Simon decided that these two represented a target worth chasing (or as he said later, a threat). He would prove able to get them, but at the cost of leaving his centre hanging. I lost a light horse to his artillery (I didn’t know that was a match-up to avoid!), but was able to use my chariots to effect, taking out his artillery, a blade, who were unable to expand out of column in time, and an auxilia. For all that, it was a narrow victory.

It's all over; while the Roman commander and cavalry are over to their left flank, the chariots do the damage.
-
Game 5: Alexandrian Imperial (II/15), Lewis Osborne (Timaru)
My next opponent was the youngest competitor, Lewis, who had used Ancient Britons himself. Like the Assyrians, the chance of him being the defender were remote. I went for terrain similar to what I had against the Romans (in fact I managed to stay at the same table for the whole day!). This time Tenvantius was on a chariot and I went for two psiloi. Alexander went for a defensive deployment and artillery instead of an elephant.

Initial Deployments against Alexander.
Six PIPs on the first turn got my psiloi into the woods on the left flank. The light horse also headed over to that flank too. While Alexander’s pikes and artillery sat on the hill, I thought I’d have a good chance to bring superior numbers to bear on the mounted on the left flank. This was going fairly well, and I got one of the elements of companion cavalry, but my decision to try to get Alexander himself by having Tenvantius flank him proved my undoing. Alexander recoiled me and the depth of the chariot proved fatal. He was then able to turn and attack Tenvantius and recoil him again. His deep base contacted my light horse by a few mm and it was all over, as I’d lost a psiloi earlier to his companions.

More learning with chariots: avoid going sideways!
-
Game 6: Spartacus (II/45c), Dave Batchelor (Timaru)
My final game of the day was against a fellow umpire, Dave, who brought Spartacus’ army. It was the first time I was the aggressor. Had Spartacus broken out to Britain, only to get attacked by the locals? I went with Tenvantius on foot again, but with two psiloi, as against an army of warband I figured they’d be useful. Dave went for a foot general, so had five 4Bd, five 5Wb and two 2Ps.

Initial Deployments against Spartacus.
In a crowded battlefield I believe one of my light horse got into trouble and was destroyed. At that point I retired the offending die that had rolled a 1 and my luck saw me home. In a day that had seen my warbands do very little (anything, pretty much), the chance to face other warbands must have inspired them. Perhaps they felt they had something to prove against raggedy-arsed 5Wb, as they consistently beat them (overlaps, a Wb general and double-rank advantages helped, of course).

Two mobs of slaves put to flight, one, I think by psiloi.
As the escaped slaves fought, the gladiators looked on, and before they could get into action another mob of slaves was defeated and Spartacus’ army broke and ran. What punishments worse than crucifixion could the Britons dream up for those they captured?

Another mob of unwashed slaves break and the Spartican adventure in Britain falls to ruin.
It was nice to end on a victory, and interesting that it was one that saw my warbands in action finally. I think I had struggled to make the Britons act as a combined-arms army and ended up winning (or more frequently losing) with the mobile part of the army, which made contact before the warbands could move up. Another lesson there!
It was a very enjoyable day with all the games being played in good spirits. Yet it wasn’t over. I’d played mostly Timaruvians in the competition, and I’d see more of them that evening, when four of them came over to Keith’s for dinner and a game of Big Battle DBA (BBDBA).

