Practice games
15 January, 2019
Yesterday I caught up with Joel for some very enjoyable practice games. In the first two games Mithridates squared off against Sulla. I took the scythed chariot to assess its potential, as well as an Armenian ally of a 4Kn amd two LH: Cv (gen), SCh, four 4Bd, two 3Ax, Ps + 4Kn, two LH.
- Mithridates v. Sulla
In the first battle, Mithridates was the defender, and went for a battlefield of two gentle hills, a hamlet and a patch of rocky ground (both RGo).

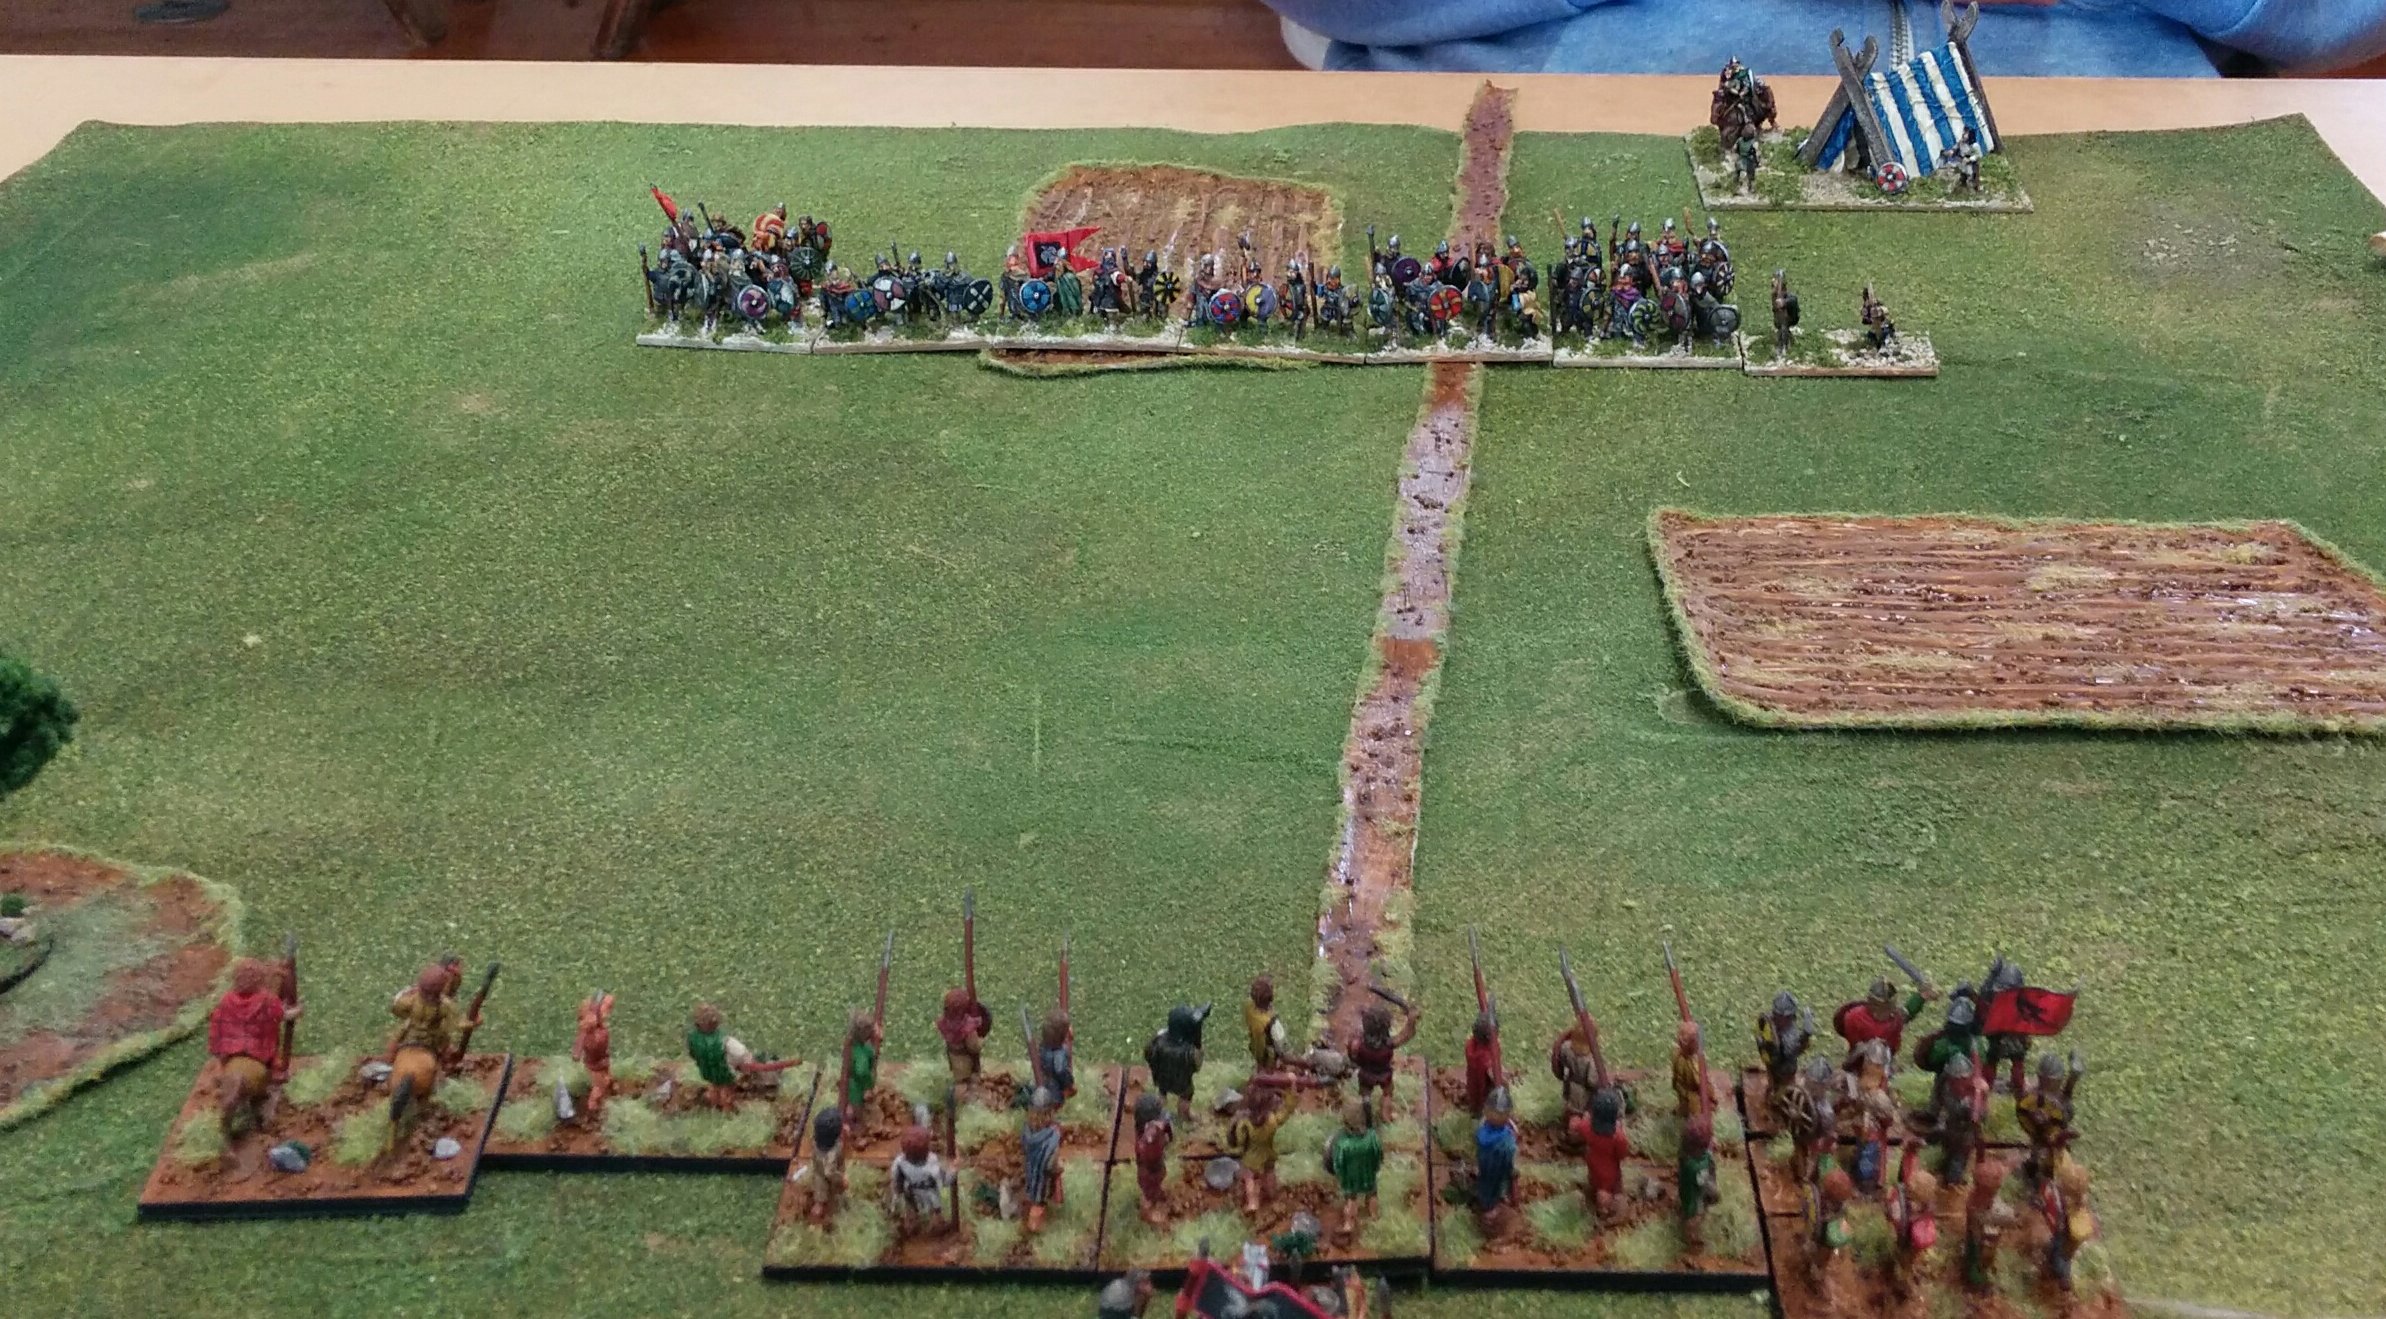
The two armies arrayed.

Mithridates.

Sulla.
This battle opened fast, with Roman psiloi advancing to face the scythed chariot. I opted to go after it with the Kappadokians, who were supposed to face the Roman cavalry. They killed it, but then were facing Roman legionaries, and the whole battleline was disordered. My combat dice were bad, but they shouldn’t have saved me from being dragged into such a disruptive effort to save the chariot. I lost.
- Sulla v. Mithridates
The second battle saw Mithrdidates on the offence facing an impressive city in the Balkans (Diocletian’s palace).

The Roman defenders.

Mithridates.
This time the chariot got stuck into some blade, along with the cataphracts. In short order the chariot had destroyed some blades and advanced into overlap onto some psiloi that the cataphracts routed.
The Romans were limited by PiPs in their response, but they managed to destroy an Armenian LH (these had rushed forward to cover the cataphracts, and avoid being attacked by the Roman cavalry).

The Roman response on their right flank.
Mithridates decided to continue the attack with the cataphracts, and to send the chariot out to the left to attack another legionary element. The remaining light horse retired. The chariot failed this time, and the cataphracts got a draw with the legionaries — not good. Now we were 2-2, but I had only 9 elements to the Romans 10.

After combat, the chariot and cataphracts are destroyed.
There was a lull while we both reorganised (and battled low PiPs).

The armies regroup.
The Romans won this one too, as I committed the imitation legionaries at little chance of success. The psiloi on their right fled, leaving its neighbour to be overlapped. I was pressured into this, as the two Kappadokians in the woods were risking being overlapped when the Romans advanced against them. On reflection, the Kappadokians would have been better on the other flank to face the cavalry. They did little in the woods. Overall, the verdict on the chariot is that it’s not a super-weapon, but could add some interesting wrinkles to a battle.
- Samanids v. Aztecs
After lunch it was the turn of the Samanids. First up they faced Aztecs (in the New World too, a first for the fabled Samanid navy!). The Aztecs deployed between two woods, while the invaders chose to deploy in the open.

The Aztec hordes (literally).

The Samanids
The Aztecs advanced beyond the woods. The Samanids saw an opportunity for their archers against the Aztec psiloi and moved them to their left as they advanced and methodically began to destroy hordes with their spear and cavalry.

Contact against the hordes.
In time we succeeded in killing all but one of the hordes (that one being the one that Joel had hoped would go, as it had a warband behind it, waiting to attack). We also got the two psiloi with two archers and a psiloi. In the centre one enemy blade had also been destroyed. However, one of our cavalry was destroyed, as had a bow. The enterprising enemy blade rushed through the gap he’d created and attacked our reserve, an element of archers. It survived the first round of combat, and then we surrounded it.

The blade is surrounded. The enemy general had retreated a little, and the remaining horde and warband can be seen in the background.
It survived, forcing us to recoil. The next turn it got that archer, while the general was able to attack my remaining archer that was in a wood, which broke in terror. I lost 4-3, though 8 of the Aztec elements had been broken! An excellent game.
- Samanids v. Cortez
My last game saw the Samanids face Cortez (IV/19c) and his Tlaxcalan allies. This time they were defending. Their hills and rough going was all in one part of the battlefield, which they were defending.

Cortez.

The Samanids.
I hoped to neutralise the artillery with my spearmen, while the archers shot from the protection of the hill. Getting into position on the hill took time, and the first element of archers to make it over the crest advanced into a hail of arrows and fled. The other two did get themselves into position, but did not feel they had the numbers to advance, especially as an element of spearmen had been shot away by the artillery.
What saved the Samanids was the slow reactions of the Spanish. In desperation the Samanid cavalry moved to outflank on their right flank. The response was a series of 1 PiPs. On the first, a single archer turned and shot at the Samanid LH, who recoiled to the edge of world. They paid for this by being fallen upon by the cavalry, who double-overlapped it and routed it. Another 1 PiP by the Spanish saw Cortez advance to face the cavalry. They ignored him and destroyed another archer. This continued until all three archers on that flank had fled. The Spanish response was to advance in the centre, but it proved too late; fast blade advancing uphill against solid bow in bad going made no headway. And the Samanid spear survived a round of combat against the Spanish solid foot.

Cortez advances on the Samanid foot.In the background the dire state of the Spanish left flank can be seen.
Meanwhile, the Samanid cavalry surrounded the Spanish artillery, while one cavalry sought to delay Cortez (they’d recoiled when facing him with LH flanking; now the LH joined the fight on the artillery. Cortez could only look on as his artillery joined the rout.

Cortez is unable to save the day as his artillery is destroyed.

The Spanish notice their left flank has broken and start to flee.
The final battle of the day was my only victory, and it owed a good deal to luck, but I enjoyed all the games, and learned a lot about using these two armies. In particular, I can see mastering archers as taking a while. Also, the scythed chariot is a challenge to use so that it disrupts the enemy, and not my own army.
Browny-con
8 October, 2018
Browny-con was organised by Grant at his house and was a great success — 8 players and six rounds of DBA. We used a scoring system, but were relaxed about army choices, going for match-ups at each round.
A few missed games at either end missed all the rounds, and we scored 5 pts for a bye. Otherwise it was 8 for a win, 1 for a loss and 0 for a draw and you subtracted losses for your win and added kills for your loss or draw. The scores were:
Benny 35
Mark 32
Simon 30
Grant 28
Dave 26
Philip 24
Joel 23
Nick 18
Camps sacked and generals killed were (Camps sacked – Generals killed):
Benny (0-2)
Mark (0-1)
Simon (0-0)
Grant (1-2)
Dave (0-1)
Philip (1-0)
Joel (0-0)
Nick (0-1)
My games were:
1. Mitanni v. Sea People (Philip)
The Mitanni destroyed the Sea People using their light option (Psiloi and Fast Auxilia). It was their six chariots that proved superior to the auxilia and fast blade they met.
2. Campanians v. Polybian Romans (Joel)
Joel fielded a lovely BUA (Diocletian’s palace). I had him have it on his side and charged into contact with him, hoping to win on my left flank where I had fast auxilia and cavalry against his cavalry and psiloi. My centre crumbled (hoplites not enduring against blade), and things looked hopeless when my general 6-1ed his to turn around the game. I then destroyed the psiloi and cavalry on my left wing. It was a very jammy victory!
3. Mitanni v. Ugarit (Dave)
What I did to Joel, Dave did to me. I had the factors, I thought, in this battle — I had solid auxilia facing fast auxilia and I had a LCh facing a psiloi on the other flank. The dice went against me and I was 6-1ed repeatedly, losing my General and five other elements in an absolute rout.
4. Mitanni v. Midianites (Grant)

Mitanni face Midianites.
After lunch I faced Grant’s Midianites, and was grateful to finally be defending, avoiding sand dunes. I went for my heavy option of solid auxilia and solid bow. The battle was tipping in Grant’s favour when one of my bow was destroyed, but the dice went my way and I rolled up his flank and won quickly.
5. Late Carthaginian v. Pyrrhus (Benny)

Carthage faces Pyrrhus.
This was a game I thought I had; I managed to get my elephant to face Pyrrhus. All I had to do was QK his Kn general. Unfortunately, to do this I’d moved the elephant in front of a pair of Gallic warbands. If I’d moved the warbands first, I might have avoided this. It was a sideways shuffle. Predictably the elephant had to recoil — twice! On my left flank a psiloi was destroyed by an enemy one, allowing it to close the door on my auxilia, ending the game.
I was lucky to avoid losing two LH to a situation on the other flank. Benny’s LH and cavalry had advanced on opposite sides of the hamlet, so they were not lined up. The Numidians were positioned to ZoC both of them. Benny attacked with the Cv and the Numidians conformed (as he couldn’t). He then could close the door with the LH. Fortunately I won the battle. It’s an odd situation. Benny’s cavalry couldn’t advance as a group, as they weren’t one. He didn’t set out to create such a situation, but it was a nasty one.

Numidians before being attacked by cavalry with a LH overlap.
6. Mithridates v. Marian Romans (Nick)
Nick’s bad luck continued. He took an artillery element in the middle of his legionaries. It faced my Sarmatian Kn flanked by pikes. On my left flank the Romans had more BGo troops than I did facing each other across a wood. Nick’s PiPs were terrible, which prevented him from moving into the woods. He attacked with his legionaries, leaving a gap for the artillery to continue shooting at the Sarmatians. I was lucky to avoid losing anyone in these attacks, but got to charge the Sarmatians at the artillery and close the door on the legionaries in the gap with some LH. The gap widened, and after surviving a turn the artillery was destroyed. This gap was one that the Romans couldn’t fill, hampered by bad PiPs and poor combat dice.
It was a great day; most of the battles played very quickly. There’s talk of getting some HoTT armies together next.
A number of battles with Nick
10 April, 2018
Despite plans to start a regular evening DBA meeting this year, it’s yet to happen, but I have caught up with Nick for a number of enjoyable games. One back in January saw a BBDBA contest in which my Marian Romans with Numidian allies were defeated by Nick’s Romans. We didn’t take any photos. I think my Numidians forgot to be defensive and were defeated before I could win elsewhere.
A fortnight ago we had a couple games using some of my newer armies. My Numidians defeated Nick’s Marian Romans.

The Numidians face Roman interlopers in a very green season in Numidia.

The Romans’ view.
I rushed forward to trap the legionaries next to the woods. I didn’t succeed, and I had the auxilia on my left that I didn’t want to meet with psiloi. From memory I was on the verge of defeat when I was lucky enough to create a hole in the line of the blade (I’d been falling back; I’d lost my only psiloi on the right and my commander was trying to retreat over the hill). This brought me back into the fight, which was looking over for the Numidians. I had been saved by good PIPs that allowed me to retire the general while keep pressure on in the centre. I was lucky to win.
The next battle was between my Campanians and an Italiot Hoplite army. It was fought on a battlefield with no Bad Going, but only a boggy and a scrubby patch, both Rough Going.

Campanians facing Italiot hoplites.

The Italiots.
My Hoplites created a breakthough in the centre, but I was so obsessed with winning on the flanks I didn’t exploit it. Instead, when I rolled 1 PIP I chose to take a risk with my general facing enemy cavalry so that I could develop an advantage on my right flank. This cost me the game, as my General was 6-1ed and destroyed. The Italiots managed a close victory.
Last weekend we caught up again. I got the Marians and Numidians out for a BBDBA game. Nick fielded his Early Imperial Romans. This game was interesting, as my centre destroyed his in record time and my Numidians were able to break their opponent with this support. I’ve not seen blade go down to blade so fast before. My dice were very good. the element that did it was a ring in. To get the 10 elements of legionaries I needed I used an element with different shield patterns. These are an element for my Mithridatic army, one I’ve described as Marian exiles fighting for Mithridates. Clearly they are dedicated defenders of the Republic.

The heroic Marian exiles.
The game was nearly over before the left wing made contact. My elephants were still stuck in rough going (my new hamlet), and I was nervous of the Roman knights.

The righteous defenders of the free Republic face off on hills against the supporters of the tyrant Augustus.

The EIR wing on my left, cavalry, knights and auxilia.

The EIR centre, auxilia, blade and bow.

The EIR wing on my right, blade, auxilia and rogue Numidian LH.

The battle from the side; the centre led by Cato is between two difficult hills; Juba’s Numidian psiloi are on one hill while his imitation legionaries, elephant and cavalry are in rough going; Labianus on the right wing is in a hamlet with elephants, cavalry and solid auxilia; he has psiloi and fast auxilia on the other hill.
Clearly the Numidians were not keen on fighting each other, as there were a number of rounds of combat that saw no casualties on that wing; the Romans were not so delicate in their attitude to each other. This is my first victory with this Marian BBDBA army. I’m still not sure how to get it to work well. I will probably get my Carthaginians out as a BBDBA army again soon. They are similarly winless, but I now have a better idea of how to organise commands.
Gallic Cavalry
23 October, 2016
I’ve finished the last of the figures I needed to get done for my trip to Conquest in two weeks time. These are a command element for my Marian Romans, and four elements of Gallic cavalry.
The Roman command is to replace the one I have of Julius Caesar. I’ve called the commander Quintus Labienus, the only one of Caesar’s legates who did not follow him over the Rubicon. Labienus was not only a brilliant commander, but also probably a man of principle; his decision to fight for the republic rather than his commander in Gaul is likely to have been taken out of a sense of loyalty to the concept of the republic; the idea he was a client of Pompey is reductive.

Caesar and Labienus.
I’m not sure I’m entirely happy with this element. They are all Freikorp figures, but the standard bearer is a giant next to the earlier figures. Nevertheless, I look forward to using Labienus rather than Caesar!

Another angle.

Another.
The four new elements of Gallic cavalry took quite a while to get done. At the last minute I found another figure to allow me to do four elements, rather than have a HotT hero. It involved using a figure from my Ancient British LH that are orphans until I get some more 3Wb; the horse was left over from an element of Carthaginian cavalry, which was fortuitous.

Four Gallic cavalry.
These were hard to fit on the bases. Both the CB and the Xyston figures are a bit animated. Keeping ‘hands inside the bus’ hasn’t entirely worked, especially on the sides of the elements. However, I’m pleased with the way the Xyston figures look amongst the Corvus Belli ones (and with the news that CB will be back in production again.

One side.

The other.
These elements will allow me to field Gauls as mercenaries and auxiliaries in other armies, and to use them for BBDBA.

All the Gallic cavalry.
Finally, I’ve added a corpse for Androgeus, one that he got the head he’s standing on for.

Androgeus and the decapitated Roman.

The head is now not so drained of blood.

Fresh blood from the Freikorp corpse.
Next up may be a Campanian army, or I may start on some 1:1200 Langton ancient galleys. I’m keen to start doing some naval warfare. Then again, Nennius wants a corpse for his head too!
DBA Day at the AWC
10 October, 2016
Sunday a week ago there was a very successful DBA day at the Auckland Wargames Club. As it led to other projects being planned, I’ve not got around to writing up any report until now. The format was friendly games; no set armies or points. I had five very enjoyable games.
- 1 – Marian Romans v. Alexandrian Imperial
My first game was against John, whose army is still being painted, so he borrowed figures from me. I’m pleased to say that they knew who their paymaster was, and fought accordingly!

A bird’s-eye view of the Marian Romans.
I was the defender and laid down some Marsh and ploughed fields (I’d just made some new terrain; I realised later that Marsh is not valid for Arable armies). Appropriate to the weather that day the fields were boggy.

The Romans, complete with an elephant.
![[a666: The Alexandrian deployment.]](https://hesperiana.files.wordpress.com/2016/10/a666.jpg)
The Alexandrian deployment.

The situation at the end. Not a single companion cavalryman left!
The surprising resilience of the Kappadocians secured a quick victory.
- 2 – Prefeudal Scots v. Vikings
The second combat was against Kieran’s Vikings. Again I was the defender and went for a marsh and a wood, which ended up being in the same corner.
The Viking invaders of Scotland.

The defenders of Scotland (helped by some friendly Vikings on their right flank.
The battle was a close one, where the Scots won first blood, when the Galwegians broke an element of Vikings. However, the centre was somewhat of a stalemate, with a lot of toing and froing. On the Scots’ right their Viking allies did good execution and contributed to a close-fought 4-2 victory. Terrain and the greater mobility of the Scots were significant factors.

The finals situation; the wood has saved the fragile Scots left flank. Their Viking allies have hared up the field on the right flank, while a schiltron has collapsed in the centre.
- 4 – Later Macedonians v. Polybian Romans
After lunch I faced Joel’s freshly painted Polybian Romans. I decided I really should get my Later Macedonians out to meet them. Naturally in the face of unprovoked Roman aggression I was the defender again. I took two large terrain pieces to anchor my flanks and restrict the battlefield to the advantage of the phalanx.

The valiant Macedonians line up to hold Roman depredation at bay.

Scurrilous Romans set on spreading tyranny.
The battle was close fought, with the battle going in the Romans’ favour on their left flank, while the Macedonians secured the advantage on their own left flank, destroying both elements of Roman velites. However, it was the steadfastness of the Macedonian blueshields that secured victory; despite being flanked by Roman cavalry they repeatedly refused to break. In the centre the Galatians made noble execution of Roman legionaries and the whiteshields (leukaspides) broke their opposing legionaries.

The situation at the end; the Macedonian right flank is lucky not to have broken after their light horse fled, but the centre has triumphed.
- 3 – Later Macedonians v. Polybian Romans
Actually, there is a report that prior to this battle the Macedonian general was troubled by a nasty dream in which his thureophoroi proved his undoing. Romans report that this was an actual battle, but the more reliable Greek chronicler disagree (the battle just described was actually our second, as the first was over so fast!). The Macedonians defended again. Their terrain was too small to constrain the battlefield.

The Macedonian deployment.

The Roman deployment.
The Macedonian thureophoroi attempted to defeat the Roman velites and were disgracefully defeated (they are prone to this; witness their routing by Spartan artillery). Philip V tried to stabilise things, but was defeated himself; the battle was over without the main lines having contacted.

The final position. The thureophoroi were quickly routed and Philip was flanked and defeated. There was a scary big hole in the Macedonian line.
- 5 – Prefeudal Scots v. Carolingian Franks
The last battle was against Mike’s Carolingian Franks. The Scots had got on their boats and visited France. It didn’t go well for them.

The Carolingian Franks. The red beads denote those that can dismount.

The Prefeudal Scots.
How the Galwegians got to be in the centre facing knights I don’t remember (I think I deployed and then moved the line along a bit to fit it in the legal area and didn’t check who was facing who. Unlike the bold Kappadocians at the start of the day, the Galwegians didn’t produce an upset against the Carolingian commander. The schiltons were under pressure and collapsed, but not before a few knights had fled in the face of the Scots cavalry.

The final situation after the Scottish centre had collapsed.
All in all, it was a great day; there is another account of it here, and there are plans for more DBA action there soon.
Spanish Mercenaries
10 October, 2016

The restored Spanish scutati (existing elements in the back).
I got a few more elements completed this weekend. I completed four elements of 4Ax, which will be used for Spanish Scutati serving in Carthaginian, Syracusan and Roman armies. This project also saw three elements of 3Ax being rebased for the Spanish army and around six caetrae being substituted for scuta to make them proper scutati.

Viking 4Bw (Feudal Castings figures).
I also have rebased some of my Viking 3Bw and Ps to 4Bw to comply with DBA 3.0; the 4Bw get a combat bonus when in side combat with their 4Bd, so this seemed worth the effort. Once the Gauls are done, only the Norse Irish of my armies will need any rebasing for DBA 3.0.

Four Spanish 4Ax for service in foreign armies.
The mercenary 4Ax are a combination of figures from Corvus Belli, which are no longer manufactured, and Xyston. I am really pleased with how they mix and I’m looking forward to getting the Gallic Xyston figures done to see how they look similarly mixed.

From the side.
These figures have rocks added, along with small bushes. I’ve done the same for the Numidians I finished earlier, so they are now properly finished. I needed to refresh my supply of kitty litter, as the remaining ‘stones’ were all too small.

From the other side.
I’ve been using a wet palette when I paint, and I find it very effective, though it does expose those paints that I should really bin and get new ones; in particular, my black has turned and should be replaced. Next up should be nine elements of Gallic 4Wb; and then three elements of Gallic Cv. But I’m pretty good at getting sidetracked!
BBDBA Civil Wars
19 September, 2016
Last Friday Nick and I tried a game of BBDBA. I’d got my Numidians finished and could field a Marian army, albeit with a few of the elements not as I’d want them. Nick put together another Marian army, not with any prior preparation. I was the defender and set up all my commands, followed by Nick. I then rolled 7 total for my PIPs, so made the ploughed rough; not what I’d expected!

The perfidious Caesarians arrayed with their lickspittle lackeys in support; the left command has Spanish auxiliaries, elephants cavalry; the centre command consists of a block of legionaries and a line of them; the right has legionaries and cavalry.
My plan was to win in the centre and hold on the flanks. I gave my high dice to the centre. The Numidian flank was hampered by the ploughed fields.

The glorious defenders of the republic. On the left is the loyal Juba with his elephants, imitation legionaries and Numidians; the centre is Scipio with elephants, legionaries and Spanish auxiliaries; the right has a few legionaries, Spanish auxiliaries and Gallic cavalry, commanded by Labienus.
My initial PIPs were very low, and I was anxious about trying to get my light troops across on my left to intercept the elephants. Nick had his high PIP dice there. I seemed to forget about holding on the flanks, and although I got one of the elephants, that command broke. There was a stalemate across the ploughed field on the right and I actually did win in the centre, where Nick was using some of his legionaries to break my left flank. However, I’d lost patience, and forgotten the plan, and attacked on the right flank. It didn’t go well.
The game took some time and was very close, in that I was close to breaking, but could have won if I’d hadn’t been so rash with the Numidians. In the end Nick broke the Numidians and won the battle. It was a fun game and I learnt a good deal about BBDBA.
We’ll have another game soon; I may have to rethink my commands; the centre could have used a more mobile reserve, but then the left flank would be less effective, possibly. Food for thought!
More on Allan Massie
3 September, 2016
I’ve now finished the Robert Harris trilogy on Cicero. It was very good, but it pales in comparison to Allan Massie’s books. I read his Augustus next, and loved it. Augustus is the narrator, and it is in two halves. The first he narrates to his grandsons Gaius and Lucius. It is optimistic; the second is narrated towards the end of his life and is much more gloomy. Massie paints a picture of somebody who is keen to present his legacy as a service to Rome; he has Augustus’ Res Gestae for this. He presents somebody who is perhaps not so self-aware as he thinks, as comes out when his dynastic plans go awry. Comments from Maecenas and Livia are particularly revealing.
I’d have to read Robert Graves’ I Claudius again (I read it as a teenager), but I think Massie’s portrayal of Livia is probably more believable. She’s a proud Claudian, not shy of reminding Augustus that she deigned to marry down to him!
One of the strengths of Massie’s books is that you very much get the perspective of the narrator, and it is biased. The scene he describes of the forging of the second triumvirate is similar in Augustus to in Mark Antony, which I’m reading now, but the differences are revealing. Augustus justifies himself, while Antony won’t talk of it, and it’s described by his secretary, Critias. I’ve not put the two scenes alongside each other, but the description of discussion of the proscription is modified.
Massie describes Mark Antony very favourably. His biggest failing is his sense of honour (something Ronald Syme suggests too). He would have been best to have crushed Octavian while he had the upper hand, but is described as having given his word, and therefore was not willing to do this. Massie’s description of Antony’s relationship with Marcus Brutus is fascinating; he gives a context for why Antony described Brutus as the noblest Roman at his funeral.
The varied takes on Brutus in the three books I’ve read by Massie so far are a nice illustration of how well he gets into the persona of his narrators. Mark Antony’s sympathy for Brutus contrasts with the antipathy, for different reasons, of Augustus and Decimus Brutus in the two earlier books.
Meanwhile, I have all the figures for the Thapsus BBDBA army. They are all primed and waiting to be painted. The Numidians are close to being done, and the Xyston Gauls and Spanish will mix nicely with the CB ones. It helps that I’m using CB shields. Plans to go to Conquest are also advancing. I had a couple of games of DBA with Nick a couple of weeks ago. We had a Marian Roman civil war, where his Romans with an elephant were undone by my use of Armenian cataphracts (and some good dice). My Seleucids against his Ptolemaics was the reverse, where my PIP dice were cripplingly low; the elephant and the scythed chariot are not forgiving of such dice. It was only that Nick had average combat dice that allowed me to hang around for as long as I did.
Allan Massie and Robert Harris
7 August, 2016
What got me thinking of fielding a Marian Roman army for BBDBA was reading Allan Massie’s novel Caesar. It’s narrated by Decimus Brutus, one of Caesar’s lieutenants and one of the conspirators. It examines the motives of the aristocracy in that period sensitively and intelligently. I particularly liked the way Massie described Decimus Brutus’ changing opinion of the choices Labienus made. Initially he’s derided as an overprincipalled clown, but later as the necessity for assassination grows in Brutus’ mind he is sympathetic to Labienus; there is also a fictional letter to Brutus from Labienus explaining why he supported Pompey, recognising him as the lesser of two evils and one that he thought he might be able to control better.
I’d like to read the rest of Massie’s novels on the figures of this period — Mark Antony, Augustus, Tiberius, Caligula, and Nero’s Heirs, but I can’t get the books from Google Play to my Nook; until I can I won’t buy more. Instead I’ve been finishing Robert Harris’ series narrated by Cicero’s slave then freedman, Tiro. I’ve finished the first two books, Imperium and Lustrum (or Conspirata) and am just starting on the last Dictator. The portrayal of Cicero is believable, and his take on Caesar is one that I agree with.
Anyway, it was while reading Massie that I thought that I could happily field an army led by either the Republican resistance to Caesar, or the Liberators who delivered extrajudicial justice to the tyrant. The Thapsus army has the advantage of allowing a Numidian ally and lots of elephants to bolster the Roman blade against opponents with knights. I’ve had the Numidians waiting to be painted for a while, and I had a Freikorps Carthaginian elephant that has a Numidian mahout; I’ll get two more for the maximum pachydermal goodness. I was pleased to read in the continuation of Caesar’s Civil War commentaries that Labienus had Gallic cavalry with him at Thapsus, so that’s an incentive to get more of my Gallic cavalry painted to enable Labienus to restore the Republic to its former virtue, guided by the moral vision of Cato the Younger.
BBDBA
6 August, 2016
It’s been quite a while since I’ve posted on this blog. Recently I was reminded that Conquest was coming up at the end of this year; Keith’s planning a new format with some BBDBA for the last day. It’s got me motivated to see what I could field if I were to attend. I don’t have enough figures for any army to be made up of 36 elements from one list. I’d need to field 24 elements from one list and take an ally. This precludes taking a successor army, which is a pity, as pike are better with solid wings, something they struggle to get in normal DBA. At this stage I’ve got a few armies I’m looking at:
The Republican army at Thapsus led by Scipio and Labienus and aided by their ally the Numidian Juba. I’m painting the Numidians now, and I’m looking at rebasing Spanish to make enough 4Ax. Otherwise, I’m pretty much able to field this army. I would look to get a few more elephants, though. I’m not normally a big fan of Roman armies, but the any that resisted the tyrant Caesar is OK, especially with honourable leaders such as Labienus and Cato the Younger.
Another army is a Mithridatic one with an Armenian ally. I’d need to paint a bit more to get this one ready. It’d have two solid wings of light horse and auxilia, a centre of blade or pike and enough knights to be a threat.
I could also put together a Syracusan army with a Carthaginian ally.
Anyway, along with getting these armies ready, I’m reluctantly planning to rebase my Gauls as 4Wb; I’m hoping I can get some rather nice looking Xyston Gallic foot nobles to mix in with the Corvus Belli ones to add some further presence to each element. I also have plenty of Gallic cavalry to look at painting. Perhaps they could be another BBDBA army!

