Practice games
15 January, 2019
Yesterday I caught up with Joel for some very enjoyable practice games. In the first two games Mithridates squared off against Sulla. I took the scythed chariot to assess its potential, as well as an Armenian ally of a 4Kn amd two LH: Cv (gen), SCh, four 4Bd, two 3Ax, Ps + 4Kn, two LH.
- Mithridates v. Sulla
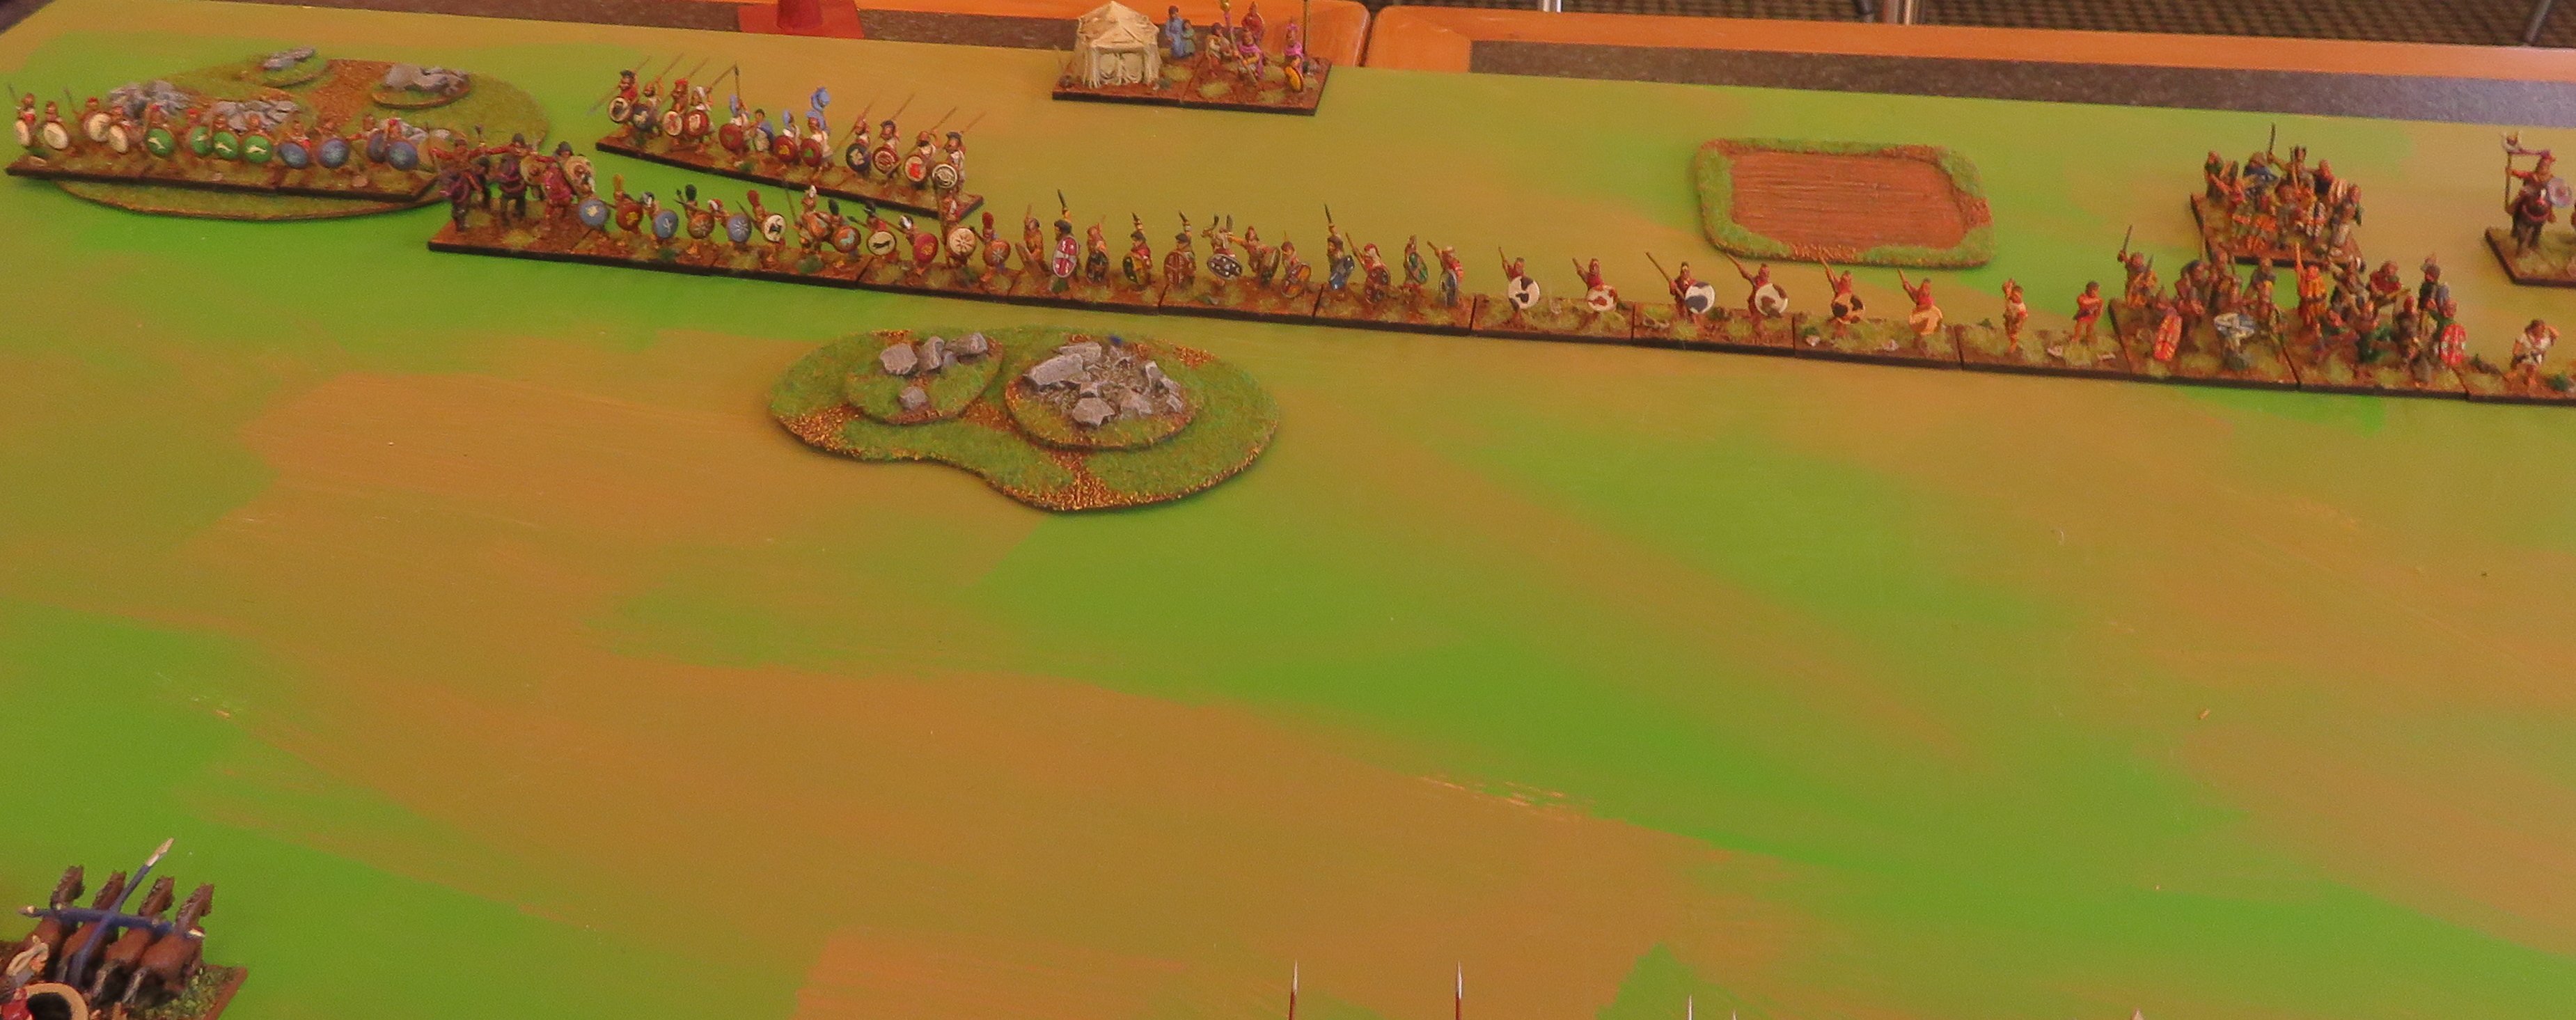
In the first battle, Mithridates was the defender, and went for a battlefield of two gentle hills, a hamlet and a patch of rocky ground (both RGo).

The two armies arrayed.

Mithridates.

Sulla.
This battle opened fast, with Roman psiloi advancing to face the scythed chariot. I opted to go after it with the Kappadokians, who were supposed to face the Roman cavalry. They killed it, but then were facing Roman legionaries, and the whole battleline was disordered. My combat dice were bad, but they shouldn’t have saved me from being dragged into such a disruptive effort to save the chariot. I lost.
- Sulla v. Mithridates
The second battle saw Mithrdidates on the offence facing an impressive city in the Balkans (Diocletian’s palace).

The Roman defenders.

Mithridates.
This time the chariot got stuck into some blade, along with the cataphracts. In short order the chariot had destroyed some blades and advanced into overlap onto some psiloi that the cataphracts routed.
The Romans were limited by PiPs in their response, but they managed to destroy an Armenian LH (these had rushed forward to cover the cataphracts, and avoid being attacked by the Roman cavalry).

The Roman response on their right flank.
Mithridates decided to continue the attack with the cataphracts, and to send the chariot out to the left to attack another legionary element. The remaining light horse retired. The chariot failed this time, and the cataphracts got a draw with the legionaries — not good. Now we were 2-2, but I had only 9 elements to the Romans 10.

After combat, the chariot and cataphracts are destroyed.
There was a lull while we both reorganised (and battled low PiPs).

The armies regroup.
The Romans won this one too, as I committed the imitation legionaries at little chance of success. The psiloi on their right fled, leaving its neighbour to be overlapped. I was pressured into this, as the two Kappadokians in the woods were risking being overlapped when the Romans advanced against them. On reflection, the Kappadokians would have been better on the other flank to face the cavalry. They did little in the woods. Overall, the verdict on the chariot is that it’s not a super-weapon, but could add some interesting wrinkles to a battle.
- Samanids v. Aztecs
After lunch it was the turn of the Samanids. First up they faced Aztecs (in the New World too, a first for the fabled Samanid navy!). The Aztecs deployed between two woods, while the invaders chose to deploy in the open.

The Aztec hordes (literally).

The Samanids
The Aztecs advanced beyond the woods. The Samanids saw an opportunity for their archers against the Aztec psiloi and moved them to their left as they advanced and methodically began to destroy hordes with their spear and cavalry.

Contact against the hordes.
In time we succeeded in killing all but one of the hordes (that one being the one that Joel had hoped would go, as it had a warband behind it, waiting to attack). We also got the two psiloi with two archers and a psiloi. In the centre one enemy blade had also been destroyed. However, one of our cavalry was destroyed, as had a bow. The enterprising enemy blade rushed through the gap he’d created and attacked our reserve, an element of archers. It survived the first round of combat, and then we surrounded it.

The blade is surrounded. The enemy general had retreated a little, and the remaining horde and warband can be seen in the background.
It survived, forcing us to recoil. The next turn it got that archer, while the general was able to attack my remaining archer that was in a wood, which broke in terror. I lost 4-3, though 8 of the Aztec elements had been broken! An excellent game.
- Samanids v. Cortez
My last game saw the Samanids face Cortez (IV/19c) and his Tlaxcalan allies. This time they were defending. Their hills and rough going was all in one part of the battlefield, which they were defending.

Cortez.

The Samanids.
I hoped to neutralise the artillery with my spearmen, while the archers shot from the protection of the hill. Getting into position on the hill took time, and the first element of archers to make it over the crest advanced into a hail of arrows and fled. The other two did get themselves into position, but did not feel they had the numbers to advance, especially as an element of spearmen had been shot away by the artillery.
What saved the Samanids was the slow reactions of the Spanish. In desperation the Samanid cavalry moved to outflank on their right flank. The response was a series of 1 PiPs. On the first, a single archer turned and shot at the Samanid LH, who recoiled to the edge of world. They paid for this by being fallen upon by the cavalry, who double-overlapped it and routed it. Another 1 PiP by the Spanish saw Cortez advance to face the cavalry. They ignored him and destroyed another archer. This continued until all three archers on that flank had fled. The Spanish response was to advance in the centre, but it proved too late; fast blade advancing uphill against solid bow in bad going made no headway. And the Samanid spear survived a round of combat against the Spanish solid foot.

Cortez advances on the Samanid foot.In the background the dire state of the Spanish left flank can be seen.
Meanwhile, the Samanid cavalry surrounded the Spanish artillery, while one cavalry sought to delay Cortez (they’d recoiled when facing him with LH flanking; now the LH joined the fight on the artillery. Cortez could only look on as his artillery joined the rout.

Cortez is unable to save the day as his artillery is destroyed.

The Spanish notice their left flank has broken and start to flee.
The final battle of the day was my only victory, and it owed a good deal to luck, but I enjoyed all the games, and learned a lot about using these two armies. In particular, I can see mastering archers as taking a while. Also, the scythed chariot is a challenge to use so that it disrupts the enemy, and not my own army.
Conquest 2018, Pt. 3
17 November, 2018
The final day of Conquest was three BBDBA games. A lot hinged on the initial dice roll for who was the invader and got to set up second. As an army characterised by Phil Barker as particularly aggressive, the Later Carthaginians should have had the advantage here, but on this occasion they allowed themselves to be invaded for the first two battles.
- 1. Polybian Romans (Keith)
The first battle was against Keith’s Polybian Romans. I placed two large marshes and a difficult hill. The command with the Gallic Warband commander set up behind the hill; the spear were in the middle and the left flank with the C-in-C had a marsh occupied with two psiloi.

The Carthaginian right flank and central commands.

The two armies opposed; the Carthaginian left flank command can be seen in the foreground.

The Roman right flank and centre.

Their left flank.
I came to realise that the terrain was not working to my advantage, and things stagnated with neither side able to make much progress in the time was called. On the left flank the cavalry had to retire before the advancing foot.

Initial advances.

Working at correcting things.
On the right flank the warband struggled to move over the hill, and the command range of the commander slowed down the advance of the psiloi, who were needed to support the Spanish scutati.

Slow progress on the right flank.
At the time the game ended the Carthaginian centre was almost broken (a flanked spearman refused to break), the warband were starting to put pressure on the right flank, but were disorganised by the hill. On the left flank a stalemate had resulted.
- 2. Athenians with Thessalian allies (Colin)
Against Colin’s Greeks, the Carthaginians were again defending. Colin had cavalry seeking to destroy exposed psiloi on my left flank, and on the right flank they had Thessalian cavalry facing the Numidians.

Athenians with Thessalian allies on their left flank.]

The opposing Carthaginian left flank.

Their right flank and centre.
Things did not go altogether to plan for the Greeks, and the Athenian cavalry were briskly destroyed by valiant Libyans. This precipitated a collapse on that flank.

Libyan javelinmen gloriously see off Athenian cavalry, while Numidians rush to fill an anticipated gap.
The Numidians were trying to bolster the threat to the left flank. As it turned out, two of them could turn round, while two stayed to exploit the advantage. The Athenian light troops were no match for the Spanish, and soon the Gauls were ululating their way forward.

The Athenian right flank starts to fold as their light troops break and the Gallic warbands surge forward.
On the other flank, things were not so happy.

Thessalians have the Carthaginians at a disadvantage.
However, the Carthaginians had a lucky escape, when the Thessalian commander was killed.

Disaster for the Thessalians as their commander is killed.
For all this, the Thessalian cavalry still had the Carthaginians at a disadvantage.

Despite the loss of their general the Thessalians continue to apply pressure.
The Gauls broke the Athenians right flank, but not before two warbands were broken. They spent a few turns mopping it up (in hindsight I should have remembered that it should have been removed after losing half of their elements; this was possibly crucial). Meanwhile, the Carthaginian centre was faltering and eventually broke.

The Carthaginian centre breaks.
When time was called I need one more element to win. I might have got it had I remembered that a command is removed as soon as half of it has been destroyed; I might have gained an extra turn to get that last element. For all that, I was under pressure on the right flank and had my centre collapsing.
- 3. Seleucids (Gordon)
Finally, in the last game I was the aggressor against Gordon’s Seleucids. I exploited this to the hilt in choosing which commands faced which.

The Seleucid left flank facing Carthage invading Syria.

Their centre and right flank.
Taking note of where the Seleucid cavalry was, the Carthaginians chose to have their light troops in the centre to face the phalanx. Their spearmen would hold the right flank defensively, and the cavalry on the left flank could exploit their numbers against psiloi and light horse, while the Numidians faced the xystophoroi.
The Carthaginians meet the phalanx with light troops and the elephants and chariots with spearmen.

Massed cavalry face the beleaguered Seleucid right flank.

The two armies opposed.

The light troops advance while the spearmen wait.

Cavalry swarm forward on their left flank.
The Seleucid scythed chariots proved ineffectual, and the centre and right flank waited while the left flank sought to exploit its advantage. It did this rapidly. It lost two Numidians to the xystophoroi, but in the end prevailed so that the cavalry could chase down the exposed psiloi. Meanwhile, the rest of the Seleucids were advancing, but were unable to gain a significant advantage, and the phalanx was waiting to be rolled up on its exposed flank. At this point the Seleucid general capitulated.

The Seleucid right flank has collapsed and the phalanx is defenceless. The Seleucids capitulate.

The Seleucid elephants on their left flank had routed some Spanish scutati, but overall had made little impression in the short time they had before their other flank collapsed.
I was pleased with how the Carthaginians performed. I think the aggression dice is hugely significant for BBDBA. I wonder if deploying with alternating commands might not reduce this a little.
Conquest 2018, Pt. 2
13 November, 2018
After lunch on Saturday I had a chance to get my newly painted Syrians out. I realised, with relief, that they would not have to face Eric’s Hussites, and, with disappointment, that they would not meet Robin’s Ottomans. I’d had a couple of games the Monday before with Grant facing Normans impersonating WotR English, as there were two of those armies here, and I’d not learned how to face ranged elements well. I did better in the second of the games with Grant, which buoyed me up somewhat.
- 1. War of the Roses English (Keith)
Their first encounter was with the Keith’s WotR English. And sure enough, I was defending. However, the English did not go for too much terrain.

The Syrians.
I deployed my Adath militia on a dificult hill and the rest of my army spreading out to the right of it.

The English.
Facing them the English deployed their artillery next to an enclosure (RGo) and on their open right flank they had a solitary cavalry, although their reserve would be able to reinforce it.
I hoped to attack the artillery with my javelinmen and archers; and I succeeded in getting the two Bedouin behind their lines, where they destroyed an element of billmen. The archers attacked the artillery on its flank, forcing it to turn to face. The English commander and the reserve billmen responded to the Bedouing threat. Overlapped by the billmen and attacked by the general, one of the Bedouin nearly won the battle, rolling 6 to 2. It was a stick!

Bedouin get behind the lines.
On my next turn, I rolled 5 PiPs and becoming shaken by the enemy shooting (one of the Syrian cavalry had broken), I charged into the echeloned enemy line. It was a disaster. I’d somehow miscounted the enemy, and my elements did not end up facing the ones I thought they would. My general outdid the English one, rolling a humiliating 1 to lose the game.
In hindsight, the attack was folly, but it it uncomfortable receiving fire, and I couldn’t see a way of improving the situation for the Bedouin (the Turkomans might have been able to join them).
- 2. Aztecs (Colin)
For my second battle I was more comfortably defending, and I did not make it easy for the Aztecs, chosing a small hamlet (BUA), a gentle hill and a road.

The Aztecs, splendidly painted.
The Aztecs massed their hordes on their right flank and their psiloi on their left. I had the luxury of deploying to choose my targets. My javelinmen and the horde faced the psiloi, while cavalry faced the warband and blades. My light horse screened the hordes.

The Syrians.
On contact the general destroyed some blades and the warband went down to some ghulams. Elsewhere their general recoiled the other Ghulams, as did their psiloi my javelinmen.

Contact!
Their general opted to retreat to the hill, while the hordes flanked and destroyed a Bedouin LH. On my turn, the ghulams destroyed another blade, and the javelinmen and archers got a psiloi to break the enemy’s resolve.

Victory!
That was the last outing for the Syrians, as my next round was a bye. I was sitting second by my count, but my hope of winning rested on Keith’s English defeating Eric’s Hussites, as he had secured two more points in his defeat against me than I got in my defeat to Keith. As it turned out, his Hussites proved too tough for the English and I came second. It was a thoroughly enjoyable day — good opponents and good games played in a good spirit. I’d like to thank Keith for organising it!
Conquest 2018, Pt. 1
12 November, 2018
This is the sixth Conquest DBA competition I’ve taken part in; my first was in 2009, and then there was a hiatus between 2012 and 2015. This time I took my Later Carthaginians again and the Syrians. I didn’t get the veteran spearmen painted in time for the trip, but there were a couple of new figures, more Libyan skirmishers, and some Liby-Phoenician cavalry; both of these elements were heroic on occasions.
The first day was DBA and the Carthaginians had three battles in the morning. It started with the ill-omened discovery that the white shielded spearmen had had a shield fall off.
- 1. Early Mycenaeans (Robin)
Up first was Robin’s Early Mycenaeans, with a menacing combination of heavy chariots and pike. I was the attacker.

Early Mycenaeans.

Another angle.
I was able to arrange my psiloi to neutralise his phalanx, and my spear and Numidians to face his chariots. On the flanks my match-ups were favourable too, and the general formed a reserve for the spear.

The Carthaginians.
Early up the new Libyan skirmishers routed some pike (6-1) and the blue shields did likewise to some heavy chariots; the white shields were less steadfast (disconcerted by the loss of one of their shields). The green shields recoiled the enemy general, while the Numidians suckered in their opposing chariots.

After the initial rounds of combat.
The battle developed rapidly; the general filled the gap left by the departing white shields, and the Numidians destroyed their opposing chariots. Meanwhile, the enemy general routed the green shields. However, the Numidians moved across and taught him a stern lesson, winning the game.

Victorious against one squadron of chariots, the Numidians then triumph over to the enemy general.
This was the first general’s scalp for the Numidians, but by no means their last.
- 2. Palmyrans (Eric)
Next up I faced Eric’s Palmyrans. I was again attacking. These had a fort positioned with mathematical precision on the field. I opted to have the fort on my battle line, and Eric garrisoned it with a bow element.

The Palmyrans and their fort.
I deployed to try to take the fort on the first turn.

The Carthaginian deployment.

Another angle.
The white shields were comforted to see their shield returned owing to the magic of Blutak. On the first turn I saw the Palmyrans advance with fearsome speed, and I failed to take the fort. I was then hampered by PiP dice of 1 or 2 for most of the game. Early up the blue shields fell to the enemy commander, and the Libyan skirmishers were routed by cataphracts. Things were looking bleak, but then the green shields took the fort on a solo assault and while the Balaeric slingers scorned the dangers of the opposing cataphracts and light horse for three turns, the Carthaginian cavalry destroyed an archer. The white shields had destroyed a cataphract unit (showing the difference a shield makes!). However, the enemy commander had destroyed one of the Numidian cavalry.

Things swing back towards the Carthaginians. The new Liby-Phoenician cavalry shine against archers.
On the turn that the second archer fell, the Balaeric slingers decided they’d done enough and retired. The game was now balanced 4-4. I rolled a handsome 3 for PiPs (the most since the first turn). I decided to bring the spearmen out of the fort and attack again with the Numidians. The double overlapped general was defeated and the Numidians collected their second scalp.

After the general is routed.
This was a very satisfying victory. I could bemoan my PiPs, but my troops resisted shooting with great determination, and my combat dice were good when it mattered.
- 3. Seleucids (Gordon)
The Carthaginian’s last outing for the day was against Gordon’s Seleucids. Again I was the attacker. And again I opted to face the phalanx with psiloi.

Seleucid deployment.

Carthaginian deployment.
The Carthaginians saw off the scythed chariot (against their spear). As the lines meet, Seleucid psiloi are overpowered by the Carthaginian cavalry and the Balaeric slingers flee the phalanx. However, one of the spear is routed by an elephant.

Early situation.
On the left flank the last psiloi fled, and the Seleucid general attempted to stabilise things. However, the Balaeric slingers demolished two elements of pike to win the game. The Gauls sat out their second battle, never moving.

Victory. The double-overlapped pike is destroyed.
The morning was hugely successful for the Carthaginians; all but the Gauls had been in the action, and the light troops had proved very dangerous.
Browny-con
8 October, 2018
Browny-con was organised by Grant at his house and was a great success — 8 players and six rounds of DBA. We used a scoring system, but were relaxed about army choices, going for match-ups at each round.
A few missed games at either end missed all the rounds, and we scored 5 pts for a bye. Otherwise it was 8 for a win, 1 for a loss and 0 for a draw and you subtracted losses for your win and added kills for your loss or draw. The scores were:
Benny 35
Mark 32
Simon 30
Grant 28
Dave 26
Philip 24
Joel 23
Nick 18
Camps sacked and generals killed were (Camps sacked – Generals killed):
Benny (0-2)
Mark (0-1)
Simon (0-0)
Grant (1-2)
Dave (0-1)
Philip (1-0)
Joel (0-0)
Nick (0-1)
My games were:
1. Mitanni v. Sea People (Philip)
The Mitanni destroyed the Sea People using their light option (Psiloi and Fast Auxilia). It was their six chariots that proved superior to the auxilia and fast blade they met.
2. Campanians v. Polybian Romans (Joel)
Joel fielded a lovely BUA (Diocletian’s palace). I had him have it on his side and charged into contact with him, hoping to win on my left flank where I had fast auxilia and cavalry against his cavalry and psiloi. My centre crumbled (hoplites not enduring against blade), and things looked hopeless when my general 6-1ed his to turn around the game. I then destroyed the psiloi and cavalry on my left wing. It was a very jammy victory!
3. Mitanni v. Ugarit (Dave)
What I did to Joel, Dave did to me. I had the factors, I thought, in this battle — I had solid auxilia facing fast auxilia and I had a LCh facing a psiloi on the other flank. The dice went against me and I was 6-1ed repeatedly, losing my General and five other elements in an absolute rout.
4. Mitanni v. Midianites (Grant)

Mitanni face Midianites.
After lunch I faced Grant’s Midianites, and was grateful to finally be defending, avoiding sand dunes. I went for my heavy option of solid auxilia and solid bow. The battle was tipping in Grant’s favour when one of my bow was destroyed, but the dice went my way and I rolled up his flank and won quickly.
5. Late Carthaginian v. Pyrrhus (Benny)

Carthage faces Pyrrhus.
This was a game I thought I had; I managed to get my elephant to face Pyrrhus. All I had to do was QK his Kn general. Unfortunately, to do this I’d moved the elephant in front of a pair of Gallic warbands. If I’d moved the warbands first, I might have avoided this. It was a sideways shuffle. Predictably the elephant had to recoil — twice! On my left flank a psiloi was destroyed by an enemy one, allowing it to close the door on my auxilia, ending the game.
I was lucky to avoid losing two LH to a situation on the other flank. Benny’s LH and cavalry had advanced on opposite sides of the hamlet, so they were not lined up. The Numidians were positioned to ZoC both of them. Benny attacked with the Cv and the Numidians conformed (as he couldn’t). He then could close the door with the LH. Fortunately I won the battle. It’s an odd situation. Benny’s cavalry couldn’t advance as a group, as they weren’t one. He didn’t set out to create such a situation, but it was a nasty one.

Numidians before being attacked by cavalry with a LH overlap.
6. Mithridates v. Marian Romans (Nick)
Nick’s bad luck continued. He took an artillery element in the middle of his legionaries. It faced my Sarmatian Kn flanked by pikes. On my left flank the Romans had more BGo troops than I did facing each other across a wood. Nick’s PiPs were terrible, which prevented him from moving into the woods. He attacked with his legionaries, leaving a gap for the artillery to continue shooting at the Sarmatians. I was lucky to avoid losing anyone in these attacks, but got to charge the Sarmatians at the artillery and close the door on the legionaries in the gap with some LH. The gap widened, and after surviving a turn the artillery was destroyed. This gap was one that the Romans couldn’t fill, hampered by bad PiPs and poor combat dice.
It was a great day; most of the battles played very quickly. There’s talk of getting some HoTT armies together next.
Recent games
7 October, 2018
This year I’ve not had many games of DBA, but I’ve enjoyed the ones I’ve played. In the middle of the year we had a series of games organised by Grant at his house that he called Browney-con. I’ll finish the write-up some time soon. Otherwise, last month I caught up with Nick for a game of BBDBA at the AWC. My Carthaginians lost to his Polybian Romans, but I did take away from it a better combination of commands.

Carthaginians (right) facing invading Polybian Romans last September.
This weekend we had more games at the AWC (no photos this time). My Carthaginians went against Nick’s Polybians again. I was the attacker, and made things difficult for myself by deploying first! I possibly created an opportunity for myself, as my left flank was the high PIP command with all my Cv and LH. My right flank ended up in rough going against Nick’s high PIP command of Cv and 4Ax. Great dice allowed me to redeploy four of the Numidians to the right flank. In a tight encounter they managed to destroy that flank for the loss of only one Numidian. However, the command on that flank collapsed on the same turn, losing their Wb commander and two of their Scutarii.
Remarkably, the centre of Sp was unharmed, as was the left flank, apart from the Numidians that had done their march. That flank was in a stalemate with the Triarii. In fact, the spearmen were overpowering the Legionaries, and had inflicted a loss, as had the Wb general before he was killed.
The battle came to a conclusion with the Numidians ignoring the two demoralised commands facing each other and marching to the centre of the field to attack psiloi there. The spearmen had another success and in the last turn completed their great performance by killing another element of legionaries. The Numidians had already broken the command, however, with their attacks on psiloi, and the Roman high PIP command lost their general too.
After lunch we had two games of DBA. My Mittani were unsuccessful against Grant’s Midianites and Kieran’s Minoans, whereas Nick’s newly painted Later Crusaders were successful against Kieran’s Japanese, and Grant’s Ayyubid Egyptians. It was a really enjoyable day and there’s talk of more games too; hopefully we can get a campaign underway.
A number of battles with Nick
10 April, 2018
Despite plans to start a regular evening DBA meeting this year, it’s yet to happen, but I have caught up with Nick for a number of enjoyable games. One back in January saw a BBDBA contest in which my Marian Romans with Numidian allies were defeated by Nick’s Romans. We didn’t take any photos. I think my Numidians forgot to be defensive and were defeated before I could win elsewhere.
A fortnight ago we had a couple games using some of my newer armies. My Numidians defeated Nick’s Marian Romans.

The Numidians face Roman interlopers in a very green season in Numidia.

The Romans’ view.
I rushed forward to trap the legionaries next to the woods. I didn’t succeed, and I had the auxilia on my left that I didn’t want to meet with psiloi. From memory I was on the verge of defeat when I was lucky enough to create a hole in the line of the blade (I’d been falling back; I’d lost my only psiloi on the right and my commander was trying to retreat over the hill). This brought me back into the fight, which was looking over for the Numidians. I had been saved by good PIPs that allowed me to retire the general while keep pressure on in the centre. I was lucky to win.
The next battle was between my Campanians and an Italiot Hoplite army. It was fought on a battlefield with no Bad Going, but only a boggy and a scrubby patch, both Rough Going.

Campanians facing Italiot hoplites.

The Italiots.
My Hoplites created a breakthough in the centre, but I was so obsessed with winning on the flanks I didn’t exploit it. Instead, when I rolled 1 PIP I chose to take a risk with my general facing enemy cavalry so that I could develop an advantage on my right flank. This cost me the game, as my General was 6-1ed and destroyed. The Italiots managed a close victory.
Last weekend we caught up again. I got the Marians and Numidians out for a BBDBA game. Nick fielded his Early Imperial Romans. This game was interesting, as my centre destroyed his in record time and my Numidians were able to break their opponent with this support. I’ve not seen blade go down to blade so fast before. My dice were very good. the element that did it was a ring in. To get the 10 elements of legionaries I needed I used an element with different shield patterns. These are an element for my Mithridatic army, one I’ve described as Marian exiles fighting for Mithridates. Clearly they are dedicated defenders of the Republic.

The heroic Marian exiles.
The game was nearly over before the left wing made contact. My elephants were still stuck in rough going (my new hamlet), and I was nervous of the Roman knights.

The righteous defenders of the free Republic face off on hills against the supporters of the tyrant Augustus.

The EIR wing on my left, cavalry, knights and auxilia.

The EIR centre, auxilia, blade and bow.

The EIR wing on my right, blade, auxilia and rogue Numidian LH.

The battle from the side; the centre led by Cato is between two difficult hills; Juba’s Numidian psiloi are on one hill while his imitation legionaries, elephant and cavalry are in rough going; Labianus on the right wing is in a hamlet with elephants, cavalry and solid auxilia; he has psiloi and fast auxilia on the other hill.
Clearly the Numidians were not keen on fighting each other, as there were a number of rounds of combat that saw no casualties on that wing; the Romans were not so delicate in their attitude to each other. This is my first victory with this Marian BBDBA army. I’m still not sure how to get it to work well. I will probably get my Carthaginians out as a BBDBA army again soon. They are similarly winless, but I now have a better idea of how to organise commands.
AWC Chariot DBA Day
10 April, 2018
This DBA Day took place at the Auckland Wargames Club on 18.12.17. Nearly four months on I have no great memory of the individual battles, though I enjoyed the day greatly. The participants and their final points were:
Name – Army – Points
Grant – I/6b Early Bedouin – 32
Philip – I/7b Early Libyan – 25
Kieran – I/18 Minoan – 23
Nick -I/22a NK Egyptian – 21
Mike – I/24b Hittite Empire – 18
Mark – I/19 Mittani – 17
Simon – I/34a Later Hebrew – 15
Dave – I/20a Ugaritic – 13
My first battle was against the Ugarites. I either won or it was a draw that I was ahead on. I do know my horde were victorious, which is grounds for celebration on its own.

The Ugarites with their heavy chariots.

What the Ugarites saw.

Towards the end, when the Ugarites had suffered several loses.
I next faced the Egyptians and was rapidly defeated, if I remember rightly. I guess I blotted that defeat out!

Against the Egyptians.

From above.

And from the other direction.
After lunch I played the Hittites. I think I lost again, but I don’t have the score sheets any more.

Facing the Hittites.

Another angle.
The last battle was against Hebrews, and I know I won this one. However, I’m pretty sure the deployment in the river was illegal.


What the Hebrews could see.
I think I destroyed the two psiloi and then triumphed over the auxilia that came forward to meet me.
Some statistics for the day are:
Own general killed:
Grant I/6b Early Bedouin 0
Philip I/7b Early Libyan 1
Kieran I/18 Minoan 2
Nick I/22a NK Egyptian 0
Mike I/24b Hittite Empire 1
Mark I/19 Mittani 1
Simon I/34a Later Hebrew 2
Dave I/20a Ugaritic 0
Enemy generals killed:
Grant I/6b Early Bedouin 3
Philip I/7b Early Libyan 1
Kieran I/18 Minoan 1
Nick I/22a NK Egyptian 0
Mike I/24b Hittite Empire 0
Mark I/19 Mittani 0
Simon I/34a Later Hebrew 1
Dave I/20a Ugaritic 1
No camps lost or taken.
Conquest, part 3, Sunday, BBDBA
10 November, 2016
The Sunday was three BBDBA games. Points were given for breaking commands and for winning.
- Game 1: Mark B (Palmyrans)
With my high aggression I was unsurprisingly the attacker against Mark’s Palmyrans. Mark went for an open battlefield with terrain only on one wing.

Palmyran deployment.
With a preponderance of cavalry facing my left wing, I thought I could meet it with Gisgo’s light horse and psiloi. Unfortunately, I forgot that light horse now can be double ranked, in which case they are 3-2 against psiloi.

The Carthaginian deployment.
The plan was that Hanno on the left wing would overpower the foot facing them, while Hiero held the centre and Gisgo the right wing.
Unfortunately, the dunes on the right wing hampered the cavalry outflanking, although they did destroy the three 3Bw on that wing. However, good shooting in the centre saw Heiro’s warband and cavalry shot, while Gisgo’s troops fought like demons to survive.

The Palmyrans on the Carthaginian right wing.
Despite their bravery, the centre collapsed, as did Gisgo’s command. In hindsight it would have been better to have had Hanno and Gisgo swap positions. Gisgo could have contested the dunes with his scutati, the LH could have stood up to the cataphracts, and the psiloi might have stood up to the bow, if they moved quickly. Hanno’s elephants would have worried the cataphracts, and the spear and cavalry could have supported them.
Mark also suggested that I might want to rethink my commands around two commands of 13 and one of 10. I’d certainly give it some thought.
- Game 2: Keith (Asiatic Early Successor)
Against the aggressive Demetrius the Besieger, I was still the aggressor, but as he was littoral too, I had him worried that I might do a littoral landing.

The two armies arrayed.
Demetrius placed his elephants in the centre with large pike blocks on either side. Light troops and cavalry were on his wings.

Demetrius’ left flank, wary of ship-born invaders.

Demetrius’ right flank with xystophoroi and cavalry.
Hanno thought to use Gisgo’s psiloi to neutralise some of the pike and his light horse to face the knights. He would take the right flank and attempt to break through the pike with warbands supported by elephants.

Hanno’s deployment on his right flank.

Hiero in the centre and Gisgo on the left again.
Gisgo soon discovered that his scutati were outflanked by the light foot in reserve. The bad going on the right flank again slowed up the attack by Hanno’s cavalry. However, the psiloi did very well. Destroying half a pike block and stopping them from advancing. The scutati were even more resilient than in the last battle and scorned to be outflanked. Gisgo, despite being outclassed had his opposing command on the back foot. Hanno’s elephants and warband were doing good work on the right, but his spear did not like the elephants they faced, and Hiero was wilting before the pike.
Nevertheless, in the turn on which my commands broke, I was one of breaking two of Demetrius’ commands. The warband just needed to destroy another pike block, and I think that Gisgo was threatening the C-in-C having outflanked him.
Despite Gisgo’s heroics, I think in hindsight I should have gone for the same order of battle as I should have used against the Palmyrans. Gisgo would have been more effective on the right and Hanno on the left.
- Game 3: Greg K (Eastern Patrician Romans with Later Pre-Islamic Arab Nomad Ally)
Surprisingly against Greg’s Romans I was the defender. This time I deployed with Gisgo on the right facing bad going that had congregated there. Hanno was on the more open left flank.
I took quite a few pictures of this game, so I’ll let them provide the commentary.

Carthaginian deployment.

The terrain facing the Carthaginians.

The Roman right flank with pre-Islamic Arab allies.

The Roman left flank with legions, warbands, archers and psiloi.

The Roman centre with auxilia, knights and a light horse reserve.

The Carthaginians surge forward.

Gisgo’s psiloi make a double move to contest the woods.

Gisgo’s scutati enter the woods.

The Roman auxilia move to meet the elephants.

Hanno’s cavalry advances to face the Arabs.

Roman knight face Hiero’s spear.

The centres about to clash.

Psiloi flee.

The auxilia are swept away by the elephants.

The Arabs are under pressure, but the Gallic warbands are split, losing mutual support.

Hanno’s spear and warband are ridden down by knights.

The Roman light horse rout the elephants.

Gisgo’s command is under pressure.

Hiero resists a flank attack, but the Carthaginian centre is gaping.
Hiero was eventually destroyed while flanked and his command broke, as did Hanno’s. I was looking to inflict one more casualty on the Roman central command to break it, but the gap created by the two elephants was one I couldn’t fill.
I came last in this competition. I didn’t get any points, as I failed to break any commands, though I got close in both my last two games. Despite failing to win, I enjoyed the games, and I learned a lot about how to play BBDBA.
Conquest 2016, part 1, the last practice game
7 November, 2016
Last Friday, the night before I went to Conquest, I got in one final practice game of BBDBA with Nick. I’d looked over the Runners and Riders and suggested he try out a Palmyran army with its mixture of bow and cataphracts. He was able to get his Early Imperial Romans to do this.
I’d settled on my commands before I left. I’d chosen them to correspond to the different PIP dice. the C-in-C was Hanno, commanding the largest contingent and having the high PIP dice. With 16 elements, it required 6 casualties to break.

Hanno’s command.
This command had two elements of elephants and four of Gallic warbands. The hope was that the elephants would create overlaps for the warbands and increase their chance of breaking through. The command also had three elements of spear, and four of cavalry (including the commander), along with a light horse and a pair of psiloi.
Gisgo had the mobile command, designed for bad going and for outflanking. It got the middle PIP dice. It had 10 elements and broke after 4 casualties.

Gisgo’s command.
This command had a high proportion of Spanish mercenaries; three elements of scutati, two of caetrati, one of Balaeric slingers, Gisgo command of Spanish cavalry, another of Spanish light horse, and finally a pair of Numidian light horse.
The final command was led by Hiero, a Greek mercenary commander. Like Gisgo’s command it was 10 elements. It was intended to hold the line and got the low PIP dice.

Heiro’s command.
Hiero had six elements of spear, three of Sicilian Greeks, and three of Campanians. He had two warbands, including the redoubtable Androgeus and a reserve of a psiloi and some cavalry.
- Against the Palmyrans
The game against the Palmyrans saw the Carthaginians attacking. There was an oasis, two difficult hills and some rough going. The Palmyrans deployed across the entire line, with the bulk of their cataphracts in the centre.

The Palmyran deployment.
I’d made the mistake of putting my camp behind the oasis and therefore could not simply ignore the right flank. I decided to have Hiero’s command hold the right flank and Gisgo on the left flank.

The Carthaginian deployment.

Gisgo’s command facing a difficult hill.
I was relieved to learn that bow could not shoot into the difficult hills, and this gave some solidity to the left flank, but the warband strung out in the centre facing cavalry was not a good situation. Hiero might have been better there, and the warband could have been in the oasis.

After a few turns of advancing.
I don’t remember the details now, and as my luck was not equal to rectifying errors in deployment, my photography ceased!

The centre is about to engage.
I had a problem with how to attack in the centre when my right flank was not advancing. I made the mistake (in retrospect) of attacking the Palmyran bow with my cavalry. It didn’t work, and delayed the attack of the elephants; however, whatever the cavalry did, the elephants faced trouble with support.

A warband breaks, and Hanno rushes to fill the gap.

Gallic cavalry recoil from the Palmyran bow.

More warband break and Gisgo attempts to fill the gap.

Spanish scutati are broken by archery and more warband die. Hanno remembers to use his get out of jail +1 and avoids being defeated.

Palmyran cataphracts break Gallic cavalry.
I think Hanno was defeated when flanked, and his command broke. This was a battle that I never really had an advantage. I think my main mistakes were:
1. Choosing the bad going to deploy from. It might have been better to have inflicted its disruption on the Palmyrans.
2. Putting my camp behind the oasis.
3. Sticking with the deployment despite the way the warband had to be stretched across the centre facing mounted.
4. Deciding to go for the bow of the right command rather than support an attack by the elephants.
It wasn’t a good note on which to set off to Conquest.

